
Showing posts sorted by relevance for query 3d. Sort by date Show all posts
Showing posts sorted by relevance for query 3d. Sort by date Show all posts
Tuesday, January 26, 2010
Anaglyph 3D astro images and movies
Tuesday, April 29, 2014
My astroimages converted to 3D, a collection of movie clips
I have converted my astronomical images to a various 3D-formats. This time I made a video collection out of my experimental nebula 3D-models.
My astronomical images as an experimental 3D-conversionsThis is a looped 14 min video, click to start and stop. Original movie is in HD720p resolution.
Click the Youtube logo at lower right corner to see this video in Youtube.
Then, please, click the gear symbol, to see the video at 720p HD-format.
3D-stereo images from my astrophotos can be seen HERE
All my astronomical images can be seen HERE
How the 3D-models are done?
Due to enormous distances of cosmic objects, no real parallax can be imaged to get a 3D-information. I have developed a method to turn my images to a 3D-models.
Here is a short and simplified explanation, how 3D images are done:
My 3D-experiments are a mixture of scientific data, deduction and an artistic impression.
I collect distance and other useful scientific information before I do my 3d-conversion.
Usually there are known stars, coursing the ionization, so I can place them at right relative distance. If I know a distance to the nebula, I can finetune distances of the stars so, that right amount of stars are front and behind of the object. I use a "rule of thumb" method for stars, brighter is
closer, but if a real distance is know, I try to use it.
Many shapes can be figured out just by looking carefully the structures in nebula. Like dark nebulae must be at front of the emission ones to show. The general structure of many star forming regions are very same. There is a group of newly born stars, as an open cluster inside of the nebula. The stellar wind from the stars is then blowing the gas away around the cluster and forming a kind of gavitation, a hole, around it. The pillar like formations in the nebula must point to a source of stellar wind, for the same reason.
Since nebulae are practically transparent and the gas itself is emitting light, the thickness of the gas can be estimated by its brightness. Emission of ionized Oxygen, O-III, needs lots of energy. For that reason, Oxygen emission seen in the photo must be at close proximity of the ionizing star(s).
The processing workflow itself is kind of sculpting and the result is always an approximate reality.
I turned the original 2D-image to 3D by using a surface modeling software.
Image is first divided to layers by its content in a image processing software. Each layer is then projected to a 3D-surface. To build the 3D-surfaces and to have a good and realistic forms, I'm using a software, that converts the shades in the image to a 3D-form. I have semi automated the whole process, so it doesn't take too much time to make a 3D-conversion.
The nice thing about the final 3D-model is, that only image elements from the original 2D-image are used!

A typical surface model without textures

Thursday, September 16, 2021
Viral Nebula Rocks
IC1396 converted to 3D animation, very first of its kind
NOW on SuperRare
I turned my photo of IC1396 to a 3d-model at 2012 to show that it’s actually a three-dimensional volume floating in three-dimensional space. This artwork is not just a guess work, it’s based on scientific data about the structure of emission nebulae and real distance information.
This animation went viral and it was published by several news media and major websites globally at 2012, links after the photos

Location, Constellation Cepheus at distance of about 3000 light years
IC 1396 spans about three degrees of sky (Full Moon has diameter of 0,5 degrees)
I took the photo and made the model at 2012, exposure time 15 hours.
Time used for the collecting scientific data, 3D-model and animation way too much.
Original photo used for the animation
 My original photo of emission nebula IC1396
Original photo used for the animation

Rotating Nebula in media
SLATE by Phill Plait
Best Astronomy Images of 2012:
DISCOVER MAGAZINE,
Jaw-dropping rotating 3D nebula
SMITHSONIAN MAGAZINE by Colin Schultz
Amazing Astrophotography Lets You See Nebulae in 3D
WIRED by Nadia Drake,
New Dimension: Nebulas Are Even More Amazing in 3-D
https://www.wired.com/2013/02/nebulas-in-3-d/
HUFFINGTON POST by Ryan Grenoble,
Nebula IC 1396, Animated In 3D By Finnish Astrophotographer J-P Metsavainio, Is Astounding
https://www.huffpost.com/entry/nebula-animated-3d-photo_n_1949152
INSIDER, Jennifer Welsh
Awesome Animation Shows An Interstellar Gas Cloud In 3D https://www.businessinsider.com/awesome-animation-shows-a-nebula-in-3d-2012-10?r=US&IR=T
PETAPIXEL, Michael Zhang
Amazing Animated GIFs Capture Nebulae in 3D Using Artificial Parallax
https://petapixel.com/2013/02/20/amazing-animated-gifs-capture-nebulae-in-3d-using-artificial-parallax/
This animation was selected to a Moving the Still exhibition in Miami Art Week 2012

How the 3D-model is made My Moleskine notebook pages from 2008, I planned how to convert nebulae to 3D
For as long as I have captured images of celestial objects, I have always seen hem three-dimensionally in my head. The scientific information makes my inner visions much more accurate, and the 3-D technique I have developed enables me to share those beautiful visions with others.
How accurate my 3-D-visions are depending on how much information I have and how well I implement it.
The final 3-D-image is always an appraised simulation of reality based on known scientific facts, deduction, and some artistic creativity.
After I have collected all the necessary scientific information about my target, I start my 3-D conversion from stars. Usually there is a recognizable star cluster which is responsible for ionizing the nebula. We don’t need to know its absolute location since we know its relative location. Stars ionizing the nebula have to be very close to the nebula structure itself. I usually divide up the rest of the stars by their apparent brightness, which can then be used as an indicator of their distances, brighter being closer. If true star distances are available, I use them, but most of the time my rule of thumb is sufficient. By using a scientific estimate of the distance of the Milky Way object, I can locate the correct number of stars in front of it and behind it.
Emission nebulae are not lit up directly by starlight; they are usually way too large for that. Rather, stellar radiation ionizes elements within the gas cloud and the nebula itself is glowing light, the principle is very much the same as in fluorescent tubes. The thickness of the nebula can be estimated from its brightness, since the whole volume of gas is glowing, brighter means thicker.
By this means, forms of the nebula can be turned to a real 3-D shape. Nebulae are also more or less transparent, so we can see both sides of it at the same time, and this makes model-making a little easier since not much is hidden.
The local stellar wind, from the star cluster inside the nebula, shapes the nebula by blowing away the gas around the star cluster. The stellar wind usually forms a kind of cavity in the nebulosity. The same stellar wind also initiates the further collapse of the gas cloud and the birth of the second generation of stars in the nebula. The collapsing gas can resist the stellar wind and produces pillar like formations which must point to a cluster.
Ionized oxygen (O-III) glows with a bluish light, and since oxygen needs a lot of energy to ionize it, this can only be achieved relatively close to the star cluster in the nebula. I use this information to position the O-III area (the bluish glow) at the correct distance relative to the heart of the nebula.
Many other small indicators can be found by carefully studying the image itself. For example, if there is a dark nebula in the image, it must be located in front of the emission one, otherwise we couldn’t see it at all.
Using the known data in this way I build a kind of skeleton model of the nebula. Then the artistic part is mixed with the scientific and logical elements, and after that the rest is very much like creating a sculpture on a cosmic scale

Thursday, February 19, 2015
A 3D-study of the IC 410 as a free view stereo pair
Images are for two different viewing methods, the first set of images is for the Parallel Vision method and the second set for the Cross Vision method. Viewing instructions can be seen HERE.
NOTE! This is a personal vision about forms and shapes, based on some scientific facts, deduction and an artistic impression. A short explanation, about the method used for the 3D conversion of my astrophoto, at the end of this post.
IC 410 as a freeview stereo pairs
For a parallel viewing method (Eyes parallel to each other)
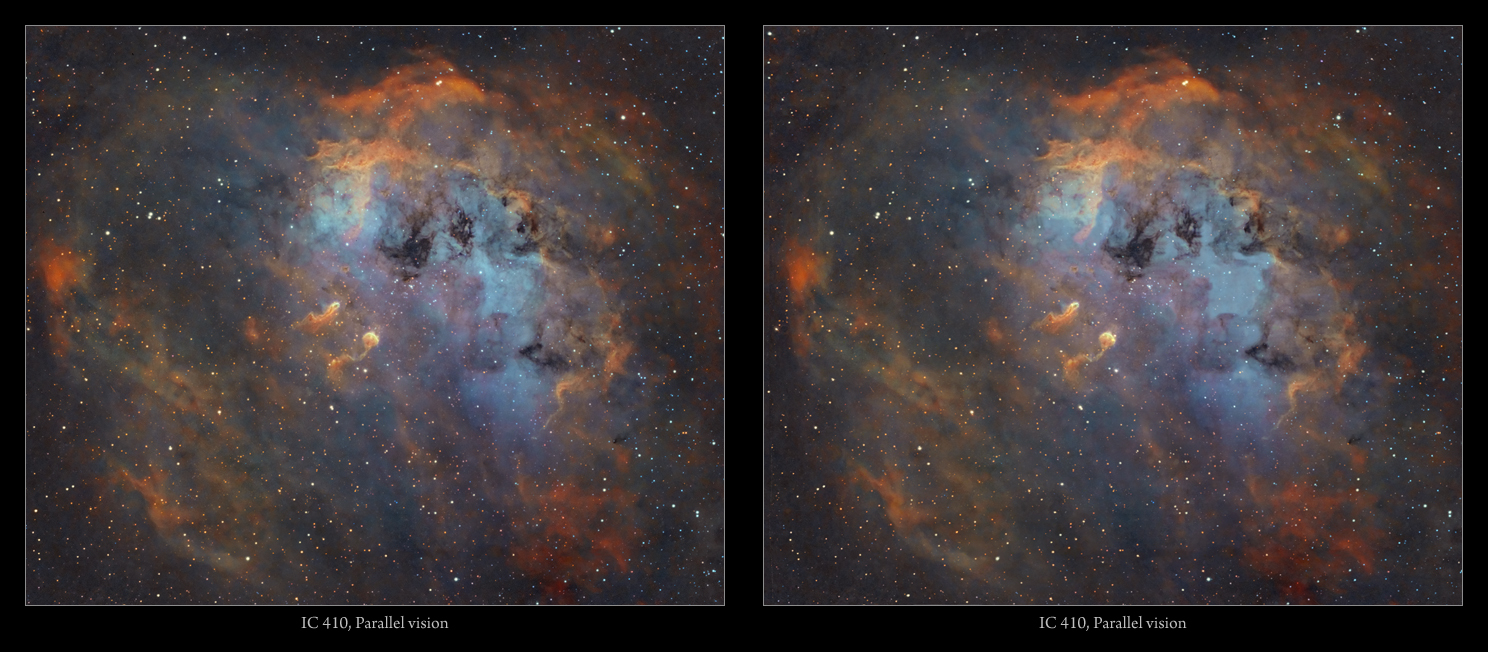
Nebula for the Parallel Vision viewing method. Click for a large image.
Original 2D-image can be seen in HERE
For a cross vision viewing method (Eyes crossed)

Nebula for the Cross Vision viewing method. Click for a large image.
Original 2D-image can be seen in HERE
An anaglyph Red/Cyan 3D version
Note. Red/Cyan glasses are needed, red lens goes to left eye

What is visible in this 3D-study?
Note how the "Tadpoles" in the 3d-image are pointing to a source of ionization, in this case an open cluster. The gas has collapsed in tadpoles. They are dense enough to resist the radiation pressure (a solar wind) from an open cluster. (The cluster can be seen inside of the ionization zone in the 3D image). New stars are forming at the tips of the tadpoles and the radiation pressure spreads the rest of the gas as a tale behind. Both formations are about ten light years long. Rest of the gas is driven away around the star cluster by the solar wind. The same solar wind is ionizing elements in the gas cloud and they are emitting light. Ionized oxygen emits blueish light, it's visible just around the open cluster. Ionization from hydrogen and sulfur together can be seen as golden hues.
More 3D-experiments in my portfolio, including the
Red/Cyan anaglyph 3D: http://astroanarchy.zenfolio.com/f359296072
HOW?
I have been asked many times, how my 3D-images are done, so here it goes!
All the original 2D-images are imaged by me, if not otherwise stated.
Due the huge distances, no real parallax can be imaged for a volumetric information.
I have developed a method to turn any 2D-astronomical image to a various 3D-formats. The result is always an approximation of the reality, based on some known scientific facts, deduction and an artistic impression.
What are the known facts?
By using a scientifically estimated distance of the object, I can organize right amount of stars front and behind the object. (as then we know the absolute position of the object at our Milky-way)
Stars are divided to groups by apparent brightness, that can be used as a draft distance indicator, brighter the closer. There is usually a known star cluster or a star(s) coursing the ionization and they can be placed in right relative position to the nebula itself .
Generally emission nebulae are not lit by the starlight directly but radiation from stars ionizing gases in the nebula. Hence the nebula itself is emitting its own light, at wavelength typical to each element. Due to that, and the thickness of the nebula can be estimated by its brightness, thicker = brighter. Nebulae are also more or less transparent, so we can see "both sides" at the same time.
Many other relative distances can be figured out just carefully studying the image, like dark nebulae must be front of bright ones. The local stellar wind, radiation pressure, from the star cluster, shapes the nebula, For that reason, pillar like formations must point to a cluster. ( Look previous image, above this text.) Same radiation pressure usually forms kind of cavitation, at the nebulosa, around the star cluster, by blowing away all the gas around the source of stellar wind. The ionized oxygen, O-III, emits blueish light, it requires lots of energy to ionize. Due to that, the blue glowing area locates usually near the source of ionization, at the heart of the nebula. This and many other small indicators can be found by carefully studying the image itself.
Using the known data, I can build a kind of skeleton model of the nebula. Then the artistic part is mixed to a scientific part, rest is very much like a sculpting.
WHY?
Firstly, they are great fun to do. Secondly, just because I can.
Many times images of nebulae looks like paintings on the canvas. I like to show a real nature of those distant objects as a three dimensional shapes floating in a three dimensional volume. This is a great way to show, how I personally see astronomical targets as a 3D-forms inside my head.
3D-experiments seems to increase a public interest to a subject, as you might have noticed.
I have studied my astronomical images much deeper, than ever without 3D-modeling.
3D-studies has really added a new dimension to my work as an astronomical photographer. (pun intended)

Monday, October 15, 2012
An experiental 3D-animation from my image of NGC 6752
I have tested a new method to publish my 3D-images as a form of Lenticular prints.
For this technique to work, I need series of images from different angles, in this case 24 images are needed.
Lenticular printing is actually an old technique but in past few years it has become much more sophisticated.
The results can be stunning visually, image plane disappears and object floats in and outside of the frame.
Since astronomical objects are too far away, no real parallax can be imaged. Doe to that, I have developed a method to turn my images to a various 3D-formats. My work flow is based on scientific data from the object, distance and the source of ionization are usually known. The different types of the nebulae has typical structures. Pillar like formations must point to the source of ionization. The radiation pressure forms kind of hollow area, inside of the nebula, around newly born stars. Dark nebulae must be at front of the emission ones to show, etc... Rest of the missing information is then replaced with an artistic vision.
The whole process is pretty much like sculpting!
NOTE! This is a personal vision about forms and shapes, based on some known facts and an artistic impression.
A globular cluster, NGC 6752, as an animated 3D-study
Please, let the image load, the size is ~6.5MB

24-frames, images are meant for a lenticular 3D-print. Hence only limited horizontal animation. If needed, I'm able to do whole "fly around" animation out of the same 3D-model, used for the image above.
NOTE. Only image elements from the original 2D-image are used for this 3D-model.
Original 2D image of the object

Image of the NGC 6752 from the year 2010
Original blog post, with technical info, can be seen here:
What are globular clusters?
First of all, they are very beautiful, visually and imaged! A globular cluster is a spherical collection of stars that orbits a galactic core as a satellite. Globular clusters are very tightly bound by gravity, which gives them their spherical shapes and relatively high stellar densities toward their centers. The name of this category of star cluster is derived from the Latin globulus—a small sphere. A globular cluster is sometimes known more simply as a globular.
Globular clusters, which are found in the halo of a galaxy, contain considerably more stars and are much older than the less dense galactic, or open clusters, which are found in the disk. Globular clusters are fairly common; there are about 150 to 158 currently known globular clusters in the Milky Way.
Globular clusters, which are found in the halo of a galaxy, contain considerably more stars and are much older than the less dense galactic, or open clusters, which are found in the disk. Globular clusters are fairly common; there are about 150 to 158 currently known globular clusters in the Milky Way.
A screenshot from the 3D-modeling software

A screen shot from the TrueSpace modeling software. This kind of model gives much more freedoms to animate, than is used in this example. A series of 24 images, with about one degree increments, are needed for the lenticular 3D print.
A collection of my experimental 3D-studies, of astronomical objects, can be found from my portfolio:
3D-material is under a folder "Volumetric 3D images"

Wednesday, October 3, 2012
An experimental 3D-animation from my image of IC 1396
I have tested a new method to publish my 3D-images as a form of Lenticular prints.
For this technique to work, I need series of images from different angles, in this case 24 images are needed.
Lenticular printing is actually an old technique but in past few years it has become much more sophisticated.
The results can be stunning visually, image plane disappears and object floats in and outside of the frame.
Since astronomical objects are too far away, no real parallax can be imaged. Doe to that, I have developed a method to turn my images to various 3D-formats. My work flow is based on scientific data from the object, distance and the source of ionization are usually known. The different types of the nebulae has typical structures, pillar like formations must point to the source of ionization, the radiation pressure forms kind of hollow area, inside of the nebula, around newly born stars, dark nebulae must be at front of the emission ones to show, etc... rest of the missing information is then replaced with an artistic vision.
The whole process is pretty much like sculpting!
An image set of IC 1396, used for a lenticular print, as an animation.
(More of my experimental 3D-images under a folder "Volumetric 3D images" in my Portfolio http://astroanarchy.zenfolio.com/ )
(More of my experimental 3D-images under a folder "Volumetric 3D images" in my Portfolio http://astroanarchy.zenfolio.com/ )

Please, wait for few moments for animation to load, the size is ~7MB
The animation shows, IC 1396, a largish ionization zone in Cepheus.
AN UPDATE
AN UPDATE
08.01.2013
The astronomer Phil Plait collected an annual list of the best astronomical images for the year 2012.
This experimental image of IC 1396 was selected as one of them.
The Best Astronomy Images of 2012
by an astronomer Phil Plait
THE LIST
My image is a sixth from the top.
The astronomer Phil Plait collected an annual list of the best astronomical images for the year 2012.
This experimental image of IC 1396 was selected as one of them.
The Best Astronomy Images of 2012
by an astronomer Phil Plait
THE LIST
My image is a sixth from the top.

http://astroanarchy.blogspot.fi/2011/10/ic-1396-home-of-elephants-trunk-nebula.html
Buy a photographic print from HERE
Here is an image series showing the apparent scale of the IC 1396 in the sky:
http://astroanarchy.blogspot.fi/2011/07/ic-1396-scale-in-sky-zoom-in-series-in.html
All of my images can be seen in my portfolio:
http://astroanarchy.zenfolio.com/
(More of my experimental 3D-images under a folder "Volumetric 3D images")
I turned the original 2D-image to 3D by using a surface modeling software (TrueSpace).
Image is first divided to layers by its content, each layer is then projected to a 3D-surface.
To have good and realistic forms, I did use an other software, Bmp2CNC, it converts the shades in the image to a 3D-form. I have semi automated the whole process, it'll takes about 20 min. to make a 3D model like in this example is used.

A screen shot from the TrueSpace modeling software.
This kind of model gives much more freedoms to animate, than is used in this example.
A series of 24 images, with about one degree increments, are needed for the lenticular 3D print.
Tuesday, June 1, 2010
Viewing 3D

Finnish-Suomeksi
Nähdäksesi anaglyph 3D-kuviani tarvitset Puna-Sinilasit!
Ne ovat yleensä erittäin edullisia, 1-2€, ja helposti ostettavissa onlinemyymälöistä.
Suomessa laseja voi ostaa ainakin täältä:
http://www.dealextreme.com/search.dx/search.3d%20glasses
http://www.dealextreme.com/search.dx/search.3d%20glasses
HUOM!
Lasien linssien täytyy olla PUNAINEN ja SINININEN, jotta kuvat näkyisivät oikein.
-
English
To see my anaglyph Red/Cyan 3D-images, you'll need a right kind of 3D-eyeglasses!
They are usually very inexpensive and can be bought online easily.
Here are few links:
USA, http://www.berezin.com/3D/3dglasses.htm
There is many online sellers for 3D-glasses, google them down to find a suitable seller in you area.
EDIT. Finnish only, sorry!
Huomasin juuri, että samassa Suomalaisessa verkkokaupassa, jossa myydään 3D-laseja, on myynnissä 9€ hintainen stereokuvien katselulaite:
http://www.elektroni.fi/?product=5452
Ko. laitteella voi katsella stereopari-paerikuvia 3D-muodossa!
Täältä voi tilata stereoparikuviani valokuvina: http://astroanarchy.zenfolio.com/p272573124
Hinta 1,95€ kappale, vähän isompi koko, joka vielä toimii, 3,95€
Katselulaitteen kanssa siis toimivat vain "parallel vision" tekniikalla katseltavat kuvat.
My Anaglyph images
Katselulaitteen kanssa siis toimivat vain "parallel vision" tekniikalla katseltavat kuvat.
My Anaglyph images
To see my Anaglyph Red/Cyan 3D-astronomical images, please use this link:
Nähdäksesi anaglyph 3D kuviani, ole hyvä ja klikkaa tätä linkkiä:
Nähdäksesi anaglyph 3D kuviani, ole hyvä ja klikkaa tätä linkkiä:
In my Blog, there is many anaglyph movies too:
Blogissani on useita anaglyph 3D elokuvaklippejä:
Blogissani on useita anaglyph 3D elokuvaklippejä:
Scroll down and don't forget to look older posts to see movies!
Rullaa alas postilistaa nähdäksesi elokuvia, älä unohda klikata "older posts" painiketta sivun alareunassa!
Rullaa alas postilistaa nähdäksesi elokuvia, älä unohda klikata "older posts" painiketta sivun alareunassa!
Wednesday, January 2, 2013
Melotte 15 as an experimental 3D-study
I have done several 3D-studies out of my astronomical images. Models are based on some known scientific facts and an artistic impression. This is an approximation to the real structure of the nebula, an educated guess, it gives a feel to the object and an idea, what it must really be like.
There are several 3D-modes to see from the same material. Animated 3D, free view stereo pairs and an anaglyph Red/Cyan 3D.
There are several 3D-modes to see from the same material. Animated 3D, free view stereo pairs and an anaglyph Red/Cyan 3D.
An animated 3D-study of Melotte 15
Please, let the animation load to see a smooth movement

There are nothing else used than a real image elements from the original 2D-shot!
An original image used for the 3D-model

http://astroanarchy.blogspot.fi/2012/12/melotte-15-in-ic-1805-project-finalized.html
An other version of the animated 3D
An experiment with a zoom effect

Free view stereo pairs
Viewing instructions
For a Parallel Vision method

For a Cross Vision method

An anaglyph Red/Cyan 3D
Pair of Red/Cyan eyeglasses are needed to see this 3d-image!
(Red and Blue filters will do the trick, red goes to left eye.)


Ps.
All my 3D-studies, stereo pairs and an anaglyph 3D, can be found here:
Animated versions are here:
Saturday, January 31, 2015
Cederblad 214 as an experimental 3D stereo pair
Images are for two different viewing methods, the first set of images is for the Parallel Vision method and the second set for the Cross Vision method. Viewing instructions can be seen HERE.
NOTE! This is a personal vision about forms and shapes, based on some scientific facts, deduction and an artistic impression. A short explanation, about the method used for the 3D conversion of my astrophoto, at the end of this post.
3D Soul Nebula as a freeview stereo pair
For a parallel viewing method

Original 2D-image can be seen in HERE
For a cross vision viewing method

Original 2D-image can be seen in HERE
More 3D-experiments in my portfolio, including the
A method used for the 3D conversion, a short explanation

at a tip of the pillars, are also potential places for the formations of the new stars.
HOW?
Firstly, they are great fun to do. Secondly, just because I can.
Many times images of nebulae looks like paintings on the canvas. I like to show a real nature of those distant objects as a three dimensional shapes floating in a three dimensional volume. This is a great way to show, how I personally see astronomical targets as a 3D-forms inside my head.
3D-experiments seems to increase a public interest to a subject, as you might have noticed.
I have studied my astronomical images much deeper, than ever without 3D-modeling.
HOW?
I have been asked many times, how my 3D-images are done, so here it goes!
All the original 2D-images are imaged by me, if not otherwise stated.
Due the huge distances, no real parallax can be imaged for a volumetric information.
I have developed a method to turn any 2D-astronomical image to a various 3D-formats. The result is always an approximation of the reality, based on some known scientific facts, deduction and an artistic impression.
What are the known facts?
By using a scientifically estimated distance of the object, I can organize right amount of stars front and behind the object. (as then we know the absolute position of the object at our Milky-way)
Stars are divided to groups by apparent brightness, that can be used as a draft distance indicator, brighter the closer. There is usually a known star cluster or a star(s) coursing the ionization and they can be placed in right relative position to the nebula itself .
Generally emission nebulae are not lit by the starlight directly but radiation from stars ionizing gases in the nebula. Hence the nebula itself is emitting its own light, at wavelength typical to each element. Due to that, and the thickness of the nebula can be estimated by its brightness, thicker = brighter. Nebulae are also more or less transparent, so we can see "both sides" at the same time.
Many other relative distances can be figured out just carefully studying the image, like dark nebulae must be front of bright ones. The local stellar wind, radiation pressure, from the star cluster, shapes the nebula, For that reason, pillar like formations must point to a cluster. ( Look previous image, above this text.) Same radiation pressure usually forms kind of cavitation, at the nebulosa, around the star cluster, by blowing away all the gas around the source of stellar wind. The ionized oxygen, O-III, emits blueish light, it requires lots of energy to ionize. Due to that, the blue glowing area locates usually near the source of ionization, at the heart of the nebula. This and many other small indicators can be found by carefully studying the image itself.
Using the known data, I can build a kind of skeleton model of the nebula. Then the artistic part is mixed to a scientific part, rest is very much like a sculpting.
WHY?
Many times images of nebulae looks like paintings on the canvas. I like to show a real nature of those distant objects as a three dimensional shapes floating in a three dimensional volume. This is a great way to show, how I personally see astronomical targets as a 3D-forms inside my head.
3D-experiments seems to increase a public interest to a subject, as you might have noticed.
I have studied my astronomical images much deeper, than ever without 3D-modeling.
3D-studies has really added a new dimension to my work as an astronomical photographer. (pun intended)
Thursday, January 28, 2010
New 3D animations from deep space objects
You'll find many of them from here: http://astroanarchy.zenfolio.com/f359296072
Due the distance, we can not have enough parallax to create real stereo pairs from deepsky objects.
I have developed, some time ago, a method to add volumetric information to a 2D astro images.
This information is based on some known facts and an artisic impression.
Here are samples of my 3D-visualizations.
This time a special technique is used to turn two slightly different images from a stereo pair to an animation.
Please, let the images load for few seconds to see them!

Original 2D-image and details HERE
Stereo pair can be found HERE
An anaglyph Red/Cyan 3D can be found HERE
A Zoom out 2D-movie HERE

Original 2D-image and details HERE
Stereo pair can be found HERE
An anaglyph Red/Cyan 3D can be found HERE

Original 2D-image and details HERE
Stereo pair can be found HERE
An anaglyph Red/Cyan 3D can be found HERE
A 2D Zoom in movie HERE

Original 2D-image and details HERE
Stereo pair can be found HERE
An anaglyph Red/Cyan 3D can be found HERE
All animations here are made by using an experimental web service. It'll turn Left and Right images from any stereo pair to a smoothly animated picture. If you'll like to give a try, please, go here: http://www.start3d.com/
Monday, February 21, 2011
Sh2-132 as a Stereo Pair 3D

Parallel vision 3D

Cross vision 3D
http://astroanarchy.blogspot.com/2011/02/sh2-132-project-finalized.html
NOTE! This is a personal vision about forms and shapes, based on some known facts and an artistic impression.
NOTE! This is a personal vision about forms and shapes, based on some known facts and an artistic impression.
HOW?
I have been asked many times, how my 3D-images are done, so here it goes!
All the original 2D-images are imaged by me, if not otherwise noted.
Due the huge distances, no real parallax can be imaged to form a volumetric information.
I have developed a method to turn any 2D-astronomical image to a various 3D-formats. The result is always an approximation of the reality, based on some known facts and an artistic impression.
What are the known facts?
By using a scientifically estimated distance of the object, I can organize right amount of stars front and behind the object. (as then we know the absolute position of an object at our Milky-way)
Stars are divided to groups by apparent brightness, that can be used as a draft distance indicator, brighter the closer. There usually is a known star cluster or a star(s) coursing the ionization and they can be placed in right relative position to the nebula itself .
Generally emission nebulae are not lit by the starlight directly but radiation from stars ionizing gases in the nebula. Hence the nebula itself is emitting its own light, typical to each element. Due that, the thickness of the nebula can be estimated by its brightness, thicker = brighter.
Many other relative distances can be figured out just carefully studying the image, like dark nebulae must be front of bright ones. The local stellar wind, radiation pressure, from the star cluster, shapes the nebula, For that reson, pillar like formations must point to a cluster. Same radiation pressure usually forms kind of cavitation, at the nebulosa, around the star cluster, by blowing away all the gas around the source of stellar wind. That and many other small indicators can be found by carefully studying the image itself.
The artistic part is then mixed to a scientific part, rest is very much like a sculpting.
WHY?
Many times images of nebulae looks like paintings on the canvas. I like to show a real nature of those distant objects as a three dimensional shapes floating in a three dimensional volume. This is a great way to show, how I personally see astronomical targets as a 3D-forms.
3D-experiments seems to increase a public interest to a subject, as you might have noticed.
I have studied my astronomical images much deeper, than ever without 3D-modeling.
3D-studies has really added a new dimension to my hobby as an astronomical photographer. (pun intended)
Thursday, February 12, 2015
Sharpless 132, Sh2-132, as an experimental 3D stereo pair
Images are for two different viewing methods, the first set of images is for the Parallel Vision method and the second set for the Cross Vision method. Viewing instructions can be seen HERE.
NOTE! This is a personal vision about forms and shapes, based on some scientific facts, deduction and an artistic impression. A short explanation, about the method used for the 3D conversion of my astrophoto, at the end of this post.
Sharpless 132 as a freeview stereo pair
For a parallel viewing method (Eyes parallel to each other)
 Nebula for the Parallel Vision viewing method. Click for a large image.
Original 2D-image can be seen in HERE
For a cross vision viewing method (Eyes crossed)
 Nebula for the Cross Vision viewing method. Click for a large image.
Original 2D-image can be seen in HERE
More 3D-experiments in my portfolio, including the
Red/Cyan anaglyph 3D: http://astroanarchy.zenfolio.com/f359296072
Red/Cyan anaglyph 3D: http://astroanarchy.zenfolio.com/f359296072
HOW?
I have been asked many times, how my 3D-images are done, so here it goes!
All the original 2D-images are imaged by me, if not otherwise stated.
Due the huge distances, no real parallax can be imaged for a volumetric information.
I have developed a method to turn any 2D-astronomical image to a various 3D-formats. The result is always an approximation of the reality, based on some known scientific facts, deduction and an artistic impression.
What are the known facts?
By using a scientifically estimated distance of the object, I can organize right amount of stars front and behind the object. (as then we know the absolute position of the object at our Milky-way)
Stars are divided to groups by apparent brightness, that can be used as a draft distance indicator, brighter the closer. There is usually a known star cluster or a star(s) coursing the ionization and they can be placed in right relative position to the nebula itself .
Generally emission nebulae are not lit by the starlight directly but radiation from stars ionizing gases in the nebula. Hence the nebula itself is emitting its own light, at wavelength typical to each element. Due to that, and the thickness of the nebula can be estimated by its brightness, thicker = brighter. Nebulae are also more or less transparent, so we can see "both sides" at the same time.
Many other relative distances can be figured out just carefully studying the image, like dark nebulae must be front of bright ones. The local stellar wind, radiation pressure, from the star cluster, shapes the nebula, For that reason, pillar like formations must point to a cluster. ( Look previous image, above this text.) Same radiation pressure usually forms kind of cavitation, at the nebulosa, around the star cluster, by blowing away all the gas around the source of stellar wind. The ionized oxygen, O-III, emits blueish light, it requires lots of energy to ionize. Due to that, the blue glowing area locates usually near the source of ionization, at the heart of the nebula. This and many other small indicators can be found by carefully studying the image itself.
Using the known data, I can build a kind of skeleton model of the nebula. Then the artistic part is mixed to a scientific part, rest is very much like a sculpting.
WHY?
Firstly, they are great fun to do. Secondly, just because I can.
Many times images of nebulae looks like paintings on the canvas. I like to show a real nature of those distant objects as a three dimensional shapes floating in a three dimensional volume. This is a great way to show, how I personally see astronomical targets as a 3D-forms inside my head.
3D-experiments seems to increase a public interest to a subject, as you might have noticed.
I have studied my astronomical images much deeper, than ever without 3D-modeling.
3D-studies has really added a new dimension to my work as an astronomical photographer. (pun intended)
Subscribe to:
Posts (Atom)


