I haven't publish much new images in past two three years since I have had some health problems. Now I'm good as new and can start working again. Past two years I have been slowly building a new imaging platform. I have done some shorter focal length work past six years, now it's time to go closer again.
OPTICS
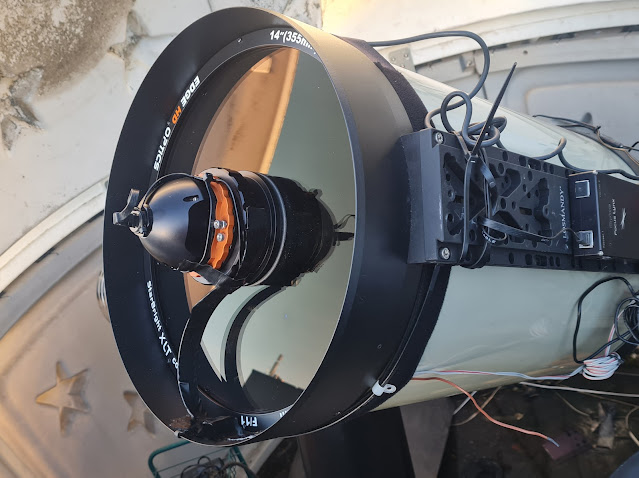
System is build around Celestron EDGE 14" telescope, I selected this scope due to its light gathering capacity, 356mm diameter and 3910mm native focal length (This very large and heavy 0.7 Reducer is especially made for the EDGE 14") One main difference to normal Celestron EDGE telescope is that I have added a secondary mirror focuser (by Optec) to get rid of a mirror flop. It can be a problem, especially with a heavy mirror. Bottom line, this scope has an excellent optical quality. There is some optical analysis and a single full scale 20min frame at end of this post.
In future I can add a "HyperStar system" to replace secondary mirror and use this telescope as a fast f2 astrograph.
Secondary mirror focuser, Note a curved vane for the flat power/data cable, no diffraction spikes!
The focuser is made all aluminium, it's really robust and easy to collimate.
MOUNT
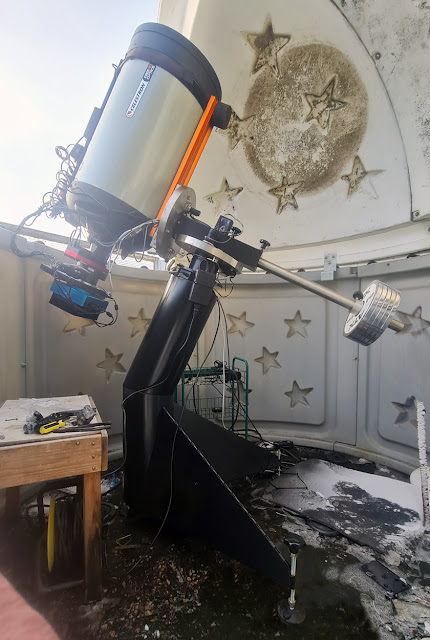
I ended up to a MESU Mount MARK II since it has 100kg capacity at imaging work with a periodic error less than 4 arcseconds peak-to-peak, impressive numbers indeed. It also has zero lash back due to its friction drive system. One of the nice features is the 80mm diameter channel for all of the cords, trough the Ra and Dec axes, no more dragging cords!
The pillar I ordered with the mount is bended knee pillar type, no meridian flip is needed and telescope can track whole sky without stopping. The pillar came in easy to handle parts and assembly was very straight forward, the assembled pillar is very rigid under the weight of heavy telescope, counter weights and accessories.
Mesu mount is absolute beautiful engineering work. Support from manufacture is also very good. I had some minor problems with settings at first but they get solved in no time after we went it trough with remote connection, while on site. Bottom line, money wise this mount is a real bargain, if compared its features to any other brand or model of mount.
Bended Knee Pillar angle at my location 65 degree North.
Counter weights are stainless steal weight lifting weights. (~35kg)
CAMERA
The Main camera is a "new"
Apogee Alta U9000M with Apogee Filter wheel. It's a second hand camera originally used for the microscopic work and it looks like a bran new, There wasn't any mechanical shutter but I moved a shutter from my old Apogee Alta U16 to this new camera. (My old camera died to an old age)
The camera has 12 micron pixels, it's a perfect match to this optical configuration giving an image scale of 0.91 arcseconds per pixel. The full image spans 46.1 x 46.1 arcminutes of sky. (One degree is 60 arcminutes and Full Moon spans around 30 arcminutes of sky)
INSTRUMENT ROTATOR
At first time I have added an instrument rotator to the imaging path. I haven't use any rotator earlier since there is always some flexure.
The
Wanderer Astro Rotator Pro has absolute zero flexure by the manufacture. I was very skeptical to this since if it moves, it will flex. It turned out, that there is a patented system based on neodymium magnets around the light path holding everything tightly together when rotator moves.
After measuring carefully everything with the CCD-inspector software from test exposures under the starfield I can say, it really has no flexures at all. It's only 18 mm thick and fit to my limited back focus nicely. The rotator can handle flawlessly all the heavy load I have placed behind it.
ACTIVE OPTIC UNIT
I have had really good experiences doing long focal length imaging with AO unit during the years. It doesn't correct the actual seeing so much but it corrects every small or big error from heat bubbles and vibrations from heavy traffic, wind, etc. and it does that really really fast.
It's as easy to use as any OAG, especially after I had an instrument rotator. With 14" scope, I can guide around 10 HZ by using mag 11 guide star. The MESU Mount is really good but there is lots of mass to move when guiding corrections are made. With AO there is just a small refracting glass element to move instead of telescope and heavy accessories.
DATA & POWER BOX
An other new accessory is
power and data box from Wanderer Astro. It makes the system less chaotic with all the data and power cords. Also controlling power and data connections can be done remotely in one software. It can handle nearly 20 amp at peak power.
DEW BUSTER
There is also my old Dew Buster installed to the telescope. it can keep the temperature just little over the dew point, this prevent the heat current. Raising warm air inside the tube will ruin the image, if heater is even slightly too warm.
FAN
I added a 70 mm computer fan to the telescopes air went to reduce the cool down time. There is an air filter in the went to prevent the dust getting inside the OTA. I can control the fan speed by the Power Box software.
QHY POLEMASTER
This is a new addition too, I was amazed how easy it was to use. Polar align took maybe 15 min and it's easy to redo at any time needed. here is a
REVIEW about this little helper,
Telescope elements labeled
QHY Polemaster, lens cover removed and ready for the action.
LENS COVER
As a last item here is a lens cover for Celestron EDGE 14" telescope. It's a simple and a must accessory to prevent dust in the collector lens. How ever, in my case there is a secondary mirror focuser sticking out and it prevents to use the standard Celestron aluminium cover over the telescope.
I solved the problem by cutting a circular hole in the lens cover. After that, I bought a steel bowl from local market ( it was just 5 € or about 5 $) I sprayed it matt black and glued it to the cover with an elastic, rubber like, superglue.
A steel bowl glued over the hole in the lens cover.
AN UPDATE, 09.10.2024,
THE FIRST LIGHT IMAGE
Click for a full size image, ~2000x2000 pixels
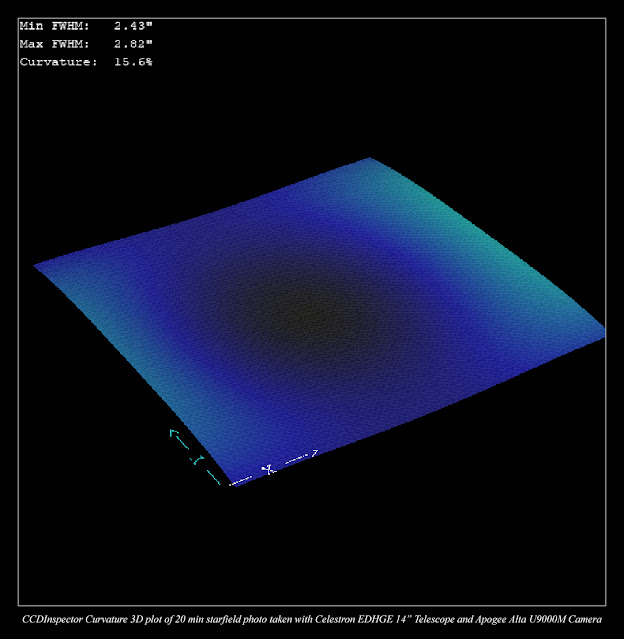
OPTICAL ANALYSIS FROM THE CCDINSPECTOR APP
The optical collimation is as good as I get it in my seeing conditions and the optical tube hold it perfectly since the main mirror is always locked down and focusing is done with the Optec Secondary Mirror Focuser only.
This is a 3D-plot of field curvature from the CCDInspector app of Celestron Edge 14" with 0.7 Focal Reducer and Apogee Alta U9000M with 12 micron pixels. This configuration produce a very flat field and stars are sharp from edge to edge in the whole field. This is impressive especially since the CCD in Alta U9000M is so large, about 37x37mm.
A single full scale 20 min O-III exposure used for the optical analysis
This is one of the test shots after the collimation procedure. Exposure time is 1200s with 3nm O-III filter. Image is calibrated with Dark Frame and Bias corrected Flat Frame. Target is WR 134 in Cygnus. Stars are pinpoint from corner to corner. There is no stretching done, Click for a full scale image.


.jpg)

.jpg)
.jpg)


