
Monday, December 20, 2021
Cygnus mosaic gets large
Three Musketeers of Swan
The Deepest and Most Detailed Image of the Entire Cygnus Constellation Ever Captured
This new composition is designed to frame the Veil Nebula supernova remnant within the field of view.
In this image, three large supernova remnants are visible. The Veil Nebula is the brightest among them, while the other two are extremely faint and diffuse. To make these two remnants more visible, I dedicated approximately 200 hours of exposure time to capturing them alone. I like to call this trio The Three Musketeers.
I’m particularly pleased with this new composition—it’s dynamic and, for the first time, showcases the entire Cygnus constellation at this level of detail and depth. At least, I haven’t seen anything quite like it before. The image spans 31 × 23 degrees of the sky and is composed of 118 individual frames. The total exposure time is around 700 hours, and the final resolution is an impressive 20,000 × 25,500 pixels. This photograph was over a decade in the making, from 2010 to 2021.
The previous version of this mosaic can be seen here: Great Mosaic of Cygnus.
Bang, bang & bang
Three large supernova remnants in the same field of view
Click for a large image
Three large supernova remnants in the same field of view
Click for a large image

This is a large area of sky, it spans 31 x 23 degrees of sky. Image is in mapped colors, from the emission of ionized elements, R=Sulphur, G=Hydrogen and B=Oxygen.
ZOOMABLE VERSION
ZOOMABLE VERSION
Image is reduced to 6000 x 7700 pixels size from the original 20.000 x 25.500 pixels.
118 Mosaic Panels
Click for a large image
Click for a large image
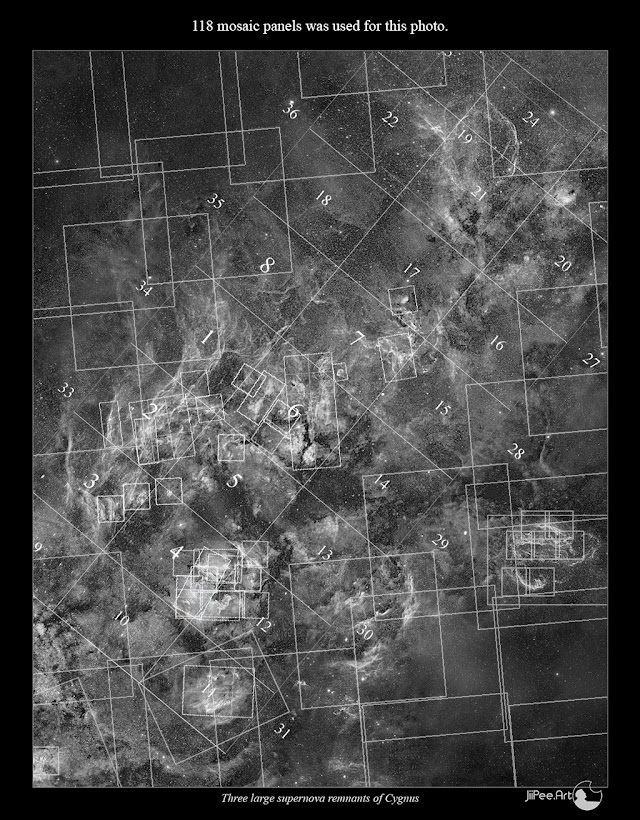
All 118 frames used in this image are displayed here. Since many of these frames were originally captured as independent artworks, the panel structure is highly complex. Additionally, different instruments have varying fields of view and resolutions, resulting in mosaic panels of three different sizes.
DETAILS
Click for a large image

Three large supernova remnants in constellation Cygnus, the Swan, are in image as colored circles
NOTE, there is an apparent size of the Moon as a scale at lower right corner in a grayscale image.
INFO
Three Supernova Remnants, Two Wolf-Rayet Stars, and a Black Hole
In the orientation image above, three large supernova remnants are visible. The first is the Cygnus Shell (W63), a bluish ring located toward the middle left. The second is the large supernova remnant (SNR) G65.3+5.7, positioned in the upper right. The third is the brightest of the three, the Veil Nebula, found along the right edge of the image.
Beyond these supernova remnants, two Wolf-Rayet stars with outer shell formations can be seen. The first is NGC 6888, the Crescent Nebula, located at the center of the image. The second is WR 134, appearing as a blue arc just to the right of the Crescent Nebula, near the Tulip Nebula.
Next to the Tulip Nebula lies the black hole Cygnus X-1. It is marked in a small close-up of the Tulip Nebula, positioned in the center-right section of the orientation image above.
The Cygnus constellation is an endless source of celestial wonders, both scientifically and artistically. As a visual artist, I find this region of the night sky incredibly inspiring. Its intricate structures and mesmerizing shapes captivate me—I could easily spend a lifetime capturing images of this cosmic treasury.
Equipment Used
Over the years, I have employed multiple optical configurations to assemble this mosaic image. Until 2014, I worked with an old Meade LX200 GPS 12" telescope, a QHY9 astro camera, Canon EF 200mm f/1.8 camera optics, and a Baader narrowband filter set.
Since 2014, I have been using a 10Micron 1000 equatorial mount, an Apogee Alta U16 astro camera, a Tokina AT-X 200mm f/2.8 camera lens, and an Astrodon 50mm square narrowband filter set.
Additionally, I have captured many detailed images using longer focal lengths. Before 2014, I used the Meade 12" scope with a reducer, and after 2014, I switched to a Celestron EDGE 11" with a reducer. My guiding cameras have included the Lodestar and, later, the Lodestar II
Monday, December 13, 2021
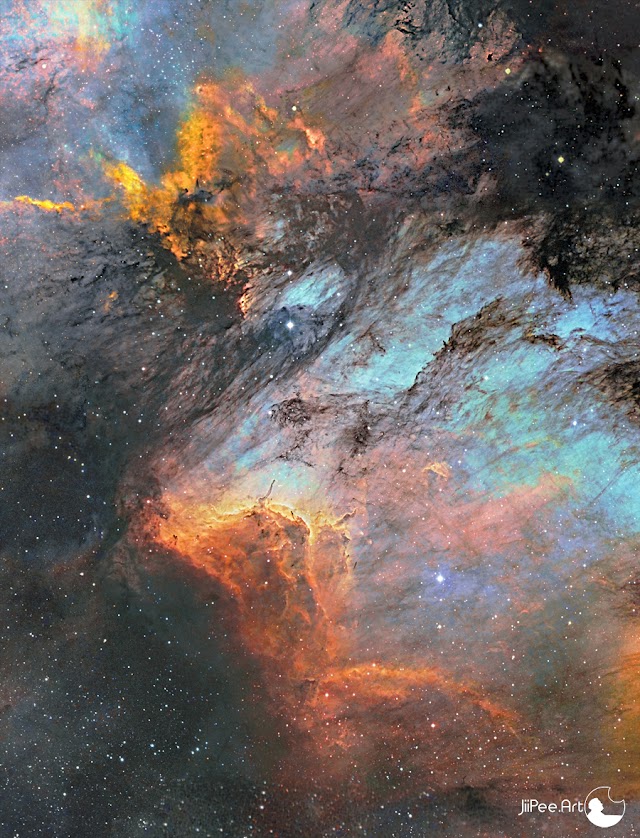
The Pelican Nebula with new data
I originally publish this nebula image at December 2016. After that, I have shot some very high resolution material from the same area of sky and I decided to upgrade my old image with better data. I'm kind of happy with the result, especially the details in dark nebulae are much sharper now and shows the complex structures of unionized gas and dust. Main reason is the long exposure time used, for H-alpha alone, there are 30 hours of exposures. Total exposure time is around 60 hours.
The dark nebula in the upper part of the photo is the gas bridge splitting visually the Pelican Nebula and the North America nebula so that the they look like two separate nebula. In reality they are actually a one large emission area.
Pelican Nebula, constellation Cygnus, the Swan
Click for a large image
The older version of this image can be seen here: https://astroanarchy.blogspot.com/2016/12/pelican-nebula-two-frame-mosaic.html
Zoomable Image
Zoomable Image
Orientation in large context

Wednesday, November 24, 2021
The Great Wall of Cygnus
Due to very cloudy weather I have remade some of my older photos, this time the Cygnus Wall has been remade. This is a combination of several older images from 2008, 2010 and 2014. Two different longer focal length telescope was used, The Meade LX200 GPS 12" and Celestron Edge 11". Beside long focal length images material from shorter focal length optics was used from the Canon EF 200mm f1,8 and Tokina AT-x 300mm f2.8 camera optics. Older material was taken with the QHY9 astro camera and after 2014 Apogee Alta U16 camera was used. Total exposure time is around 30 hours.
The Great Wall of Cygnus
Click for a large image
Click for a large image

Mapped colors from an emission of the ionized elements, Red=Sulfur, Green=Hydrogen and the Blue =Oxygen.
Wider field
Click for a large image

Zoomable Photo
Info about imaging technique
I have used my new processing/imaging technique VARES for this new composition (VAriable Resolution Imaging) It's really powerful toolset when data from very different focal lengths are combined to a single high resolution image. The principle is that the high signal/noise elements are from the long focal length instruments and the low signal/noise data from the short focal length optics is used to boost relatively featureless and very dim image elements.

Orientation in North America and Pelican nebula complex

Wednesday, November 10, 2021
NIGHT FEVER, exhibition in Helsinki 14.10 - 04-12. 2021
NIGHT FEVER
THE PLATFORM GALLERY
Lapinlahdenkatu 16 C, 00180 Helsinki
The exhibition will be open in the the evenings to highlight the
beauty and mystique of the cosmos.
Opening hours
Wed - Fri: 5pm to 9pm
Sat: 2pm to 8pm
We are also open on select Sundays and Holidays and
outside opening hours by appointment

This photograph of Melotte 15 star cluster in Cassiopeia can be seen in exhibition as a museum quality print on dibond-aluminium at size 120 x 97 cm.
Tuesday, October 12, 2021
Night Fever, Exhibition in Helsinki 14.10 - 04.12. 2021
NIGHT FEVER
EXHIBITION 14.10 - 04.12.2021, THE PLATFORM GALLERY
Lapinlahdenkatu 16 C, 00180 Helsinki

NIGHT FEVER" WILL BE OPEN IN EXHIBITION AT THE PLATFORM GALLERY IN HELSINKI FROM 14.10 - 4.12.2021
The exhibit will be open in the the evenings to highlight the
beauty and mystique of the cosmos.
Thursday to Saturday of the opening days will have special opening hours.
14.10 - 16.10
7pm to 10pm
General Opening hours Starting 20.10
Wed - Fri: 5pm to 9pm
Sat: 2pm to 8pm
We are also open on select Sundays and Holidays and
outside opening hours by appointment
NOTE
A three meter long museum quality print of Grand Mosaic of Milky Way is one of the artworks in exhibition.
Thursday, October 7, 2021
Filaments of Veil in mapped colors
I shot most of the lights for this image back in 2016, now I have added some new material to it and reprocessed the whole image. A version in visual color palette can be seen here, https://astroanarchy.blogspot.com/2021/09/filaments-of-veil-nebula-snr.html
Photo was shot with a Celestron Edge HD 11" telescope, Astrodon naarrow band filters and Apogee Alta U16 astro camera. New data is shot with a shorter focal length instrument, Tokina AT-x 300mm f2.8 camera lens, same camera and filters. Dim background emission is taken from a new material and added to this photo.
Total exposure time is now 44 hours for the whole three frame mosaic and the resolution is 11.000 x 4000 pixels.
Filaments of central veil
Click for a large image (1100 x 2900 pixels)

Image is in mapped colors, from the emission of ionized elements, R=Sulphur, G=Hydrogen and B=Oxygen
A closeup
Click for a large image
Click for a large image

Orientation
Click for a large image

INFO
Since all of the heavier elements are born in exploding stars, we all are children of supernovae. Veil Nebula is located in the constellation Cygnus at a distance of 1500 light-years. It spans three degrees of sky, (Moon has an angular diameter of 0,5 degrees at the sky) real diameter is around 70 light-years. I collected data for the photo between 2012-2020 and I made this 3D model in 2021,exposure time is 45 hours
A 3D-study of Veil nebula SNR
3D-study of Veil Nebula Photo
Every single pixel in this 3d-animation is from the original 2D-image above. The model is based on on known scientific facts, deduction and some artistic creativity. The result is an appraised simulation of reality. Astronomical photos are showing objects as paintings on a canvas, totally flat. In reality, they are three dimensional forms floating in three dimensional space. The purpose of my 3d-experiments is to show that and Give an idea, how those distant objects might look in reality.
INFO About my 3D-transformation technique and large animation here: https://astroanarchy.blogspot.com/2021/10/unveiling-veiled.html
Wednesday, October 6, 2021
Unveiling The Veiled
The Veil nebula supernova remnant in Cygnus. Original image was shot with the Canon EF 200 mm f1.8 camera optics full open, QHY9 astro camera and Baader narrowband filters at 2013.
New data is shot with Tokina 300mm f2.8 camera optics and Celestron Edge HD 11" telescope, Apogee Alta U16 astro camera with Astrodon narrowband filters between 2016 - 2020
Total exposure time is now about 45 hours.
The Veil nebula @SuperRare auction
Animation, https://superrare.com/artwork-v2/unveiling-the-veiled-volume-29145
Photo, https://superrare.com/artwork-v2/unveiling-the-veiled-29137
Veil nebula Unveiled
Click for a large image, 1250 x 1700 pixels

A very deep image of the veil nebula supernova remnant in mapped colors.
Nebula in visual colors from light emitted by an ionized elements can be seen here,
https://astroanarchy.blogspot.com/2021/09/veil-nebula-unveiled-ii.html
Nebula in visual colors from light emitted by an ionized elements can be seen here,
https://astroanarchy.blogspot.com/2021/09/veil-nebula-unveiled-ii.html
3D-study of Veil Nebula Photo
Every single pixel in this 3d-animation is from the original 2D-image above. The model is based on on known scientific facts, deduction and some artistic creativity. The result is an appraised simulation of reality. Astronomical photos are showing objects as paintings on a canvas, totally flat. In reality, they are three dimensional forms floating in three dimensional space. The purpose of my 3d-experiments is to show that and Give an idea, how those distant objects might look in reality.
INFO
Since all of the heavier elements are born in exploding stars, we all are children of supernovae. Veil Nebula is located in the constellation Cygnus at a distance of 1500 light-years. It spans three degrees of sky, (Moon has an angular diameter of 0,5 degrees at the sky) real diameter is around 70 light-years. I collected data for the photo between 2012-2020 and I made this 3D model in 2021,exposure time is 45 hours
How the 3D-model is made
 My Moleskine notebook pages from 2008, I planned how to convert nebulae to 3D
For as long as I have captured images of celestial objects, I have always seen hem three-dimensionally in my head. The scientific information makes my inner visions much more accurate, and the 3-D technique I have developed enables me to share those beautiful visions with others.
How accurate my 3-D-visions are depending on how much information I have and how well I implement it.
The final 3-D-image is always an appraised simulation of reality based on known scientific facts, deduction, and some artistic creativity.
After I have collected all the necessary scientific information about my target, I start my 3-D conversion from stars. Usually there is a recognizable star cluster which is responsible for ionizing the nebula. We don’t need to know its absolute location since we know its relative location. Stars ionizing the nebula have to be very close to the nebula structure itself. I usually divide up the rest of the stars by their apparent brightness, which can then be used as an indicator of their distances, brighter being closer. If true star distances are available, I use them, but most of the time my rule of thumb is sufficient. By using a scientific estimate of the distance of the Milky Way object, I can locate the correct number of stars in front of it and behind it.
Emission nebulae are not lit up directly by starlight; they are usually way too large for that. Rather, stellar radiation ionizes elements within the gas cloud and the nebula itself is glowing light, the principle is very much the same as in fluorescent tubes. The thickness of the nebula can be estimated from its brightness, since the whole volume of gas is glowing, brighter means thicker.
By this means, forms of the nebula can be turned to a real 3-D shape. Nebulae are also more or less transparent, so we can see both sides of it at the same time, and this makes model-making a little easier since not much is hidden.
The local stellar wind, from the star cluster inside the nebula, shapes the nebula by blowing away the gas around the star cluster. The stellar wind usually forms a kind of cavity in the nebulosity. The same stellar wind also initiates the further collapse of the gas cloud and the birth of the second generation of stars in the nebula. The collapsing gas can resist the stellar wind and produces pillar like formations which must point to a cluster.
Ionized oxygen (O-III) glows with a bluish light, and since oxygen needs a lot of energy to ionize it, this can only be achieved relatively close to the star cluster in the nebula. I use this information to position the O-III area (the bluish glow) at the correct distance relative to the heart of the nebula.
Many other small indicators can be found by carefully studying the image itself. For example, if there is a dark nebula in the image, it must be located in front of the emission one, otherwise we couldn’t see it at all.
Using the known data in this way I build a kind of skeleton model of the nebula. Then the artistic part is mixed with the scientific and logical elements, and after that the rest is very much like creating a sculpture on a cosmic scale

Monday, October 4, 2021
Three 3D-conversions out of my astronomical photos
I have made dozens of 3D-conversions out of my astronomical photos. As an artist I like to find a new views to the reality. My models are not just a guesswork, the conversion is based on real scientific data.
At the end of this blog post there is a short explanation, how I do my conversion work.
Veil nebula in O-III light alone
 Original astronomical photo about part of the Veil nebula SNR in O-III light only.

3D-study of Veil Nebula Photo
NGC1499 the California Nebula

My photo of California Nebyla in mapped colors
3D-study of California Nebula Photo
Bubble Nebula

3D-study of Bubble Nebula Photo
How 3D-models are madeMy Moleskine notebook pages from 2008, I planned how to convert nebulae to 3D
How accurate my 3-D-visions are depending on how much information I have and how well I implement it.
The final 3-D-image is always an appraised simulation of reality based on known scientific facts, deduction, and some artistic creativity.
After I have collected all the necessary scientific information about my target, I start my 3-D conversion from stars. Usually there is a recognizable star cluster which is responsible for ionizing the nebula. We don’t need to know its absolute location since we know its relative location. Stars ionizing the nebula have to be very close to the nebula structure itself. I usually divide up the rest of the stars by their apparent brightness, which can then be used as an indicator of their distances, brighter being closer. If true star distances are available, I use them, but most of the time my rule of thumb is sufficient. By using a scientific estimate of the distance of the Milky Way object, I can locate the correct number of stars in front of it and behind it.
Emission nebulae are not lit up directly by starlight; they are usually way too large for that. Rather, stellar radiation ionizes elements within the gas cloud and the nebula itself is glowing light, the principle is very much the same as in fluorescent tubes. The thickness of the nebula can be estimated from its brightness, since the whole volume of gas is glowing, brighter means thicker.
By this means, forms of the nebula can be turned to a real 3-D shape. Nebulae are also more or less transparent, so we can see both sides of it at the same time, and this makes model-making a little easier since not much is hidden.
The local stellar wind, from the star cluster inside the nebula, shapes the nebula by blowing away the gas around the star cluster. The stellar wind usually forms a kind of cavity in the nebulosity. The same stellar wind also initiates the further collapse of the gas cloud and the birth of the second generation of stars in the nebula. The collapsing gas can resist the stellar wind and produces pillar like formations which must point to a cluster.
Ionized oxygen (O-III) glows with a bluish light, and since oxygen needs a lot of energy to ionize it, this can only be achieved relatively close to the star cluster in the nebula. I use this information to position the O-III area (the bluish glow) at the correct distance relative to the heart of the nebula.
Many other small indicators can be found by carefully studying the image itself. For example, if there is a dark nebula in the image, it must be located in front of the emission one, otherwise we couldn’t see it at all.
Using the known data in this way I build a kind of skeleton model of the nebula. Then the artistic part is mixed with the scientific and logical elements, and after that the rest is very much like creating a sculpture on a cosmic scale
Thursday, September 30, 2021
Filaments of Veil Nebula SNR
I shot most of the lights for this image back in 2016, now I have added some new material to it and reprocessed the whole image. An older mapped color version can be seen here, https://astroanarchy.blogspot.com/2016/12/filaments-of-veil-nebula.html
Photo was shot with a Celestron Edge HD 11" telescope, Astrodon naarrow band filters and Apogee Alta U16 astro camera. New data is shot with a shorter focal length instrument, Tokina AT-x 300mm f2.8 camera lens, same camera and filters. Dim background emission is taken from a new material and added to this photo.
Total exposure time is now 44 hours for the whole three frame mosaic and the resolution is 11.000 x 4000 pixels.
Filaments of central veil
Click for a large image (1100 x 2900 pixels)

Image is in visual palette from emission of an ionized elements, hydrogen (H-alpha), sulfur (S-II) and oxygen (O-III). Red=Hydrogen + 33% sulfur, Green=oxygen and Blue=oxygen + 33% hydrogen to compensate otherwise missing H-beta emission.
A closeup
Click for a large image

Orientation
Click for a large image

Unveiling the Veiled
Every single pixel in this 3d-animation is from the original 2D-image above. The model is based on on known scientific facts, deduction and some artistic creativity. The result is an appraised simulation of reality. Astronomical photos are showing objects as paintings on a canvas, totally flat. In reality, they are three dimensional forms floating in three dimensional space. The purpose of my 3d-experiments is to show that and Give an idea, how those distant objects might look in reality. More info about my 3D-technique at end of this blog post: https://astroanarchy.blogspot.com/2021/10/unveiling-veiled.html
NOTE. It looks like that the animation has less stars, than the original 2d-image. That's not true, stars is normal photo are getting projected to a same plane. In 3D-model stars are in volume and it only looks like, that there are less stars.
Tuesday, September 28, 2021
Veil nebula unveiled II
I haven't start the imaging season yet, up here 65N. Nights are still short and I haven't got my imaging rig ready after the mandatory six months Summer break.
I have reprocessed some older shots with new data, this time the Veil nebula supernova remnant in Cygnus. Original image was shot with the Canon EF 200 mm f1.8 camera optics full open, QHY9 astro camera and Baader narrowband filters at 2013.
New data is shot with Tokina 300mm f2.8 camera optics and Celestron Edge HD 11" telescope, Apogee Alta U16 astro camera with Astrodon narrowband filters.
Total exposure time is now about 45 hours. I published yesterday a Pickering's Triangle photo taken with Celestron Edge HD 11"-. It's part of this new image among other.
Veil nebula Unveiled
Click for a large image, 1250 x 1700 pixels

Image is in visual palette from emission of an ionized elements, hydrogen (H-alpha), sulfur (S-II) and oxygen (O-III). Red=Hydrogen + 33% sulfur, Green=oxygen and Blue=oxygen + 33% hydrogen to compensate otherwise missing H-beta emission.
A Closeup
Click for a large image

https://astroanarchy.blogspot.com/2013/12/veil-nebula-unveiled.html
Monday, September 27, 2021
Pickering's Triangle in Visual palette
I have reprocessed some older data and made a new composition out of it. Pickering's Triangle is part of the Veil nebula supernova remnant in constellation Cygnus. It has an amazing structure of complex gas filaments. This image is one of the most detailed presentations, showing the whole triangle shape formation, I have seen so far.
Image is in visual palette from emission of an ionized elements, hydrogen (H-alpha), sulfur (S-II) and oxygen (O-III). Red=Hydrogen + 33% sulfur, Green=oxygen and Blue=oxygen + 33% hydrogen to compensate otherwise missing H-beta emission. (H-beta and H-alpha has a same shape but H-beta is weaker. H-alpha emits red light and H-beta emits blue light.) Exposure time ~20 hours.
here you can see ta mapped color image from same data, https://astroanarchy.blogspot.com/2021/08/pickerings-triangle-reprocessed-with.html
Pickering's Triangle with some new lights
click for a large image
click for a large image
Image is in visual palette from emission of an ionized elements, hydrogen (H-alpha), sulfur (S-II) and oxygen (O-III). Red=Hydrogen + 33% sulfur, Green=oxygen and Blue=oxygen + 33% hydrogen to compensate otherwise missing H-beta emission.
A Closeup
click for a large image

The complex structure of gas filaments
Orientation in Veil nebula SNR
click for a large image
Orientation in Veil nebula SNR
click for a large image

Technical details
Processing work flow
Image acquisition, MaxiDL v5.07.
Stacked and calibrated in CCDStack2.
Deconvolution with a CCDStack2 Positive Constraint, 33 iterations, added at 33% weight
Color combine in PS CS3
Levels and curves in PS CS3.
Imaging optics
Celestron Edge HD 1100 @ f7 with 0,7 focal reducer for Edge HD 1100 telescope
Mount
10-micron 1000
Cameras and filters
Imaging camera Apogee Alta U16 and Apogee seven slot filter wheel
Guider camera, Lodestar x2 and SXV-AOL
Astrodon filter, 5nm H-alpha
Astrodon filter, 3nm O-III
Astrodon filter, 3nm S-II
Exposure times
H-alpha, 15 x 1200s = 5h
O-III, 36 x 1200s binned = 12h (Autumn 2014)
S-II, from my older wide field photo of the Veil Nebula = 3h
Total 20h
Tuesday, September 21, 2021
Supernova Remnant Simeis 147, new data added
I have made a new version of my NASA APOD and National Geographic Image of the Week photo. Simeis 147 is a large and very dim supernova remnant in constellation Taurus.
I combined an old data with a new data, with different optics and camera, together.
As a result I have more details, vivid colors and better overall signal in the new photo. An
older photo is from 2011 and the new photo from 2020. Total exposure time in this new composition is over 45 hours.
Simeis 147 SNR
Click for a large image, 1700 x 1200 pixels

Image is in mapped colors, from the emission of ionized elements, R=Sulphur, G=Hydrogen and B=Oxygen
An Experimental Starless Version

Actual filaments of the supernova remnant can be seen better in this starless version.
A Closeup

Photo in Visual palette

INFO
Simeis 147 (sharpless 240), is a very faint and large supernova remnant in constellation Taurus at distance of ~3000 light years. It's constantly expanding at speed of 1000 km/second but due the size of it, we can't see any movement in it. This SN spans over 160 light years and the apparent scale in the sky is about three degrees (Moon has an apparent size of 30" = 0,5 degrees). Explosion took place approximately 30.000 years ago and left behind a pulsar (Neutron star). The pulsar has recently identified.
How long it'll takes to this supernova remnant to expand 1% large when the diameter is 160 light years and it expands at speed of 1000 km/second.
How long it'll takes to this supernova remnant to expand 1% large when the diameter is 160 light years and it expands at speed of 1000 km/second.
Answer is ~480 years.
(1% of diameter 160/100= 16, as kilometers ~151.372.800.000.00, = Y, km,
1000 km/second is ~315.360.000.00, = Z, kilometers/year.
So, X x Z = Y and X=Z/Y, X = 480 years with given values)
(1% of diameter 160/100= 16, as kilometers ~151.372.800.000.00, = Y, km,
1000 km/second is ~315.360.000.00, = Z, kilometers/year.
So, X x Z = Y and X=Z/Y, X = 480 years with given values)
SOMETHING DIFFERENT!
This artwork belongs to my VISION Series, the image is made out of my original photo of starless Simeis 147 supernova remnant.
Every single element in Vision series photos are from my original astronomical photos. I have been using the Overlapping Lightning Method (Multi Exposure Method) to create my Vision series photographs. By this method the forms and structures in astronomical object get multiplied, they are now forming a new visual dimension beyond our physical universe.
Every single element in Vision series photos are from my original astronomical photos. I have been using the Overlapping Lightning Method (Multi Exposure Method) to create my Vision series photographs. By this method the forms and structures in astronomical object get multiplied, they are now forming a new visual dimension beyond our physical universe.


Closeup

Artworks are made purely out of starless Simeis 147 image.
Technical Details
Photo from 2020
Processing workflow
Image acquisition, MaxiDL v5.07.
Stacked and calibrated in CCDStack2.
Deconvolution with a CCDStack2 Positive Constraint, 33 iterations, added at 50% weight
Color combine in PS CS3
Levels and curves in PS CS3.
Imaging optics
Mount
10-micron 1000
Cameras and filters
Imaging camera Apogee Alta U16 and Apogee seven slot filter wheel
Guider camera, Lodestar x 2 and an old spotting scope of Meade LX200
Astrodon filters,
5nm H-alpha 3nm S-II and 3nm O-III
Total exposure time
H-alpha, 15 x 1200 s, binned 1x1 = 5 h
O-III, 24x 600 s, binned 2x2 = 4 h
S-II, 1 x 12 x 600 s. binned 2x2 = 2 h
Photo from 2011
Photo from 2011
Processing work flow:
Image acquisition, MaxiDL v5.07.
Stacked and calibrated in CCDStack2.
Deconvolution with a CCDStack2 Positive Constraint, 33 iterations, added at 50% weight
Levels, curves and color combine in PS CS3.
Optics, Canon EF 200mm camera lens at f1.8
Camera, QHY9
Guiding, Meade LX200 GPS 12" and a Lodestar guider
Image Scale, ~5 arcseconds/pixel
Exposures
H-alpha 34x900s, Binned 1x1
H-alpha 14x1800s, Binned 1x1
H-alpha 42x1200s, binned 1x1
H-alpha 42x1200s, binned 1x1
Total exposure time for Hydrogen alpha is 26h
O-III & S-II channels are from an older image, exposure time 8h
Thursday, September 16, 2021
Viral Nebula Rocks
IC1396 converted to 3D animation, very first of its kind
NOW on SuperRare
I turned my photo of IC1396 to a 3d-model at 2012 to show that it’s actually a three-dimensional volume floating in three-dimensional space. This artwork is not just a guess work, it’s based on scientific data about the structure of emission nebulae and real distance information.
This animation went viral and it was published by several news media and major websites globally at 2012, links after the photos

Location, Constellation Cepheus at distance of about 3000 light years
IC 1396 spans about three degrees of sky (Full Moon has diameter of 0,5 degrees)
I took the photo and made the model at 2012, exposure time 15 hours.
Time used for the collecting scientific data, 3D-model and animation way too much.
Original photo used for the animation
 My original photo of emission nebula IC1396
Original photo used for the animation

Rotating Nebula in media
SLATE by Phill Plait
Best Astronomy Images of 2012:
DISCOVER MAGAZINE,
Jaw-dropping rotating 3D nebula
SMITHSONIAN MAGAZINE by Colin Schultz
Amazing Astrophotography Lets You See Nebulae in 3D
WIRED by Nadia Drake,
New Dimension: Nebulas Are Even More Amazing in 3-D
https://www.wired.com/2013/02/nebulas-in-3-d/
HUFFINGTON POST by Ryan Grenoble,
Nebula IC 1396, Animated In 3D By Finnish Astrophotographer J-P Metsavainio, Is Astounding
https://www.huffpost.com/entry/nebula-animated-3d-photo_n_1949152
INSIDER, Jennifer Welsh
Awesome Animation Shows An Interstellar Gas Cloud In 3D https://www.businessinsider.com/awesome-animation-shows-a-nebula-in-3d-2012-10?r=US&IR=T
PETAPIXEL, Michael Zhang
Amazing Animated GIFs Capture Nebulae in 3D Using Artificial Parallax
https://petapixel.com/2013/02/20/amazing-animated-gifs-capture-nebulae-in-3d-using-artificial-parallax/
This animation was selected to a Moving the Still exhibition in Miami Art Week 2012

How the 3D-model is madeMy Moleskine notebook pages from 2008, I planned how to convert nebulae to 3D
For as long as I have captured images of celestial objects, I have always seen hem three-dimensionally in my head. The scientific information makes my inner visions much more accurate, and the 3-D technique I have developed enables me to share those beautiful visions with others.
How accurate my 3-D-visions are depending on how much information I have and how well I implement it.
The final 3-D-image is always an appraised simulation of reality based on known scientific facts, deduction, and some artistic creativity.
After I have collected all the necessary scientific information about my target, I start my 3-D conversion from stars. Usually there is a recognizable star cluster which is responsible for ionizing the nebula. We don’t need to know its absolute location since we know its relative location. Stars ionizing the nebula have to be very close to the nebula structure itself. I usually divide up the rest of the stars by their apparent brightness, which can then be used as an indicator of their distances, brighter being closer. If true star distances are available, I use them, but most of the time my rule of thumb is sufficient. By using a scientific estimate of the distance of the Milky Way object, I can locate the correct number of stars in front of it and behind it.
Emission nebulae are not lit up directly by starlight; they are usually way too large for that. Rather, stellar radiation ionizes elements within the gas cloud and the nebula itself is glowing light, the principle is very much the same as in fluorescent tubes. The thickness of the nebula can be estimated from its brightness, since the whole volume of gas is glowing, brighter means thicker.
By this means, forms of the nebula can be turned to a real 3-D shape. Nebulae are also more or less transparent, so we can see both sides of it at the same time, and this makes model-making a little easier since not much is hidden.
The local stellar wind, from the star cluster inside the nebula, shapes the nebula by blowing away the gas around the star cluster. The stellar wind usually forms a kind of cavity in the nebulosity. The same stellar wind also initiates the further collapse of the gas cloud and the birth of the second generation of stars in the nebula. The collapsing gas can resist the stellar wind and produces pillar like formations which must point to a cluster.
Ionized oxygen (O-III) glows with a bluish light, and since oxygen needs a lot of energy to ionize it, this can only be achieved relatively close to the star cluster in the nebula. I use this information to position the O-III area (the bluish glow) at the correct distance relative to the heart of the nebula.
Many other small indicators can be found by carefully studying the image itself. For example, if there is a dark nebula in the image, it must be located in front of the emission one, otherwise we couldn’t see it at all.
Using the known data in this way I build a kind of skeleton model of the nebula. Then the artistic part is mixed with the scientific and logical elements, and after that the rest is very much like creating a sculpture on a cosmic scale
Monday, September 13, 2021
Beyond the astronomical photography
NOTE. Vision series artworks are soon to be sold as NFT @SuperRare

I’m an astrophotographer but first of all I’m a visual artist, as an artist, I’m dazzled by all the forms I’m able to capture in my photos of cosmic objects, nebulae, supernova remnants, galaxies, etc. Colors from ionized elements are connected to the shapes and textures, they form a physical reality around us.
I’m telling a story with my photos, and many times my artworks are also personal notes. The Vision series of photos are forming visual notes about shapes, structures, textures, and colors I have seen and captured during my couple of decades-long journey as an astronomical nature photographer.
Every single element in Vision series photos are from my original astronomical photos. I have been using the Overlapping Lightning Method (Multi Exposure Method) to create my Vision series photographs. By this method the forms and structures in astronomical object get multiplied, they are now forming a new visual dimension beyond our physical universe.
The photographic method I'm using was fashionable back in the 1920s among avant-gardists and surrealistic photographers. At the time the work was done in a darkroom, I’m using about the same technique but instead of a darkroom, I’m using digital image processing.
The original photo is rotated, moved, and/or mirrored as I like, and then multiple layers stacked back together so that the original brightness is maintained. For this task, I use Photoshop and various astronomical stacking methods and applications.
Few samples of my Vision Series, the original astronomical photo I used to create them at end of the page.
Visions of Veil
Please, click for a large image


Visions of Veil series is based on my original photo

Image info can be seen here, https://astroanarchy.blogspot.com/2015/09/pickerings-triangle-my-first-light-for.html
Subscribe to:
Posts (Atom)


