
Showing posts sorted by date for query 3d. Sort by relevance Show all posts
Showing posts sorted by date for query 3d. Sort by relevance Show all posts
Sunday, January 4, 2026
My work selected among the best photographs of 2025
This came as a complete surprise.
My photographic work has been selected for Amateur Photographer’s annual feature The Best Photos of the Year 2025 — a curated selection highlighting outstanding photographic work from across the world and across all genres.
Despite its historic name, Amateur Photographer is one of the oldest and most respected photography magazines in the world, founded in 1884 and still widely read by professional photographers, editors, curators, and serious image-makers internationally. Its annual “Best of the Year” feature is a highly selective editorial choice, not an open competition.
While the feature highlights a single image, it’s worth noting that this recognition comes in the context of a much broader body of work. Over the past years I’ve been developing long-form astronomical projects that combine deep scientific data with artistic interpretation — most recently culminating in the publication of a new 3-D astronomy book created in collaboration with Sir Brian May.
It seems likely that the visibility and coherence of this larger production played a role in bringing my work to the editors’ attention, rather than any single image standing alone.
What makes this recognition especially meaningful to me is that the selection places astronomical imaging alongside documentary, fine art, landscape, portrait, and conceptual photography — evaluated not as a niche technical category, but as photography in its own right.
My work is built on long-term data collection, scientific accuracy, and careful visual interpretation. Seeing it resonate beyond the astronomy community, and being recognised purely on visual and artistic grounds, is both humbling and deeply encouraging.
Many thanks to the editorial team at Amateur Photographer for the selection — and to everyone who continues to follow, support, and engage with my work. The universe still has many stories left to tell.
Stereo Photo of the NGC 1365 Galaxy

Historiallisesta nimestään huolimatta Amateur Photographer on yksi maailman vanhimmista ja arvostetuimmista valokuvauslehdistä. Vuonna 1884 perustettua julkaisua lukevat yhä laajasti ammattivalokuvaajat, kuvatoimittajat, kuraattorit ja vakavasti otettavat kuvan tekijät kansainvälisesti. Lehden vuosittainen Best of the Year -kokonaisuus on tarkoin harkittu toimituksellinen valinta, ei avoin kilpailu.
Vaikka artikkelissa nostetaan esiin yksittäinen kuva, tämä tunnustus liittyy laajempaan ja pitkäjänteiseen tuotantoon. Olen viime vuosien aikana kehittänyt laajoja astronomisia teoskokonaisuuksia, joissa syvällinen tieteellinen data yhdistyy taiteelliseen tulkintaan. Tämä työ on hiljattain huipentunut uuden 3D-astronomiakirjan julkaisuun yhteistyössä Sir Brian Mayn kanssa.
On todennäköistä, että juuri tämän laajemman tuotannon näkyvyys ja kokonaisuus ovat osaltaan tuoneet työni toimituksen huomioon, yksittäisen kuvan sijaan.
Tunnustuksesta tekee minulle erityisen merkityksellisen se, että astronominen kuvantaminen asettuu valinnassa rinnakkain dokumentaarisen, taide-, maisema-, muoto- ja konseptuaalisen valokuvauksen kanssa — ei erikoisena teknisenä lajina, vaan valokuvauksena omassa oikeudessaan.
Työni perustuu pitkäaikaiseen datankeruuseen, tieteelliseen tarkkuuteen ja huolelliseen visuaaliseen tulkintaan. Se, että tämä lähestymistapa resonoi myös tähtikuvauksen ulkopuolella ja saa tunnustusta puhtaasti visuaalisin ja taiteellisin perustein, on sekä nöyräksi tekevä että rohkaiseva kokemus.
Lämpimät kiitokset Amateur Photographer -lehden toimitukselle valinnasta — sekä kaikille, jotka seuraavat, tukevat ja jakavat kiinnostuksensa työhöni. Universumilla on yhä lukemattomia tarinoita kerrottavanaan.

This stereo image of a large barred spiral galaxy was used in the article to represent my work as an astronomical photographer. Note: the dot-like objects in the background are not stars, but countless distant galaxies.
Tämä tuli minulle täytenä yllätyksenä
Valokuvallinen työni on valittu Amateur Photographer -lehden vuosittaiseen The Best Photos of the Year 2025 -kokonaisuuteen, joka on toimituksellisesti kuratoitu katsaus vuoden merkittävimpiin valokuviin eri puolilta maailmaa ja kaikista valokuvauksen genreistä.Historiallisesta nimestään huolimatta Amateur Photographer on yksi maailman vanhimmista ja arvostetuimmista valokuvauslehdistä. Vuonna 1884 perustettua julkaisua lukevat yhä laajasti ammattivalokuvaajat, kuvatoimittajat, kuraattorit ja vakavasti otettavat kuvan tekijät kansainvälisesti. Lehden vuosittainen Best of the Year -kokonaisuus on tarkoin harkittu toimituksellinen valinta, ei avoin kilpailu.
Vaikka artikkelissa nostetaan esiin yksittäinen kuva, tämä tunnustus liittyy laajempaan ja pitkäjänteiseen tuotantoon. Olen viime vuosien aikana kehittänyt laajoja astronomisia teoskokonaisuuksia, joissa syvällinen tieteellinen data yhdistyy taiteelliseen tulkintaan. Tämä työ on hiljattain huipentunut uuden 3D-astronomiakirjan julkaisuun yhteistyössä Sir Brian Mayn kanssa.
On todennäköistä, että juuri tämän laajemman tuotannon näkyvyys ja kokonaisuus ovat osaltaan tuoneet työni toimituksen huomioon, yksittäisen kuvan sijaan.
Tunnustuksesta tekee minulle erityisen merkityksellisen se, että astronominen kuvantaminen asettuu valinnassa rinnakkain dokumentaarisen, taide-, maisema-, muoto- ja konseptuaalisen valokuvauksen kanssa — ei erikoisena teknisenä lajina, vaan valokuvauksena omassa oikeudessaan.
Työni perustuu pitkäaikaiseen datankeruuseen, tieteelliseen tarkkuuteen ja huolelliseen visuaaliseen tulkintaan. Se, että tämä lähestymistapa resonoi myös tähtikuvauksen ulkopuolella ja saa tunnustusta puhtaasti visuaalisin ja taiteellisin perustein, on sekä nöyräksi tekevä että rohkaiseva kokemus.
Lämpimät kiitokset Amateur Photographer -lehden toimitukselle valinnasta — sekä kaikille, jotka seuraavat, tukevat ja jakavat kiinnostuksensa työhöni. Universumilla on yhä lukemattomia tarinoita kerrottavanaan.
Thursday, November 20, 2025
New book with Sir Brian May is out!
ISLANDS IN INFINITY, GALAXIES 3D
Buy a copy (UK store)
https://shop.londonstereo.com/islands-in-infinity-galaxies-3-d.html
You will be able to purchase the book directly from me as soon as the copies arrive here — in about two weeks or so. I’ll announce the opening of my online book shop both on social media and here.

From left to right: Prof. Ward-Thompson, Sir Brian May and yours truly
Our new book was published at the Museum of Brands in London on Thursday, 13 November 2025.
What a hectic and wonderful experience with the whole book team and a large, enthusiastic audience.
This is the first book in the world that lets readers see the real shapes of galaxies and galaxy groups in true 3D — a completely new way to understand cosmic structures.
VIDEO
Sir Brian May talks about how our collaboration began
Please, click the image to see the video
.jpg)
Video was taken at 2020, when out first book, Cosmic Clouds 3D was published
Photos and videos from the publication event in London, 13 November 2025
.jpg)
Location: Museum of Brands in London (Photo, J-P Peltoniemi)
.jpg)
Sir Brian May and J-P at front of media (Photo, J-P Peltoniemi)
A photoshoot just before opening of the event
J-P and Sir Brian May
You can’t experience the photos in true 3D in this video the way the audience did during the live presentation.
Sorry about the image and audio quality — the lighting improves towards the end, during the audience questions.
Sorry about the image and audio quality — the lighting improves towards the end, during the audience questions.
ISLANDS IN INFINITY: GALAXIES 3-D
by Brian May, Professor Derek Ward-Thompson, J-P Metsävainio,
published by The London Stereoscopic Company, 13 November 2025 https://shop.londonstereo.com
Islands in Infinity is the first book to explore galaxies in stereoscopic 3-D. Created by Brian May (PhD in Astronomy), Professor Derek Ward-Thompson (galaxy expert), and astro-photography master J-P Metsävainio, it offers a groundbreaking visual journey through the cosmos, accompanied by compelling narrative.
Featuring more than 200 colour images from the world’s leading land- and space-based telescopes, along with over 80 original artworks, Islands in Infinity delivers a breathtaking 3-D introduction to the formation, nature, evolution, and classification of some of the 200 billion galaxies that fill the observable Universe. The use of stereoscopic technology allows us to see deeper into galaxies and gain insights never before possible.
Readers are taken on an extraordinary voyage through the weird and wonderful shapes of colliding and merging galaxies, witnessing their chaotic transformations. Moving toward the edge of the visible Universe, the book explores how galaxies gather in clusters and superclusters, looking outward—and back in time—toward the dawn of the cosmos and the Big Bang itself.
Each copy comes complete with a Lite OWL Stereoscopic Viewer, designed by Brian May which will bring the images to life in the magic of 3-D.
Sir Brian May says - For the very first time, readers will be able to enjoy stereoscopic renderings of galaxies previously only seen as flat ‘mono’ images. And this, coupled with a text from one of the world’s experts on the evolution of galaxies, will give a uniquely new insight into the Universe as it is now perceived. Moreover, it’s an account understandable and enjoyable by anyone interested in the biggest subject in the Universe - not just astro experts. It will be a gripping read !!
Professor Ward-Thompson says - In this book you will, I hope, find everything you need to understand what galaxies are, how they originated, how they have evolved into many different types of galaxy, and how they interact and give birth to everything we experience on our tiny blue planet inside our Solar System, itself inside our very own Galaxy, the Milky Way.
J-P Metsävainio says - I undertook a major but deeply rewarding task: converting a vast number of galaxies into 3D stereo while ensuring that every detail remained as scientifically accurate as possible. It was truly thrilling to watch these complex structures come to life before my eyes as I saw them in three dimensions for the first time. Galaxy clusters revealed their true nature, with accurate relative distances, and delicate dust lanes appearing to float in front of the galactic discs. I felt as if I were holding the universe in my hands — and I hope readers will share that same eye-opening experience through the pages of this book.
Monday, November 3, 2025
Something new. astronomical 3d-sculpures
I have been an astrophotographer for about thirty years, and for almost as long, I have been converting my photographs into various three-dimensional formats. My 3D images and animations are always based on real astronomical data. The result is an approximation of reality — never a guesswork creation.
I haven’t often published my 3D studies in my blog or on social media, since they usually require a special viewing method, such as Red/Cyan glasses, special viewing methods or stereoscopic displays, to be properly experienced.
Now I have begun working on a new series of physical artworks, where I transform my photographs into tangible 3D forms. In these pieces, viewers can perceive cosmic structures at a glance — the relative distances between stars and galaxies are represented as accurately as possible. It’s like sculpting on a cosmic scale.
Here are a few examples of my first prototypes. I’m using new and intriguing materials to manipulate light — to both reveal and conceal. I am especially fascinated by the idea of large, room-sized cosmic landscapes where the viewer can literally walk into space.
Videos offer some sense of my work, but in real life, even my smallest sculptures contain a sense of infinity. That’s difficult to capture in video, yet it’s there — quietly unfolding before the eyes.
Messier 13, a Globular Cluster
Every star in this 3D-sculpture is from my original photo of M13
Messier 81 galaxy
Cat's Eye Nebula
Jones 1 Planetary Nebula
Tuesday, August 12, 2025
An artwork for the Art Museum of Oulu
While waiting to get back to imaging, I completed an artwork commissioned by the Art Museum of Oulu.
This is part of the Art Cabinet project, and I was given complete freedom to fill the cabinet with my art.
The cabinet measures 120 × 110 × 65 cm and has two doors in the front and one on the top.
My idea was to evoke a sense of infinity when the doors are opened. To achieve this, I used the blackest paint in the world—Vantablack. I have photographed galaxies over the past 30 years, and I decided to use them to create a 3D representation of infinity.
Here are a couple of pictures, but the video will best show how successful I was.


The Video
Sunday, February 16, 2025
New Tool, a Powerful Dell Precision 7875 Workstation
Workstation computers from Dell are really well-built and come with excellent next-business-day onsite service. I have been using them for a couple of decades for my work. My previous workstation served me well for almost nine years—these kinds of computers do not age as fast as normal consumer PCs.
My old Dell workstation has two ten-core Xeon processors, 128GB of memory, and a decent graphics card. Since I work with 4K and 8K videos, 3D graphics, and run AI locally, my old workstation has become far too slow. It goes to my observatory computer, little overkill for telescope and camera control but works well there.
The new Dell Precision 7875 Workstation features a 96-core AMD Threadripper Pro processor (3.2 – 5.1 GHz), 512GB of RAM, and a 20GB NVIDIA RTX 4000 Ada graphics card. It comes with a standard three-year next-business-day onsite service in case anything goes wrong.
My new display is also from Dell—a 40-inch 21:9 curved Thunderbolt hub monitor with a stunning 5K resolution and a 120Hz refresh rate. The curve in the monitor is perfect for correcting perspective distortion, ensuring that straight lines remain visually straight.
I also use an Ergotron monitor arm, so no desk space is wasted, allowing me to position the large display at the optimal distance and orientation with ease
New Workstation and Display

Wednesday, January 29, 2025
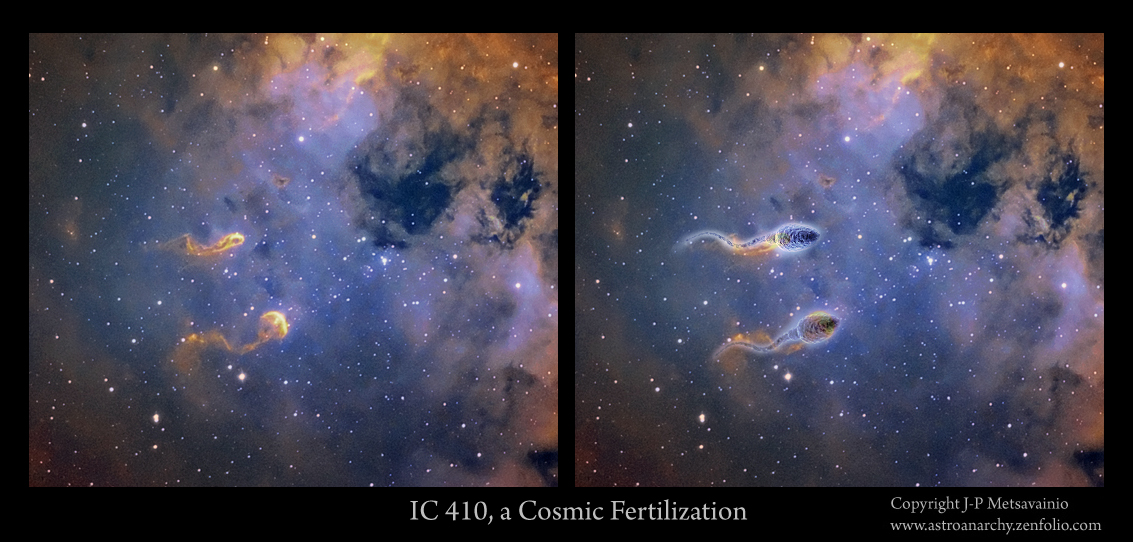
A Cosmic genesis, IC 410 in Auriga
UPDATE
My photo of IC410 ended up to the PetaPixel, world's leading independent photography publication.
This must be one of my best photos of IC410 so far, and I'm very pleased with the result.
I’ve been shooting this target over and over again for decades, and every time it has shown me something new. (There are links to older versions of IC410 at the end of this blog post.)
This has been a fascinating object for me, as it holds great symbolism. Overall, this nebula resembles a microscopic photo of human fertilization, where new life is about to be born, and the germ cells are meeting each other.
New things are being born in this photo as well, but not life as we know it. At the tips of those tadpole-like formations, the gas is collapsing, and new stars are beginning to form. For scale, those tadpoles are about ten light-years long and located about 10.000 light-years away from us.
In fact, they are the second generation of stars in this nebula. The first group was the open cluster of stars at the center of the image, NGC 1893. This group of stars is also responsible for the appearance of the entire nebula complex. The radiation pressure from the stars shapes the gas and causes it to glow by ionizing the elements within it. This same radiation pressure also causes the gas to collapse, starting the process of second-generation star formation in the nebula.
The seeing was very good in my conditions, with an FWHM of 1.6 (typically it's between 2.2 - 3.0). The total exposure time is around 30 hours, collected over several nights during a three-month period between the end of 2024 and the beginning of 2025
A Cosmic Genesis, IC 410
Click for a full size, 2700x2400 pixels

A mapped color image from a light emitted by an ionized elements,
sulfur=red, hydrogen=green and oxygen=blue
sulfur=red, hydrogen=green and oxygen=blue
A Full Resolution Detail
Click for a full size, 2100x2100 pixels
Click for a full size, 2100x2100 pixels

Tadpole like formations are ten light years long and locates 10.000 light years from us.
New stars are forming in the tips of them since the gravity gets the gas and dust collapsing. When the pressure and heat are high enough, nuclear fusion of lighter elements is able start , the new star is born.
IC 410 in Visual Colors
Click for a full size, 2400x2400 pixels

sulfur=red, hydrogen=red and oxygen=blue, this combination is very close to a natural color palette
IC 410 in a Large Context
A massive mosaic Photo of Auriga
The area of the new photo is marked as a white rectangle
Click for a full size, 2900x1600 pixels
Click for a full size, 2900x1600 pixels

Info about this massive photo can be seen in this Blog post:
https://astroanarchy.blogspot.com/2020/03/the-grande-mosaic-of-auriga.html
A little Closer
Click for a full size, 2400x2400 pixels

Info about this massive photo can be seen in this Blog post:
https://astroanarchy.blogspot.com/2020/03/new-photo-deep-in-to-darkness.html
INFO
This cosmic view shows off an otherwise faint emission nebula IC 410, captured with 14" telescope and narrowband filters. Above and right of center you can spot two remarkable inhabitants of the interstellar pond of gas and dust, known as the tadpoles of IC 410. Partly obscured by foreground dust, the nebula itself surrounds NGC 1893, a young galactic cluster of stars. Formed in the interstellar cloud a mere 4 million years ago, the intensely hot, bright cluster stars energize the glowing gas. Globules composed of denser cooler gas and dust, the tadpoles are around 10 light-years long and are likely sites of ongoing star formation. Sculpted by stellar winds and radiation their heads are outlined by bright ridges of ionized gas while their tails trail away from the cluster's central young stars. IC 410 and embedded NGC 1893 lie some 10,000 light-years away, toward the nebula-rich constellation Auriga.
Source; NASA APOD
My older photos of the IC 410 in Chronological Order
2008, my first photo of IC 410, https://astroanarchy.blogspot.com/2008/03/ic-405-410-with-color.html
2008, my second tryout with IC 410, https://astroanarchy.blogspot.com/2008/11/ic405-ic410-in-hst-hubble-space.html
2010, version, https://astroanarchy.blogspot.com/2010/01/ic-410-cosmic-fertilization.html
2012, version, https://astroanarchy.blogspot.com/2012/12/a-cosmic-fertilization.html
2015 version, https://astroanarchy.blogspot.com/2015/02/new-photo-ic-410-in-auriga.html
2015, 3D studies of IC410, https://astroanarchy.blogspot.com/2015/07/an-experimental-3d-study-of-emission_28.html
2020, a wide field mosaic, https://astroanarchy.blogspot.com/2020/03/new-photo-deep-in-to-darkness.html
2020, IC 410 as apart of an interesting mosaic version, https://astroanarchy.blogspot.com/2020/03/the-birth-of-venus.html
IC 410, a Photo from 2012 vs 2025 Version of it
Click for a full size, 1500x1500 pixels

I noticed some movement in a one star, it's marked at upper right
There are other small movement at stars but it's just due to a different optical curvatures between two optical configurations.
The details in the tadpoles are much clearer in the new version, the dark nebulae now show fine structures, and the gas complex at the lower left—barely visible in the 2012 photo—now reveals beautiful details. The amount and clarity of the stars are amazing in the new version, along with many other small features that have now been captured.
Technical details
Processing workflow
Image acquisition, MaximDL v5.07.
Stacked and calibrated in CCDStack2.
Deconvolution with a CCDStack2 Positive Constraint, 27 iterations, added at 50% weight
Color combine in PS CS3
Levels and curves in PS CS3.
Imaging optics,
Celestron EDGE 14" with 0.7 Focal reducer
Mount,
MesuMount Mark II
Cameras,
Imaging camera Apogee Alta U9000M and Apogee seven slot filter wheel
Guider camera, Lodestar x 2 and SXV-AO Active Optics @ 5hz
filters,
Astrodon 5nm H-alpha, 3nm S-II and 3nm O-III
Total exposure time 30h
H-alpha, 60 x 1200 s, binned 1x1 = 20 h
O-III,21x 1200 s, binned 2x2 = 7h
O-III,21x 1200 s, binned 2x2 = 7h
S-II, 15 x 1200 s. binned 2x2 = 5h
A single calibrated 20 min exposure of H-alpha, Bin 1x1
Click for a full size image.

It does look like a human germ cells
Saturday, September 28, 2024
NEW SETUP FOR MY ASTRONOMICAL NATURE IMAGING WORK
I haven't publish much new images in past two three years since I have had some health problems. Now I'm good as new and can start working again. Past two years I have been slowly building a new imaging platform. I have done some shorter focal length work past six years, now it's time to go closer again.
OPTICS
System is build around Celestron EDGE 14" telescope, I selected this scope due to its light gathering capacity, 356mm diameter and 3910mm native focal length (This very large and heavy 0.7 Reducer is especially made for the EDGE 14") One main difference to normal Celestron EDGE telescope is that I have added a secondary mirror focuser (by Optec) to get rid of a mirror flop. It can be a problem, especially with a heavy mirror. Bottom line, this scope has an excellent optical quality. There is some optical analysis and a single full scale 20min frame at end of this post.
In future I can add a "HyperStar system" to replace secondary mirror and use this telescope as a fast f2 astrograph.

Secondary mirror focuser, Note a curved vane for the flat power/data cable, no diffraction spikes!
The focuser is made all aluminium, it's really robust and easy to collimate.
The focuser is made all aluminium, it's really robust and easy to collimate.
MOUNT
I ended up to a MESU Mount MARK II since it has 100kg capacity at imaging work with a periodic error less than 4 arcseconds peak-to-peak, impressive numbers indeed. It also has zero lash back due to its friction drive system. One of the nice features is the 80mm diameter channel for all of the cords, trough the Ra and Dec axes, no more dragging cords!
The pillar I ordered with the mount is bended knee pillar type, no meridian flip is needed and telescope can track whole sky without stopping. The pillar came in easy to handle parts and assembly was very straight forward, the assembled pillar is very rigid under the weight of heavy telescope, counter weights and accessories.
Mesu mount is absolute beautiful engineering work. Support from manufacture is also very good. I had some minor problems with settings at first but they get solved in no time after we went it trough with remote connection, while on site. Bottom line, money wise this mount is a real bargain, if compared its features to any other brand or model of mount.

Bended Knee Pillar angle at my location 65 degree North.
Counter weights are stainless steal weight lifting weights. (~35kg)
.jpg)

CAMERA
The Main camera is a "new" Apogee Alta U9000M with Apogee Filter wheel. It's a second hand camera originally used for the microscopic work and it looks like a bran new, There wasn't any mechanical shutter but I moved a shutter from my old Apogee Alta U16 to this new camera. (My old camera died to an old age)
The camera has 12 micron pixels, it's a perfect match to this optical configuration giving an image scale of 0.91 arcseconds per pixel. The full image spans 46.1 x 46.1 arcminutes of sky. (One degree is 60 arcminutes and Full Moon spans around 30 arcminutes of sky)
INSTRUMENT ROTATOR
At first time I have added an instrument rotator to the imaging path. I haven't use any rotator earlier since there is always some flexure.
The Wanderer Astro Rotator Pro has absolute zero flexure by the manufacture. I was very skeptical to this since if it moves, it will flex. It turned out, that there is a patented system based on neodymium magnets around the light path holding everything tightly together when rotator moves.
After measuring carefully everything with the CCD-inspector software from test exposures under the starfield I can say, it really has no flexures at all. It's only 18 mm thick and fit to my limited back focus nicely. The rotator can handle flawlessly all the heavy load I have placed behind it.
ACTIVE OPTIC UNIT
Maybe an overkill but I have added an active optics unit to the light path. It's SXV-AO from Starlight Xpress UK.
I have had really good experiences doing long focal length imaging with AO unit during the years. It doesn't correct the actual seeing so much but it corrects every small or big error from heat bubbles and vibrations from heavy traffic, wind, etc. and it does that really really fast.
It's as easy to use as any OAG, especially after I had an instrument rotator. With 14" scope, I can guide around 10 HZ by using mag 11 guide star. The MESU Mount is really good but there is lots of mass to move when guiding corrections are made. With AO there is just a small refracting glass element to move instead of telescope and heavy accessories.
DATA & POWER BOX
An other new accessory is power and data box from Wanderer Astro. It makes the system less chaotic with all the data and power cords. Also controlling power and data connections can be done remotely in one software. It can handle nearly 20 amp at peak power.
DEW BUSTER
There is also my old Dew Buster installed to the telescope. it can keep the temperature just little over the dew point, this prevent the heat current. Raising warm air inside the tube will ruin the image, if heater is even slightly too warm.
FAN
I added a 70 mm computer fan to the telescopes air went to reduce the cool down time. There is an air filter in the went to prevent the dust getting inside the OTA. I can control the fan speed by the Power Box software.
QHY POLEMASTER
This is a new addition too, I was amazed how easy it was to use. Polar align took maybe 15 min and it's easy to redo at any time needed. here is a REVIEW about this little helper,
.jpg)
Telescope elements labeled
.jpg)
QHY Polemaster, lens cover removed and ready for the action.
LENS COVER
As a last item here is a lens cover for Celestron EDGE 14" telescope. It's a simple and a must accessory to prevent dust in the collector lens. How ever, in my case there is a secondary mirror focuser sticking out and it prevents to use the standard Celestron aluminium cover over the telescope.
I solved the problem by cutting a circular hole in the lens cover. After that, I bought a steel bowl from local market ( it was just 5 € or about 5 $) I sprayed it matt black and glued it to the cover with an elastic, rubber like, superglue.

A steel bowl glued over the hole in the lens cover.
AN UPDATE, 09.10.2024,
THE FIRST LIGHT IMAGE
THE FIRST LIGHT IMAGE
Click for a full size image, ~2000x2000 pixels

https://astroanarchy.blogspot.com/2024/10/first-light-for-my-new-imaging-setup.html
OPTICAL ANALYSIS FROM THE CCDINSPECTOR APP

The optical collimation is as good as I get it in my seeing conditions and the optical tube hold it perfectly since the main mirror is always locked down and focusing is done with the Optec Secondary Mirror Focuser only.

This is a 3D-plot of field curvature from the CCDInspector app of Celestron Edge 14" with 0.7 Focal Reducer and Apogee Alta U9000M with 12 micron pixels. This configuration produce a very flat field and stars are sharp from edge to edge in the whole field. This is impressive especially since the CCD in Alta U9000M is so large, about 37x37mm.
A single full scale 20 min O-III exposure used for the optical analysis

Thursday, October 7, 2021
Filaments of Veil in mapped colors
I shot most of the lights for this image back in 2016, now I have added some new material to it and reprocessed the whole image. A version in visual color palette can be seen here, https://astroanarchy.blogspot.com/2021/09/filaments-of-veil-nebula-snr.html
Photo was shot with a Celestron Edge HD 11" telescope, Astrodon naarrow band filters and Apogee Alta U16 astro camera. New data is shot with a shorter focal length instrument, Tokina AT-x 300mm f2.8 camera lens, same camera and filters. Dim background emission is taken from a new material and added to this photo.
Total exposure time is now 44 hours for the whole three frame mosaic and the resolution is 11.000 x 4000 pixels.
Filaments of central veil
Click for a large image (1100 x 2900 pixels)

Image is in mapped colors, from the emission of ionized elements, R=Sulphur, G=Hydrogen and B=Oxygen
A closeup
Click for a large image
Click for a large image

Orientation
Click for a large image

INFO
Since all of the heavier elements are born in exploding stars, we all are children of supernovae. Veil Nebula is located in the constellation Cygnus at a distance of 1500 light-years. It spans three degrees of sky, (Moon has an angular diameter of 0,5 degrees at the sky) real diameter is around 70 light-years. I collected data for the photo between 2012-2020 and I made this 3D model in 2021,exposure time is 45 hours
A 3D-study of Veil nebula SNR
3D-study of Veil Nebula Photo
Every single pixel in this 3d-animation is from the original 2D-image above. The model is based on on known scientific facts, deduction and some artistic creativity. The result is an appraised simulation of reality. Astronomical photos are showing objects as paintings on a canvas, totally flat. In reality, they are three dimensional forms floating in three dimensional space. The purpose of my 3d-experiments is to show that and Give an idea, how those distant objects might look in reality.
INFO About my 3D-transformation technique and large animation here: https://astroanarchy.blogspot.com/2021/10/unveiling-veiled.html
Wednesday, October 6, 2021
Unveiling The Veiled
The Veil nebula supernova remnant in Cygnus. Original image was shot with the Canon EF 200 mm f1.8 camera optics full open, QHY9 astro camera and Baader narrowband filters at 2013.
New data is shot with Tokina 300mm f2.8 camera optics and Celestron Edge HD 11" telescope, Apogee Alta U16 astro camera with Astrodon narrowband filters between 2016 - 2020
Total exposure time is now about 45 hours.
The Veil nebula @SuperRare auction
Animation, https://superrare.com/artwork-v2/unveiling-the-veiled-volume-29145
Photo, https://superrare.com/artwork-v2/unveiling-the-veiled-29137
Veil nebula Unveiled
Click for a large image, 1250 x 1700 pixels

A very deep image of the veil nebula supernova remnant in mapped colors.
Nebula in visual colors from light emitted by an ionized elements can be seen here,
https://astroanarchy.blogspot.com/2021/09/veil-nebula-unveiled-ii.html
Nebula in visual colors from light emitted by an ionized elements can be seen here,
https://astroanarchy.blogspot.com/2021/09/veil-nebula-unveiled-ii.html
3D-study of Veil Nebula Photo
Every single pixel in this 3d-animation is from the original 2D-image above. The model is based on on known scientific facts, deduction and some artistic creativity. The result is an appraised simulation of reality. Astronomical photos are showing objects as paintings on a canvas, totally flat. In reality, they are three dimensional forms floating in three dimensional space. The purpose of my 3d-experiments is to show that and Give an idea, how those distant objects might look in reality.
INFO
Since all of the heavier elements are born in exploding stars, we all are children of supernovae. Veil Nebula is located in the constellation Cygnus at a distance of 1500 light-years. It spans three degrees of sky, (Moon has an angular diameter of 0,5 degrees at the sky) real diameter is around 70 light-years. I collected data for the photo between 2012-2020 and I made this 3D model in 2021,exposure time is 45 hours
How the 3D-model is made
 My Moleskine notebook pages from 2008, I planned how to convert nebulae to 3D
For as long as I have captured images of celestial objects, I have always seen hem three-dimensionally in my head. The scientific information makes my inner visions much more accurate, and the 3-D technique I have developed enables me to share those beautiful visions with others.
How accurate my 3-D-visions are depending on how much information I have and how well I implement it.
The final 3-D-image is always an appraised simulation of reality based on known scientific facts, deduction, and some artistic creativity.
After I have collected all the necessary scientific information about my target, I start my 3-D conversion from stars. Usually there is a recognizable star cluster which is responsible for ionizing the nebula. We don’t need to know its absolute location since we know its relative location. Stars ionizing the nebula have to be very close to the nebula structure itself. I usually divide up the rest of the stars by their apparent brightness, which can then be used as an indicator of their distances, brighter being closer. If true star distances are available, I use them, but most of the time my rule of thumb is sufficient. By using a scientific estimate of the distance of the Milky Way object, I can locate the correct number of stars in front of it and behind it.
Emission nebulae are not lit up directly by starlight; they are usually way too large for that. Rather, stellar radiation ionizes elements within the gas cloud and the nebula itself is glowing light, the principle is very much the same as in fluorescent tubes. The thickness of the nebula can be estimated from its brightness, since the whole volume of gas is glowing, brighter means thicker.
By this means, forms of the nebula can be turned to a real 3-D shape. Nebulae are also more or less transparent, so we can see both sides of it at the same time, and this makes model-making a little easier since not much is hidden.
The local stellar wind, from the star cluster inside the nebula, shapes the nebula by blowing away the gas around the star cluster. The stellar wind usually forms a kind of cavity in the nebulosity. The same stellar wind also initiates the further collapse of the gas cloud and the birth of the second generation of stars in the nebula. The collapsing gas can resist the stellar wind and produces pillar like formations which must point to a cluster.
Ionized oxygen (O-III) glows with a bluish light, and since oxygen needs a lot of energy to ionize it, this can only be achieved relatively close to the star cluster in the nebula. I use this information to position the O-III area (the bluish glow) at the correct distance relative to the heart of the nebula.
Many other small indicators can be found by carefully studying the image itself. For example, if there is a dark nebula in the image, it must be located in front of the emission one, otherwise we couldn’t see it at all.
Using the known data in this way I build a kind of skeleton model of the nebula. Then the artistic part is mixed with the scientific and logical elements, and after that the rest is very much like creating a sculpture on a cosmic scale

Monday, October 4, 2021
Three 3D-conversions out of my astronomical photos
I have made dozens of 3D-conversions out of my astronomical photos. As an artist I like to find a new views to the reality. My models are not just a guesswork, the conversion is based on real scientific data.
At the end of this blog post there is a short explanation, how I do my conversion work.
Veil nebula in O-III light alone
 Original astronomical photo about part of the Veil nebula SNR in O-III light only.

3D-study of Veil Nebula Photo
NGC1499 the California Nebula

My photo of California Nebyla in mapped colors
3D-study of California Nebula Photo
Bubble Nebula

3D-study of Bubble Nebula Photo
How 3D-models are madeMy Moleskine notebook pages from 2008, I planned how to convert nebulae to 3D
How accurate my 3-D-visions are depending on how much information I have and how well I implement it.
The final 3-D-image is always an appraised simulation of reality based on known scientific facts, deduction, and some artistic creativity.
After I have collected all the necessary scientific information about my target, I start my 3-D conversion from stars. Usually there is a recognizable star cluster which is responsible for ionizing the nebula. We don’t need to know its absolute location since we know its relative location. Stars ionizing the nebula have to be very close to the nebula structure itself. I usually divide up the rest of the stars by their apparent brightness, which can then be used as an indicator of their distances, brighter being closer. If true star distances are available, I use them, but most of the time my rule of thumb is sufficient. By using a scientific estimate of the distance of the Milky Way object, I can locate the correct number of stars in front of it and behind it.
Emission nebulae are not lit up directly by starlight; they are usually way too large for that. Rather, stellar radiation ionizes elements within the gas cloud and the nebula itself is glowing light, the principle is very much the same as in fluorescent tubes. The thickness of the nebula can be estimated from its brightness, since the whole volume of gas is glowing, brighter means thicker.
By this means, forms of the nebula can be turned to a real 3-D shape. Nebulae are also more or less transparent, so we can see both sides of it at the same time, and this makes model-making a little easier since not much is hidden.
The local stellar wind, from the star cluster inside the nebula, shapes the nebula by blowing away the gas around the star cluster. The stellar wind usually forms a kind of cavity in the nebulosity. The same stellar wind also initiates the further collapse of the gas cloud and the birth of the second generation of stars in the nebula. The collapsing gas can resist the stellar wind and produces pillar like formations which must point to a cluster.
Ionized oxygen (O-III) glows with a bluish light, and since oxygen needs a lot of energy to ionize it, this can only be achieved relatively close to the star cluster in the nebula. I use this information to position the O-III area (the bluish glow) at the correct distance relative to the heart of the nebula.
Many other small indicators can be found by carefully studying the image itself. For example, if there is a dark nebula in the image, it must be located in front of the emission one, otherwise we couldn’t see it at all.
Using the known data in this way I build a kind of skeleton model of the nebula. Then the artistic part is mixed with the scientific and logical elements, and after that the rest is very much like creating a sculpture on a cosmic scale
Thursday, September 30, 2021
Filaments of Veil Nebula SNR
I shot most of the lights for this image back in 2016, now I have added some new material to it and reprocessed the whole image. An older mapped color version can be seen here, https://astroanarchy.blogspot.com/2016/12/filaments-of-veil-nebula.html
Photo was shot with a Celestron Edge HD 11" telescope, Astrodon naarrow band filters and Apogee Alta U16 astro camera. New data is shot with a shorter focal length instrument, Tokina AT-x 300mm f2.8 camera lens, same camera and filters. Dim background emission is taken from a new material and added to this photo.
Total exposure time is now 44 hours for the whole three frame mosaic and the resolution is 11.000 x 4000 pixels.
Filaments of central veil
Click for a large image (1100 x 2900 pixels)

Image is in visual palette from emission of an ionized elements, hydrogen (H-alpha), sulfur (S-II) and oxygen (O-III). Red=Hydrogen + 33% sulfur, Green=oxygen and Blue=oxygen + 33% hydrogen to compensate otherwise missing H-beta emission.
A closeup
Click for a large image

Orientation
Click for a large image

Unveiling the Veiled
Every single pixel in this 3d-animation is from the original 2D-image above. The model is based on on known scientific facts, deduction and some artistic creativity. The result is an appraised simulation of reality. Astronomical photos are showing objects as paintings on a canvas, totally flat. In reality, they are three dimensional forms floating in three dimensional space. The purpose of my 3d-experiments is to show that and Give an idea, how those distant objects might look in reality. More info about my 3D-technique at end of this blog post: https://astroanarchy.blogspot.com/2021/10/unveiling-veiled.html
NOTE. It looks like that the animation has less stars, than the original 2d-image. That's not true, stars is normal photo are getting projected to a same plane. In 3D-model stars are in volume and it only looks like, that there are less stars.
Subscribe to:
Posts (Atom)


