
Tuesday, October 15, 2024
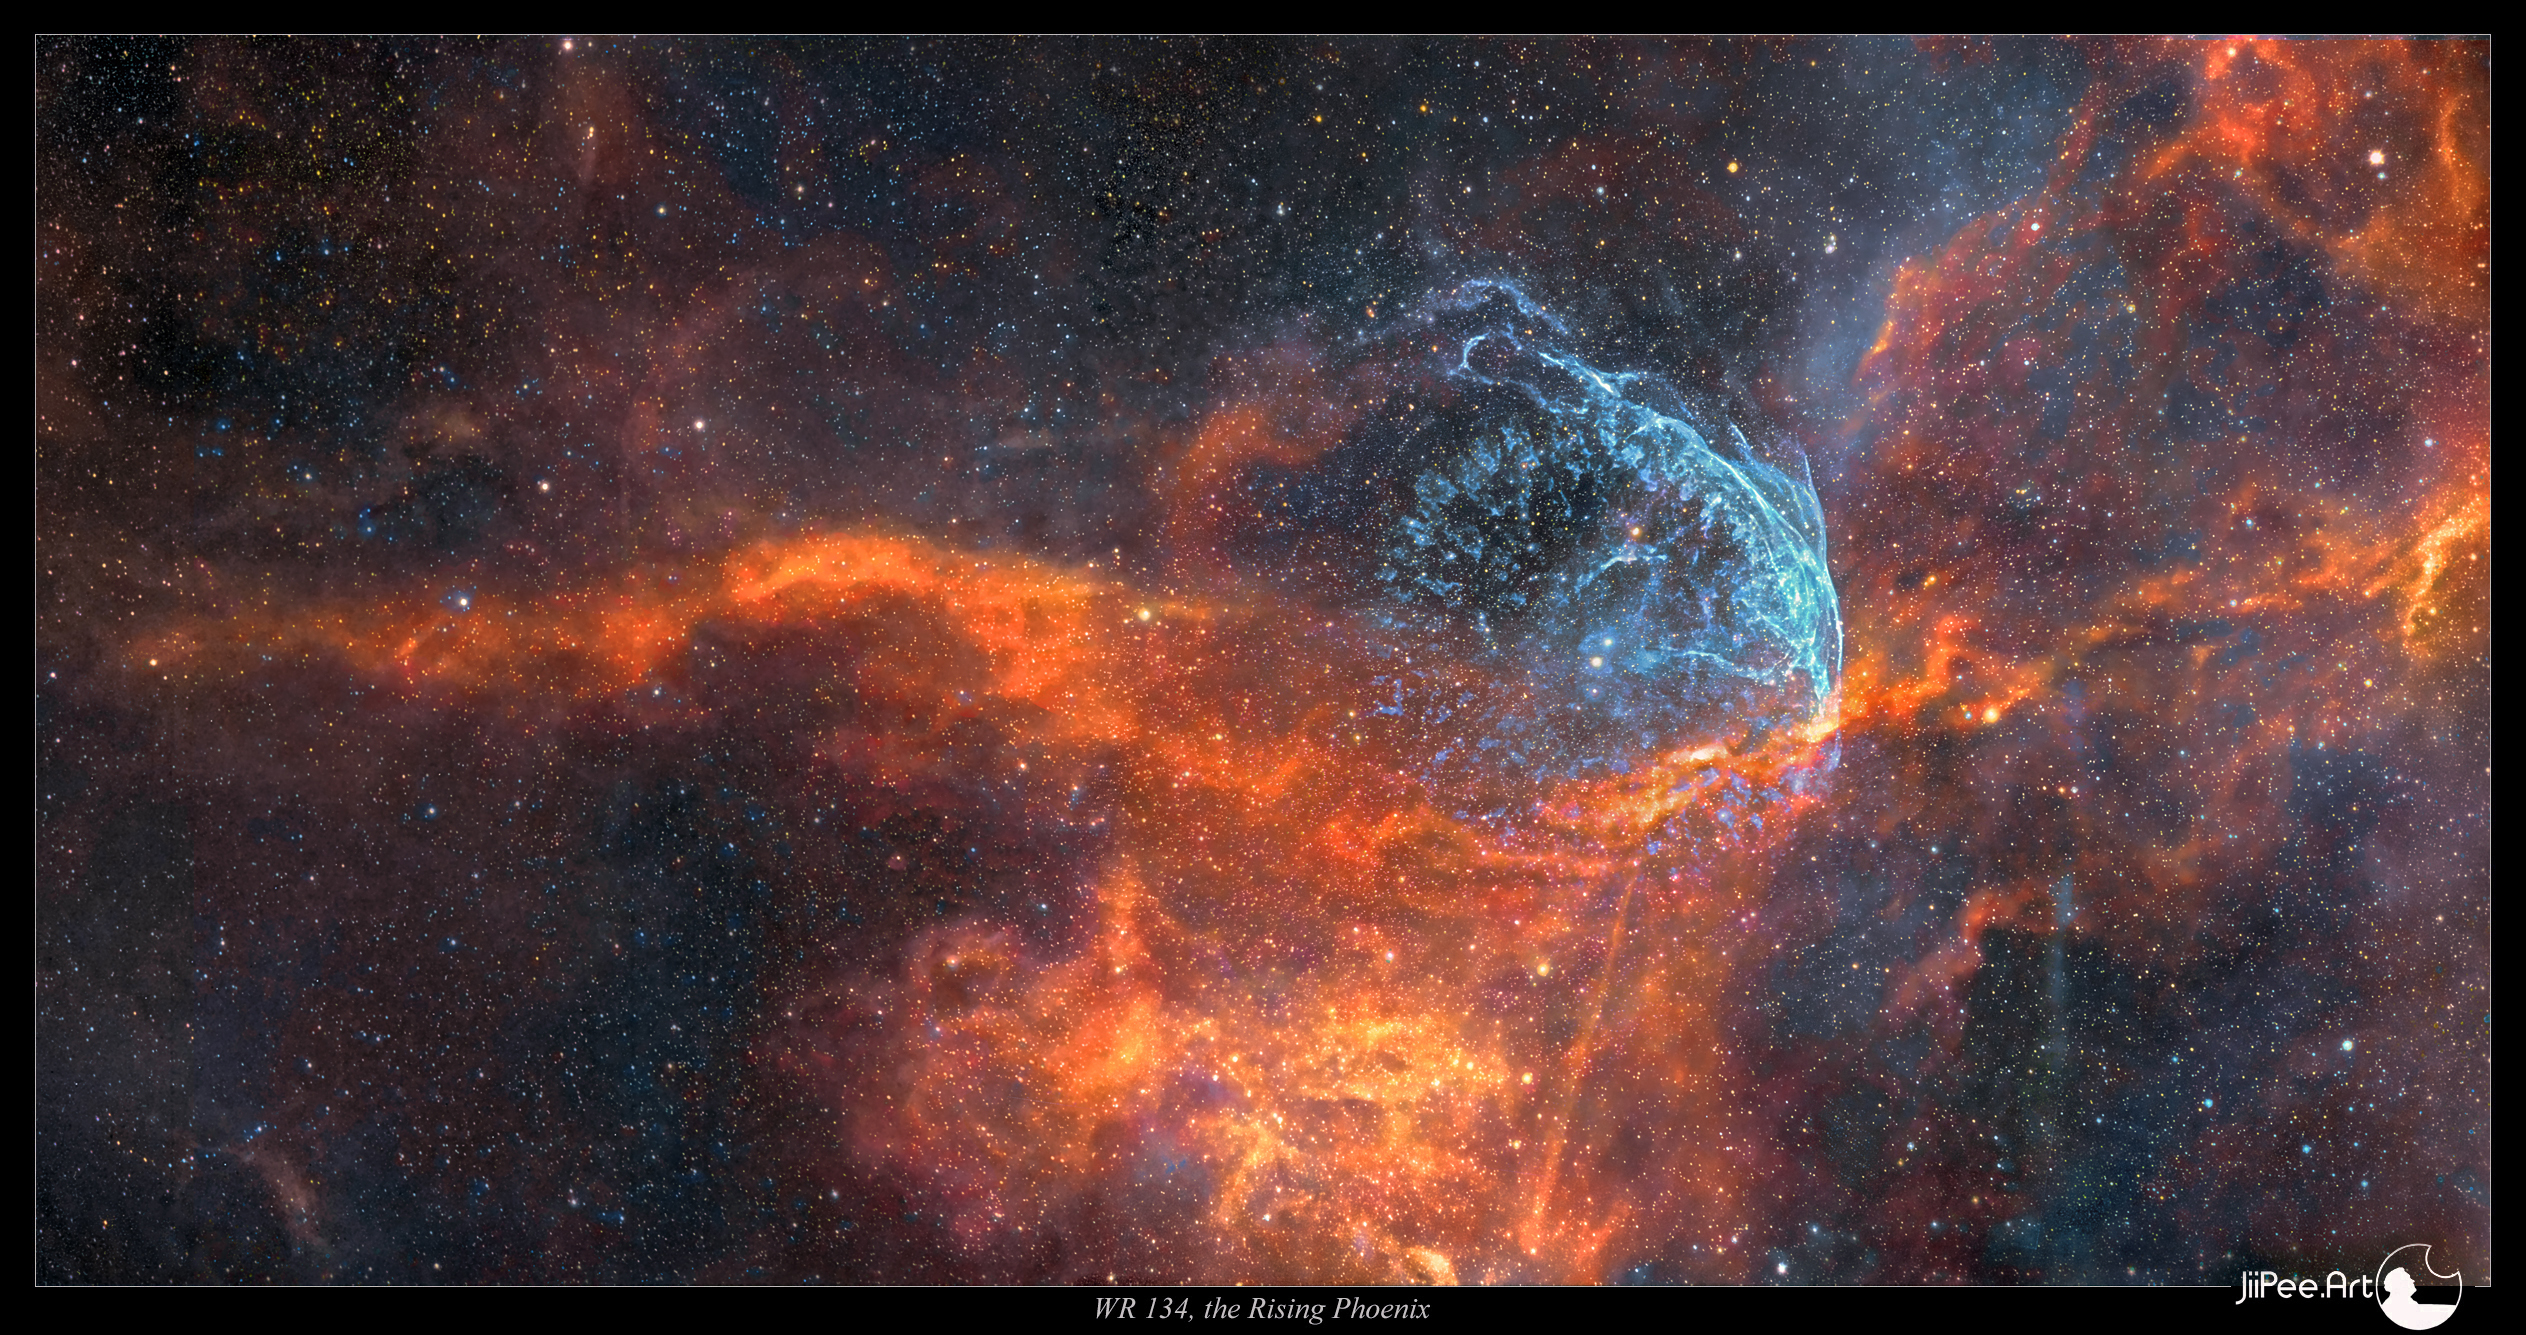
WR 134, The Rising Phoenix
BUY A POSTER
https://astroanarchy.zenfolio.com/
This is the second light for my new imaging setup, the first light image can be seen HERE
For years I have wanted to shoot a long focal length photo of this amazing mass ejecting star in constellation Cygnus, the Swan. Past five years I have done short focal length imaging with camera optics, now it's time to get closer.
I spent several clear nights to capture light emitted by an ionized elements in this gas formation. (H-alpha, S-II and O-III) For compositional reasons I ended up to a two panel mosaic image. Total exposure time is 23h.
When processing the final image I couldn't be noticing how much this formation looked like a mystical creature, the Phoenix Bird. I rarely use any other than official catalog numbers as a name of my photos but this time I simply had to name this composition to "Rising Phoenix".
When art meets science, the results can be beautiful. It can become something more than either of them on their own can ever be.
WR 134 as a Rising Phoenix
Click for a large image, 2500x1300 pixels photo shows the WR 134 like never seen before.
 The photo is in mapped colors from an ionized elements, H-alpha=green, S-II=red and O-III=blue, Original resolution is 12.000 x 7000 pixels
200% Enlarged Portion of the Full Resolution Photo
Click for a full size, 2000x2000 pixels

RISING PHOENIX PAREIDOLIA
Click for a large image

This image shows how I see the Phoenix Bird in this image
Info about the WR 134
WR 134 is a variable Wolf-Rayet star located around 6,000 light years away from us in the constellation of Cygnus. It's surrounded by a faint bubble of glowing ionized oxygen, blown out by the intense radiation and fast solar wind from the star. The star has five times the radius of the sun and it's 400,000 times more luminous.
My Wide Field Photo of the Area
Click for a large image, ~2500x2000 pixels

WR 134 can be seen just up left from the center, at right from the middle lays the Tulip Nebula,
Sh2-101. I took this narrowband photo with Tokina AT-X 300mm f2.8 camera lens @ full open.
The camera was a Apogee Alta U16 with an Astrodon narrowband filter set, exposure time around 10h. This is a one frame image. Note, the "noise" in the background is not a noise, there are millions of stars
This photo is a part of very large mosaic image,
can you find the WR 134 from THIS massive panorama of Northern Milky Way
WR 134, the Rising Phoenix in visual spectrum
Click for a large image, ~2500x1300 pixels
The photo is in visual colors from an ionized elements, H-alpha=red, S-II=red and O-III=blue
A Starless Image of WR 134 Animated
Click for a large image

An Animation about emission layers
Click for a large image
Click for a large image

In this animation the blue O-III channel can be seen alone without other two emission lines in image, H-alpha and S-II, and in a last frame, without other stars but WR134 visible
Technical details
Processing workflow
Image acquisition, MaximDL v5.07.
Stacked and calibrated in CCDStack2.
Deconvolution with a CCDStack2 Positive Constraint, 27 iterations, added at 50% weight
Color combine in PS CS3
Levels and curves in PS CS3.
Imaging optics, Celestron EDGE 14" with 0.7 Focal reducer
Mount, MesuMount Mark II
Cameras, Imaging camera Apogee Alta U9000M and Apogee seven slot filter wheel
Guider camera, Lodestar x 2 and SXV-AO Active Optics @ 5hz
filters, Astrodon 5nm H-alpha, 3nm S-II and 3nm O-III
Total exposure time 23h
H-alpha, 15 x 1200 s, binned 1x1 = 5 h
O-III, 45x 1200 s, binned 1x1 = 15h
S-II, 9 x 1200 s. binned 2x2 = 3h
A single, full scale, 20 min O-III exposure
Click for a full scale image.
This is a dim target, 1200s O-III exposure doesn't show much about the O-III formation around the star WR 134.
 This is one of the test shots after the collimation procedure. Exposure time is 1200s with 3nm O-III filter. Image is calibrated with Dark Frame and Bias corrected Flat Frame. Target is WR 134 in Cygnus. Stars are pinpoint from corner to corner. Optical analysis of this frame can be found at end of THIS blogpost
PS,
Terminator Arrives from the Future
My wife saw the new photo and pointed out, that the blue formation looks like an electric bubble used for a time traveling, as seen in a Terminator movies.

BUY A POSTER
https://astroanarchy.zenfolio.com/
Wednesday, October 9, 2024
FIRST LIGHT FOR MY NEW IMAGING SETUP
After a couple of years I'm able to publish a bran new photo!
This is a first light to my new imaging setup, it took couple of years to get it up and running.
I selected a relatively bright target since I wanted to test the system as soon as possible. The Pelican Nebula in constellation Cygnus, the Swan, is my first target.
The new system has a focal length of 2730mm with a massive 0.7 focal reducer for the Celestron EDGE 14" telescope. The new camera has 12 micron pixel size and it gives me an image scale of 0.91 arc seconds/pixel. (That's perfect for my seeing conditions.) The field of view spans 46.1 x 46.1 arcminutes of sky. (For a scale, Full Moon covers 30x30 arcminutes of sky)
The native resolution of the Apogee Alta U9000M camera is 3056x3056 pixels. I'm using a stacking method that doubles the measures by using the "Drizzle" while imaging. The final image is then 6112x6112 pixels.
Only five hours of light from an ionized hydrogen (H-alpha) is used for this photo. Other two color channels, O-III and S-II, are borrowed from my older long focal length photo of this target taken with Celestron EDGE 11" telescope.
Pelican Nebula
Click the photo to see a 2000x2000 pixel version

Click the image to see a full size version
This photo is in mapped colors from light from an ionized elements, hydrogen = green, sulfur=red and oxygen=blue. (H-alpha, S-II and O-III)
200% Enlarged Portion of the Full Resolution Photo
Click for a full size, 2000x2000 pixels

A Full Size H-alpha Frame
Click the image to see a full size version, 3056x3056 pixels
Click the image to see a full size version, 3056x3056 pixels

This is a stretched stack of fifteen 20min. calibrated H-alpha frames. Collimation wasn't perfect at the time so some oval stars can be seen in lower right corner. Now the collimation is under one arcseconds and the whole frame has pinpoint stars from corner to corner. (It's a large CCD, diagonal is 52mm) Optical analysis at end of this blog post,
Herbig-Haro Objects
Herbig–Haro (HH) objects are bright patches of nebulosity associated with newborn stars. They are formed when narrow jets of partially ionized gas ejected by stars collide with nearby clouds of gas and dust at several hundred kilometers per second. Herbig–Haro objects are commonly found in star-forming regions. (Source, Wikipedia)

I have labeled Herbig-Haro Objects in this closeup from my photo.
Technical details
Processing workflow
Image acquisition, MaxiDL v5.07.
Stacked and calibrated in CCDStack2.
Deconvolution with a CCDStack2 Positive Constraint, 27 iterations, added at 50% weight
Color combine in PS CS3
Levels and curves in PS CS3.
Imaging optics
Celestron EDGE 14" with 0.7 Focal reducer
Mount
MesuMount Mark II
Cameras and filters
Imaging camera Apogee Alta U9000M and Apogee seven slot filter wheel
Guider camera, Lodestar x 2 and SXV-AO Active Optics @ 6hz
Astrodon filters,
5nm H-alpha 3nm S-II and 3nm O-III
Total exposure time
H-alpha, 15 x 1200 s, binned 1x1 = 5 h
O-III, 3x 1200 s, binned 2x2 = 1h
S-II, 3 x 1200 s. binned 2x2 = 1h (
Saturday, September 28, 2024
NEW SETUP FOR MY ASTRONOMICAL NATURE IMAGING WORK
I haven't publish much new images in past two three years since I have had some health problems. Now I'm good as new and can start working again. Past two years I have been slowly building a new imaging platform. I have done some shorter focal length work past six years, now it's time to go closer again.
OPTICS
System is build around Celestron EDGE 14" telescope, I selected this scope due to its light gathering capacity, 356mm diameter and 3910mm native focal length (This very large and heavy 0.7 Reducer is especially made for the EDGE 14") One main difference to normal Celestron EDGE telescope is that I have added a secondary mirror focuser (by Optec) to get rid of a mirror flop. It can be a problem, especially with a heavy mirror. Bottom line, this scope has an excellent optical quality. There is some optical analysis and a single full scale 20min frame at end of this post.
In future I can add a "HyperStar system" to replace secondary mirror and use this telescope as a fast f2 astrograph.

Secondary mirror focuser, Note a curved vane for the flat power/data cable, no diffraction spikes!
The focuser is made all aluminium, it's really robust and easy to collimate.
The focuser is made all aluminium, it's really robust and easy to collimate.
MOUNT
I ended up to a MESU Mount MARK II since it has 100kg capacity at imaging work with a periodic error less than 4 arcseconds peak-to-peak, impressive numbers indeed. It also has zero lash back due to its friction drive system. One of the nice features is the 80mm diameter channel for all of the cords, trough the Ra and Dec axes, no more dragging cords!
The pillar I ordered with the mount is bended knee pillar type, no meridian flip is needed and telescope can track whole sky without stopping. The pillar came in easy to handle parts and assembly was very straight forward, the assembled pillar is very rigid under the weight of heavy telescope, counter weights and accessories.
Mesu mount is absolute beautiful engineering work. Support from manufacture is also very good. I had some minor problems with settings at first but they get solved in no time after we went it trough with remote connection, while on site. Bottom line, money wise this mount is a real bargain, if compared its features to any other brand or model of mount.

Bended Knee Pillar angle at my location 65 degree North.
Counter weights are stainless steal weight lifting weights. (~35kg)
.jpg)

CAMERA
The Main camera is a "new" Apogee Alta U9000M with Apogee Filter wheel. It's a second hand camera originally used for the microscopic work and it looks like a bran new, There wasn't any mechanical shutter but I moved a shutter from my old Apogee Alta U16 to this new camera. (My old camera died to an old age)
The camera has 12 micron pixels, it's a perfect match to this optical configuration giving an image scale of 0.91 arcseconds per pixel. The full image spans 46.1 x 46.1 arcminutes of sky. (One degree is 60 arcminutes and Full Moon spans around 30 arcminutes of sky)
INSTRUMENT ROTATOR
At first time I have added an instrument rotator to the imaging path. I haven't use any rotator earlier since there is always some flexure.
The Wanderer Astro Rotator Pro has absolute zero flexure by the manufacture. I was very skeptical to this since if it moves, it will flex. It turned out, that there is a patented system based on neodymium magnets around the light path holding everything tightly together when rotator moves.
After measuring carefully everything with the CCD-inspector software from test exposures under the starfield I can say, it really has no flexures at all. It's only 18 mm thick and fit to my limited back focus nicely. The rotator can handle flawlessly all the heavy load I have placed behind it.
ACTIVE OPTIC UNIT
Maybe an overkill but I have added an active optics unit to the light path. It's SXV-AO from Starlight Xpress UK.
I have had really good experiences doing long focal length imaging with AO unit during the years. It doesn't correct the actual seeing so much but it corrects every small or big error from heat bubbles and vibrations from heavy traffic, wind, etc. and it does that really really fast.
It's as easy to use as any OAG, especially after I had an instrument rotator. With 14" scope, I can guide around 10 HZ by using mag 11 guide star. The MESU Mount is really good but there is lots of mass to move when guiding corrections are made. With AO there is just a small refracting glass element to move instead of telescope and heavy accessories.
DATA & POWER BOX
An other new accessory is power and data box from Wanderer Astro. It makes the system less chaotic with all the data and power cords. Also controlling power and data connections can be done remotely in one software. It can handle nearly 20 amp at peak power.
DEW BUSTER
There is also my old Dew Buster installed to the telescope. it can keep the temperature just little over the dew point, this prevent the heat current. Raising warm air inside the tube will ruin the image, if heater is even slightly too warm.
FAN
I added a 70 mm computer fan to the telescopes air went to reduce the cool down time. There is an air filter in the went to prevent the dust getting inside the OTA. I can control the fan speed by the Power Box software.
QHY POLEMASTER
This is a new addition too, I was amazed how easy it was to use. Polar align took maybe 15 min and it's easy to redo at any time needed. here is a REVIEW about this little helper,
.jpg)
Telescope elements labeled
.jpg)
QHY Polemaster, lens cover removed and ready for the action.
LENS COVER
As a last item here is a lens cover for Celestron EDGE 14" telescope. It's a simple and a must accessory to prevent dust in the collector lens. How ever, in my case there is a secondary mirror focuser sticking out and it prevents to use the standard Celestron aluminium cover over the telescope.
I solved the problem by cutting a circular hole in the lens cover. After that, I bought a steel bowl from local market ( it was just 5 € or about 5 $) I sprayed it matt black and glued it to the cover with an elastic, rubber like, superglue.

A steel bowl glued over the hole in the lens cover.
AN UPDATE, 09.10.2024,
THE FIRST LIGHT IMAGE
THE FIRST LIGHT IMAGE
Click for a full size image, ~2000x2000 pixels

https://astroanarchy.blogspot.com/2024/10/first-light-for-my-new-imaging-setup.html
OPTICAL ANALYSIS FROM THE CCDINSPECTOR APP

The optical collimation is as good as I get it in my seeing conditions and the optical tube hold it perfectly since the main mirror is always locked down and focusing is done with the Optec Secondary Mirror Focuser only.

This is a 3D-plot of field curvature from the CCDInspector app of Celestron Edge 14" with 0.7 Focal Reducer and Apogee Alta U9000M with 12 micron pixels. This configuration produce a very flat field and stars are sharp from edge to edge in the whole field. This is impressive especially since the CCD in Alta U9000M is so large, about 37x37mm.
A single full scale 20 min O-III exposure used for the optical analysis
Tuesday, August 8, 2023
Grand Mosaic of the Milky Way is now large than ever
Last spring, I published a large mosaic photo of the Milky Way, and it went viral!
You can read a blog post about it here: Gigapixel Mosaic of the Milky Way.
You can read a blog post about it here: Gigapixel Mosaic of the Milky Way.
Now, I have an even larger version of the mosaic, spanning an impressive 145 degrees of sky—from Orion to Cygnus. The previous version covered 120 degrees.
This new panorama was published today for the first time in the world by the Finnish Tähdet ja Avaruus magazine.
This new panorama was published today for the first time in the world by the Finnish Tähdet ja Avaruus magazine.
The Grand Mosaic of the Milky Way Galaxy II
This is the only photograph in the world that captures the Northern Milky Way with such incredible depth and detail—and now, it’s larger than ever!
Click for a large image, 7000 x 1150 pixels

Over a decade of work, 1500 hours of exposure, and 301 individual frames—all captured in a single image. Note: An image of the Full Moon is included in the lower left corner for scale.
NEW! ZOOMABLE IMAGE
23.000 x 3500 pixels
You can now pan and zoom around the large image!
For better accessibility and to save bandwidth, the photo size has been reduced to 40,000 × 6,000 pixels from the original 120,000 × 18,000 pixels.
Note: All material on this blog is copyrighted. Any use without the author's permission is strictly prohibited.

IMAGE SPECS
- Panorama spans 145 x 22 degrees of sky (Full Moon covers 0,5 degrees of sky)
- Resolution 120.000 x 18.000 pixels
- Photos has 2.2 gigapixels in it, the spatial resolution is equal to 8.8 gigapixel image from color camera since all the channels are in native resolution.
- There are least nine confirmed supernova remnants in this panorama
- About 25 million stars are visible in the photo
- Distance to the nebulae in the image between 350 to 20.000 light years
- Exposure time over 1500 hours between 2009 - 2021
- 301 individual images are stitched together seamlessly
- It took about 12 years to finalize this photo
- Narrowband image from light of ionized elements, hydrogen = green, sulfur = red and oxygen = blue
- Processing time for the whole panorama, way too large part of my life
ORIENTATION
Click for a large image

CLOSEUP SERIES
Click for the large images, it's worth it!
A zoom in series from upper left of the large panorama image above to gives an idea about the overall resolution of the large mosaic image.

All the dots are stars, not the noise!


Closeup of the supernova remnant IC 443
DETAILS
Click for a large image, 5000 x 1500 pixels

There are several very dim and practically unimaged supernova remnants in this panorama.
NOTE, all material in this blog is under copyright, any kind of usage without authors permission is forbidden.
NOTE, all material in this blog is under copyright, any kind of usage without authors permission is forbidden.
NEW! ZOOMABLE IMAGE
11500 x 3400 pixels
11500 x 3400 pixels
The reason I continue this slow and meticulous work is simple: endless curiosity. I love revealing the true wonder of our universe, showing just how extraordinary our world really is. Every time I look through my camera, I am in awe of what I see, and capturing that beauty is my purpose as an artist. For the past 25 years, I have been driven by the need to fulfill my passion.
This image showcases a vast section of the Northern Milky Way in high resolution. Beyond its sheer size, it reaches incredible depths, revealing exceptionally faint and previously uncharted nebulae across the galactic plane. One of the main motivations behind this massive panorama project was the simple fact that an image like this did not exist anywhere in the world. I needed a photo like this—a map to guide my future explorations.
Unveiling the hidden beauty of our universe is my passion. I stand in rapt adoration before everything I capture. When art meets science, the results can be truly mind-blowing.
HOW?
Step 1,
PLANNING
Astrophotography is an incredibly time-intensive process. To create a color image, I must capture each target at least three times, using different filters to obtain the necessary color channels. Additionally, exposure times can be extremely long—some of the faintest objects require hundreds of hours of exposure. On average, each image in this project took around 25 hours to complete. Every step must be carefully pre-planned to achieve the best results.
I began planning this project over a decade ago, jotting down my first ideas in a small black Moleskine notebook. Even then, I knew it would take ten years to complete—but that never discouraged me. I love long-term projects; they provide both purpose and a goal, driving my work as an artist.
I had to develop many new working methods to successfully manage this massive project. These methods had to be perfected before starting, because once the project was underway, any major changes would have required canceling it entirely.
Every detail had to be precisely planned—from the composition and its alignment with Milky Way structures to numerous technical aspects, such as handling data from different optical systems with varying spatial resolutions.
I won’t go too deep into the technical details, as the complex techniques involved are simply tools—a means to create my art.

 A notebook pages from 2009
I like to compare my long imaging projects to a relationship. But in this case, it wasn’t just between two entities—it was like being in a relationship with an entire family, a large and complex clan. Just like in a family, there might be a difficult uncle or some other challenging personalities, but you have to learn to work with them. I felt the same way while stitching together the pieces of this mosaic. Some frames simply didn’t fit the way I wanted, forcing me to reshoot them, which often took months or even years. But in the end, everything came together seamlessly, without any visible gaps.
I am a perfectionist when it comes to my photography. While this trait is essential for achieving great results, it can also be a challenge. This photo could have been finished five years earlier if I had been willing to leave out some of the extremely faint targets or settle for less detail—but I simply couldn’t.
Yet, when the image was finally complete, I didn’t think about all those sleepless, freezing nights. Instead, I remembered the pure joy I felt when the most challenging parts finally came together.


Finally, in 2019, after so many years of work, I had gathered enough material to begin assembling the final mosaic image. The process took nearly two years due to the complex structure of the mosaic and the sheer volume of image data.
At the same time, I also had to capture additional missing material to complete the mosaic, making the process even more time-consuming. But every piece was essential to ensure the final image was as detailed and seamless as possible


 This image collection show the evolution of my Large Mosaic of the Milky Way Galaxy.
Click for a large image

I was certain I had captured that particular section three years ago, yet no matter how hard I searched, I couldn’t find it on any of my hard drives. As a result, I had to endure several painfully long weeks waiting for the right conditions to reshoot the missing piece. Only then could I finally complete this massive cosmic puzzle.
My little black notebook and first plans
for the project at 2008

A notebook page opening from Autumn 2008
I had to develop many new working methods to successfully manage this massive project. These methods had to be perfected before starting, because once the project was underway, any major changes would have required canceling it entirely.
Every detail had to be precisely planned—from the composition and its alignment with Milky Way structures to numerous technical aspects, such as handling data from different optical systems with varying spatial resolutions.
I won’t go too deep into the technical details, as the complex techniques involved are simply tools—a means to create my art.


I like to compare my long imaging projects to a relationship. But in this case, it wasn’t just between two entities—it was like being in a relationship with an entire family, a large and complex clan. Just like in a family, there might be a difficult uncle or some other challenging personalities, but you have to learn to work with them. I felt the same way while stitching together the pieces of this mosaic. Some frames simply didn’t fit the way I wanted, forcing me to reshoot them, which often took months or even years. But in the end, everything came together seamlessly, without any visible gaps.
I am a perfectionist when it comes to my photography. While this trait is essential for achieving great results, it can also be a challenge. This photo could have been finished five years earlier if I had been willing to leave out some of the extremely faint targets or settle for less detail—but I simply couldn’t.
Yet, when the image was finally complete, I didn’t think about all those sleepless, freezing nights. Instead, I remembered the pure joy I felt when the most challenging parts finally came together.
Step 2,
COLLECTING THE MATERIAL
2009 - 2021
NOTE
Each photo in the posters is a slow and complex battle of its own
Click for a large image


Some of my individual photos shot between 2009 and 2021 are collected here. Most of them are now part of the Large Mosaic Image of the Milky Way galaxy.
NOTE, all material in this blog is under copyright, any kind of usage without authors permission is forbidden.
NOTE, all material in this blog is under copyright, any kind of usage without authors permission is forbidden.
Step 3,
2019 -2021, SOLVING THE BIG PUZZLE
Finally, in 2019, after so many years of work, I had gathered enough material to begin assembling the final mosaic image. The process took nearly two years due to the complex structure of the mosaic and the sheer volume of image data.
At the same time, I also had to capture additional missing material to complete the mosaic, making the process even more time-consuming. But every piece was essential to ensure the final image was as detailed and seamless as possible
I used the Cartes du Ciel, a star map software, for planning and a
preliminary fit the individual frames.


EVOLUTION OF THE LARGE MOSAIC
BETWEEN 2009-2021
Click for a large image

Step 4,
ALL THE PIECES OF A
COSMIC PUZZLE CONNECTED
Click for a large image

The final photo is over 120 000 pixels wide and it has 301 individual mosaic panel. Most of the objects are originally shot as a self-standing artworks, due to that, they
are in various positions and angles to each other. This is the reason, why the
final mosaic structure looks so complicated, as can be seen in this image.
AND FINALLY
At October 2021, after 12 years, 1500 hours of exposures and countless hours of work
The Grand Mosaic of the Milky Way Galaxy II
Click for a full size image, 7000 x 4300 pixels
NOTE, all material in this blog is under copyright, any kind of usage without authors permission is forbidden.
NOTE, all material in this blog is under copyright, any kind of usage without authors permission is forbidden.
I was certain I had captured that particular section three years ago, yet no matter how hard I searched, I couldn’t find it on any of my hard drives. As a result, I had to endure several painfully long weeks waiting for the right conditions to reshoot the missing piece. Only then could I finally complete this massive cosmic puzzle.
The Mosaic Work, technical info
Optical Configurations
Over the years, I have used several optical setups to capture this mosaic.
- Up until 2014, I worked with a Meade LX200 GPS 12" telescope, a QHY9 astro camera, Canon EF 200mm f/1.8 optics, and a Baader narrowband filter set.
- Since 2014, I have used a 10Micron 1000 equatorial mount, an Apogee Alta U16 astro camera, a Tokina AT-X 200mm f/2.8 lens, and an Astrodon 50mm square narrowband filter set.
I have also captured many high-resolution details using longer focal lengths:
- Before 2014: Meade 12" telescope with a reducer
- After 2014: Celestron EDGE 11" with a reducer
- Guide cameras: Lodestar and later Lodestar II
I chose my current setup as the base tool for this project because it offers a high resolution combined with an exceptionally large field of view. Additionally, it collects photons very efficiently due to being undersampled, allowing extremely faint background nebulosity to become visible in a relatively short exposure time—often, a 30-minute frame is sufficient.
Mosaic Processing
I assemble all my mosaic images in Photoshop. Aligning the individual panels using stars as reference points is fairly straightforward. Over the years, my processing workflow has become so consistent that only minor adjustments—such as small tweaks to levels, curves, and color balance—are needed between frames.
To enhance details, I have incorporated many high-resolution subframes into the mosaic (see the mosaic map at the top of the page). To seamlessly integrate longer focal length images with shorter focal length data, I developed a custom method:
- Upscale the short focal length frames by ~25% to provide more room for high-resolution data.
- Match the high-resolution image to the mosaic, using stars as reference points.
- Remove all tiny stars from the high-resolution image to prevent optical distortions.
- Separate the stars from the low-resolution image and blend the starless high-resolution data with the starless low-resolution frame.
- Reintroduce the removed low-resolution stars on top of everything—ensuring zero data loss and maintaining a uniform star field across the entire mosaic.
This method eliminates optical distortions, which are especially noticeable in dense star fields. Since all stars in the final image originate from the same optical setup, I avoid inconsistencies. I use the same star removal technique as in my Tone Mapping Workflow to achieve this seamless integration.
Subscribe to:
Posts (Atom)


