
Showing posts sorted by date for query cygnus mosaic. Sort by relevance Show all posts
Showing posts sorted by date for query cygnus mosaic. Sort by relevance Show all posts
Tuesday, August 8, 2023
Grand Mosaic of the Milky Way is now large than ever
Last Spring I published a large mosaic photo of the Milky Way and it went viral!
A blog post about it can be seen here: https://astroanarchy.blogspot.com/2021/03/gigapixel-mosaic-of-milky-way-1250.html
I have now even a large version of it, the mosaic spans 145 degrees of sky from Orion to Cygnus, the previous version showed 120 degrees of sky.
The new panorama image was published today in Finnish Tähdet ja Avaruus Magazine
The new panorama image was published today in Finnish Tähdet ja Avaruus Magazine
at first time in the World.
This and other of my astronomical photographs can be seen in my NIGHT FEVER exhibition in Helsinki.
This and other of my astronomical photographs can be seen in my NIGHT FEVER exhibition in Helsinki.
.
The Grand Mosaic of the Milky Way Galaxy II
This is the only photo in the World showing the Northern Milky Way so deep and detailed, now it's large than ever!
Click for a large image, 7000 x 1150 pixels

Over a decade, 1500 exposure hours and 301 individual frames visible in one image
NOTE, image of the Full Moon as a scale in lover left corner.
NOTE, image of the Full Moon as a scale in lover left corner.
NEW! ZOOMABLE IMAGE
23.000 x 3500 pixels
You can now pan and zoom around the large image. Photo size is reduced to 40.000 x 6000 pixels from original 120.000 x 18.000 pixels to save some bandwidth.
NOTE, all material in this blog is under copyright, any kind of usage without authors permission is forbidden.
NOTE, all material in this blog is under copyright, any kind of usage without authors permission is forbidden.

IMAGE SPECS
- Panorama spans 145 x 22 degrees of sky (Full Moon covers 0,5 degrees of sky)
- Resolution 120.000 x 18.000 pixels
- Photos has 2.2 gigapixels in it, the spatial resolution is equal to 8.8 gigapixel image from color camera since all the channels are in native resolution.
- There are least nine confirmed supernova remnants in this panorama
- About 25 million stars are visible in the photo
- Distance to the nebulae in the image between 350 to 20.000 light years
- Exposure time over 1500 hours between 2009 - 2021
- 301 individual images are stitched together seamlessly
- It took about 12 years to finalize this photo
- Narrowband image from light of ionized elements, hydrogen = green, sulfur = red and oxygen = blue
- Processing time for the whole panorama, way too large part of my life
ORIENTATION
Click for a large image

CLOSEUP SERIES
Click for the large images, it's worth it!
A zoom in series from upper left of the large panorama image above to gives an idea about the overall resolution of the large mosaic image.

All the dots are stars, not the noise!


Closeup of the supernova remnant IC 443
DETAILS
Click for a large image, 5000 x 1500 pixels

There are several very dim and practically unimaged supernova remnants in this panorama.
NOTE, all material in this blog is under copyright, any kind of usage without authors permission is forbidden.
NOTE, all material in this blog is under copyright, any kind of usage without authors permission is forbidden.
NEW! ZOOMABLE IMAGE
11500 x 3400 pixels
11500 x 3400 pixels
The reason I keep doing my slow work is an endless
curiosity, I love to show how wonderful our world really is. That's how I feel at front of
everything I'm able to see through my photography.
Photographed area of sky is showing a large part of Northern Milky Way in high resolution. Beside the size, it's very deep, meaning that it shows extremely dim and unimaged nebulae across the galaxy plane. One of the reasons for this massive panorama project was a fact, that there was no such an image anywhere in the world. I had personal need for the photo like this since I wanted to use it as a map to the new adventures.
Revealing the hidden beauty of our universe is my passion. I stand in rapt adoration before all that I see. When art meets science, the results can be quite mind-blowing.
HOW?
Step 1,
PLANNING
Astronomical
photography is a very time-consuming process. If I want to have a color image,
I have to shoot each target least three times through a different filter to
have all three-color channels needed for color image. Also, the exposure times
can be very long, in my case even hundreds of hours for some very dim
objects. An average exposure time is around 25 hours per image. Also everything has
to be carefully pre planned.
I made imaging plans over ten years ago, I
wrote first ideas about this imaging project to my little black Moleskin
notebook. I was aware at the time, that it will take a decade to be
finalized but it doesn't bother me since I love long projects, they are
giving a purpose and the goal to my work as an artist.
My little black notebook and first plans
for the project at 2008

A notebook page opening from Autumn 2008
I needed to develop many new working
methods to be able to control this massive project. I needed to get them ready
first since ones started, the project can't be changed anymore without
canceling it. Everything needs to be spot on, the planning of composition and
its relation to the Milky Way objects, many technical aspects, like how to
handle a data from different optics with a different spatial resolution etc. I
won't go very deep into technical details, since the complex technique needed
is just a tool to make my art.


I like to compare my long imaging projects to a relationship. This project was like that too but not just between two entities. This is like a relationship with the whole family, a large Klan. There might be a nasty drunk uncle or other difficult persons in a family but
you must be able to get along with them too. I felt like that, when I was stitching pieces
together and some of them didn't fit the way I wanted and I had to reshoot them. That easily took months, or years. but at the end, everything slides together smoothly without any visible seams.
I'm a perfectionist, when dealing with my photography. This feature is essential for the great results but it also can cause problems. This photo could be ready maybe five years earlier, if I could leave some extremely dim targets out or leave them less detailed but I simply couldn't do that. When the photo was ready, I didn't remember all of those sleepless cold nights, I remembered the joy I felt when the most difficult parts got ready.
Step 2,
COLLECTING THE MATERIAL
2009 - 2021
NOTE
Each photo in the posters is a slow and complex battle of its own
Click for a large image


Some of my individual photos shot between 2009 and 2021 are collected here. Most of them are now part of the Large Mosaic Image of the Milky Way galaxy.
NOTE, all material in this blog is under copyright, any kind of usage without authors permission is forbidden.
NOTE, all material in this blog is under copyright, any kind of usage without authors permission is forbidden.
Step 3,
2019 -2021, SOLVING THE BIG PUZZLE
Finally at 2019, after so many years, I had enough material to start
working with the final mosaic image. The work took about two years due to
complex mosaic structure and massive amount of image material. I also
needed to shoot lots of missing material for the mosaic at the same time.
I used the Cartes du Ciel, a star map software, for planning and a
preliminary fit the individual frames.


EVOLUTION OF THE LARGE MOSAIC
BETWEEN 2009-2021
Click for a large image

Step 4,
ALL THE PIECES OF A
COSMIC PUZZLE CONNECTED
Click for a large image

The final photo is over 120 000 pixels wide and it has 301 individual mosaic panel. Most of the objects are originally shot as a self-standing artworks, due to that, they
are in various positions and angles to each other. This is the reason, why the
final mosaic structure looks so complicated, as can be seen in this image.
AND FINALLY
At October 2021, after 12 years, 1500 hours of exposures and countless hours of work
The Grand Mosaic of the Milky Way Galaxy II
Click for a full size image, 7000 x 4300 pixels
NOTE, all material in this blog is under copyright, any kind of usage without authors permission is forbidden.
NOTE, all material in this blog is under copyright, any kind of usage without authors permission is forbidden.
Getting to a last piece of the puzzle is always a thrilling process. Many
of us know, how frustrating it can be to notice, that one piece is missing. That's
happened to me too. I was sure that I shot the piece about three years ago
but couldn't find it anywhere from my hard drives. As a result, I had to wait
several extremely long weeks to be able to reshoot the missing piece to get
this massive puzzle finalized.
The Mosaic Work, technical info
I have used several optical configurations for this mosaic image during the years. Up to 2014 I was using an old Meade LX200 GPS 12" scope, QHY9 astrocam, Canon E200mmf1.8 camera optics and baader narrowband filter set.
After 2014 I have had 10-micron 1000 equatorial mount, Apogee Alta U16 astro camera, Tokina AT-x 200mm f2.8 camera lens and the Astrodon 50mm square narrowband filter set.
I have shot many details with a longer focal length, before 2014 by using Meade 12" scope with reducer and after 2014 Celestron EDGE 11" and reducer. Quider camera has been Lodestar and Lodestar II.
I took my current toolset as a base tool since it has a relatively high resolution combined to a very large field of view. Also it collects photons very quickly since it's undersampled and I can have very dim background nebulosity visible in very short time (many times 30 min frame is enough)
I do all my mosaic work under the PhotoShop, Matching the separate panels by using stars as an indicator is kind of straight forward work. My processing has become so constant, that very little tweaking was needed between separate frames, just some minor levels, curves and color balance.
I have used lots of longer focal length sub-frames in my mosaic to boost details. (See the mosaic map at top of the page) To match them with shorter focal length shots I developed a new method.
Firstly I upscale the short focal length frames about 25% to have more room for high resolution images.Then I match the high res photo to a mosaic by using the stars as an indicator. After that I remove all the tiny stars from the high res image. Next I separate stars from low res photo and merge the starless high res data to a starless low res frame. And finally I place the removed low res stars back at top of everything with zero data lost. Usually there are some optical distortions and it's seen especially in a star field. Now all my stars are coming from a same optical setup and I don't have any problems with distortions. (I'm using the same star removal technique as in my Tone Mapping Workflow)
Wednesday, December 21, 2022
Milky Way, 12 years, 1250 hours of exposures and 125 x 22 degrees of sky THIS IS A PERMANENT POST, NEW POSTS ARE AFTER THIS POST
You can buy prints by using the contact form at right
It took nearly twelve years to collect enough data for this high resolution gigapixel class mosaic image of the Milky Way. Total exposure time used is around 1250 hours between 2009 and 2021.
" I can hear music in this composition, from the high sounds of sparcs and bubbles at left all the way to a deep and massive sounds at right."

From Taurus to Cygnus
Click for a large image, it's really worth it! (7000 x 1300 pixels)


Image in mapped colors from the light emitted by an ionized elements, hydrogen = green, sulfur = red and oxygen = blue. NOTE, the apparent size of the Moon in a lower left corner. NOTE 2, there are two 1:1 scale enlargements from the full size original at both ends of the image
NEW, A HD-video from Germany shows my photo in full glory
https://www.youtube.com/watch?v=D-Z60eZ4yqM
(Video in Germany but images are the international language)
Close ups form the parts of the Grande Mosaic
NEW, A HD-video from Germany shows my photo in full glory
https://www.youtube.com/watch?v=D-Z60eZ4yqM
(Video in Germany but images are the international language)
Close ups form the parts of the Grande Mosaic
Cygnus side of the mosaic, https://astroanarchy.blogspot.com/2020/12/cygnus-project-grande-finale-for-now.html
Cassiopeia side of the mosaic, https://astroanarchy.blogspot.com/2021/01/mosaic-image-gets-large-400-hours-and.html
Taurus side of the mosaic, https://astroanarchy.blogspot.com/2021/02/a-new-mosaic-image-from-taurus-to.html

A closeup from large panorama to show the overall resolution
Click for a large image
 The California Nebula, NGC 1499, can be seen at bottom left of the large mosaic image.
There are about 20 million individual stars visible in the whole mosaic image.

There are about 20 million individual stars visible in the whole mosaic image.
Orientation and details
Click for a large image
Click for a large image


Imaging info
Image spans 125 x 22 degrees of the Milky About 20 million individual stars are visible in my photo!
Image spans 125 x 22 degrees of the Milky About 20 million individual stars are visible in my photo!
It took almost twelve years to finalize this mosaic image. The reason for a long time period is naturally the size of the mosaic and the fact, that image is very deep. Another reason is that I have soht most of the mosaic frames as an individual compositions and publish them as independent artworks. That leads to a kind of complex image set witch is partly overlapping with a lots of unimaged areas between and around frames. I have shot the missing data now and then during the years and last year I was able to publish many sub mosaic images as I got them ready first.
My processing workflow is very constant so very little tweaking was needed between the mosaic frames. Total exposure time is over 1250 hours. Some of the frames has more exposure time, than others. There are some extremely dim objects clearly visible in this composition, like a extremely dim supernova remnant W63, the Cygnus Shell. It lays about six degrees up from North America nebula and it can be seen as a pale blue ring. I spent about 100 hours for this SNR alone. An other large and faint supernova remnant in Cygnus can be seen at near right edge of the image. G65.5+5.7 is as large as more famous Veil nebula. There are over 60 exposure hours for this SNR alone. (Veil SNR is just outside of the mosaic area for compositional reasons but can be seen in "Detail" image above.)
My processing workflow is very constant so very little tweaking was needed between the mosaic frames. Total exposure time is over 1250 hours. Some of the frames has more exposure time, than others. There are some extremely dim objects clearly visible in this composition, like a extremely dim supernova remnant W63, the Cygnus Shell. It lays about six degrees up from North America nebula and it can be seen as a pale blue ring. I spent about 100 hours for this SNR alone. An other large and faint supernova remnant in Cygnus can be seen at near right edge of the image. G65.5+5.7 is as large as more famous Veil nebula. There are over 60 exposure hours for this SNR alone. (Veil SNR is just outside of the mosaic area for compositional reasons but can be seen in "Detail" image above.)
The Mosaic Work, technical info
I took my current toolset as a base tool since it has a relatively high resolution combined to a very large field of view. Also it collects photons very quickly since it's undersampled and I can have very dim background nebulosity visible in very short time (many times 30 min frame is enough)
I do all my mosaic work under the PhotoShop, Matching the separate panels by using stars as an indicator is kind of straight forward work. My processing has become so constant, that very little tweaking is needed between separate frames, just some minor levels, curves and color balance.
I have used lots of longer focal length sub-frames in my mosaic to boost details. (See the mosaic map at top of the page) To match them with shorter focal length shots I developed a new method.
Firstly I upscale the short focal length frames about 25% to have more room for high resolution images.Then I match the high res photo to a mosaic by using the stars as an indicator. After that I remove all the tiny stars from the high res image. Next I separate stars from low res photo and merge the starless high res data to a starless low res frame. And finally I place the removed low res stars back at top of everything with zero data lost. Usually there are some optical distortions and it's seen especially in a star field. Now all my stars are coming from a same optical setup and I don't have any problems with distortions. (I'm using the same star removal technique as in my Tone Mapping Workflow)
Closeups from large panorama to show the overall resolution
Click for a large image


IC 405 6 410 area
 IC 1396

Click for a large image

Image in mapped colors from the light emitted by an ionized elements, hydrogen = green, sulfur = red and oxygen = blue.
A 1:3 resolution close up from the photo above
Click for a large image,
Click for a large image,

A closeup from the main image shows the Sharpless 124 at up and the Cocoon nebula with a dark gas stream at bottom.
Sharpless 205, NGC 1491 and Lynds Bright Nebula 696

IC 405 6 410 area


From Bubble to Cave Nebula


Image info, https://astroanarchy.blogspot.com/2020/03/from-bubble-to-cave-nebula-area.html


 Not an igloo, this is reality of astro photographing in Finland
The tulip nebula area

The Tulip Nebula, Sh2-101, can be seen at center right, there is also a black hole Cygnus X-1
The blog post with technical details can be seen here, https://astroanarchy.blogspot.com/2020/10/the-tulip-nebula-in-cygnus-sh2-101.html
The blog post with technical details can be seen here, https://astroanarchy.blogspot.com/2020/10/the-tulip-nebula-in-cygnus-sh2-101.html
The supernova remnant G65.3+5.7

More info about this image here, https://astroanarchy.blogspot.com/2020/11/g65357-large-supernova-remnant-in_22.html
My Observatory,

Wednesday, January 5, 2022
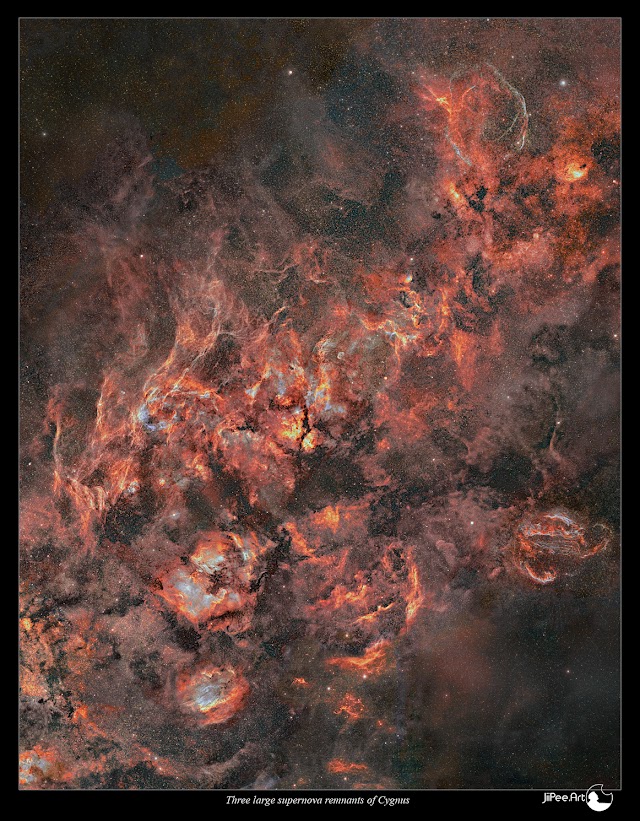
Cygnus Mosaic in Visual Colors
Three Musketeers of Swan
Deepest and most detailed image showing the whole constellation Cygnus ever taken
There are three large supernova remnants visible in this image. The Veil nebula is the most bright of them, other two are really dim and diffused. I spent about 200 exposure hours for those two alone to show them well. I call this trio to the Three musketeers.
I like the new composition, it's very dynamic and shows the whole constellation Cygnus first time ever at this detail level and deepness. I haven't seen anything like this before. Image spans now 31 x 23 degrees of sky and has 118 individual frames in it. total exposure time is now around 700 hours and the resolution 20.000 x 25.500 pixels. Image it took over a decade to finalize this photo between 2010 and 2021.
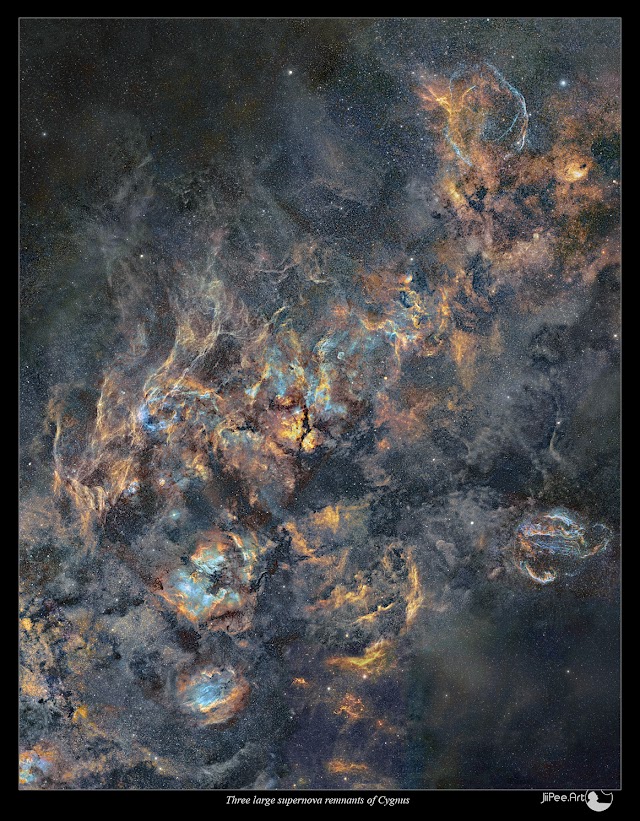
The mapped color version of this mosaic can be seen here, https://astroanarchy.blogspot.com/2021/12/cygnus-mosaic-gets-large.html
Bang, Bang & Bang
Three large supernova remnants in the same field of view
Click for a large image
Click for a large image
ZOOMABLE VERSION
Three Large Supernova Remnants
Click for a large image
Click for a large image
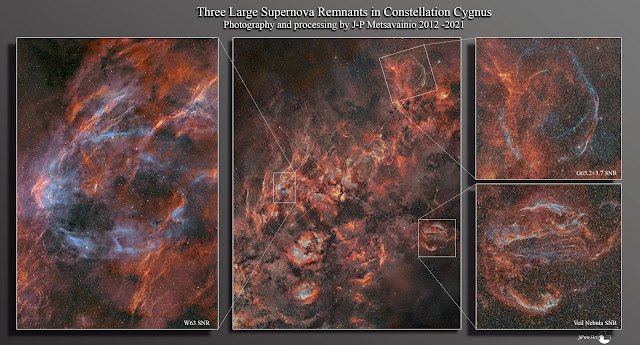
INFO
Three supernova remnants, two Wolf Rayet stars and a black hole
In the orientation image above, there are three large supernova remnants visible, first the Cygnus Shell W63 , bluish ring at middle left, secondly the large SNR G65.3+5.7 at upper right and the third is a brighter SNR, the Veil nebula at right edge of the image.
Beside three supernova remnants there are two Wolf Rayet stars with outer shell formations. NGC 6888, the Crescent Nebula at center of the image and the WR 134, it can be seen as a blue arch just right from the Crescent Nebula, near the Tulip nebula.
Next to the Tulip Nebula lays a Black hole Cygnus X-1
Constellation Cygnus is an endless source of celestial wonders, both scientifically and aesthetically. For me, as an visual artist, this are of night sky is very inspiring There are endless amount of amazing shapes and structures, I can spend rest of my life just shooting images from this treasury.
Equipments used
Monday, December 20, 2021
Cygnus mosaic gets large
Three Musketeers of Swan
Deepest and most detailed image showing the whole constellation Cygnus ever taken
The new composition is made so that the veil nebula supernova remnant fits to the field of view.
There are three large supernova remnants visible in this image. The Veil nebula is the most bright of them, other two are really dim and diffused. I spent about 200 exposure hours for those two alone to show them well. I call this trio to the Three musketeers.
I like the new composition, it's very dynamic and shows the whole constellation Cygnus first time ever at this detail level and deepness. Least I haven't seen anything like this before. Image spans now 31 x 23 degrees of sky and has 118 individual frames in it. total exposure time is now around 700 hours and the resolution 20.000 x 25.500 pixels. Image it took over a decade to finalize this photo between 2010 and 2021.
The previous version of this mosaic can be seen here, Great Mosaic of Cygnus
Bang, bang & bang
Three large supernova remnants in the same field of view
Click for a large image
Three large supernova remnants in the same field of view
Click for a large image
ZOOMABLE VERSION
Image is reduced to 6000 x 7700 pixels size from the original 20.000 x 25.500 pixels.
118 Mosaic Panels
Click for a large image
Click for a large image
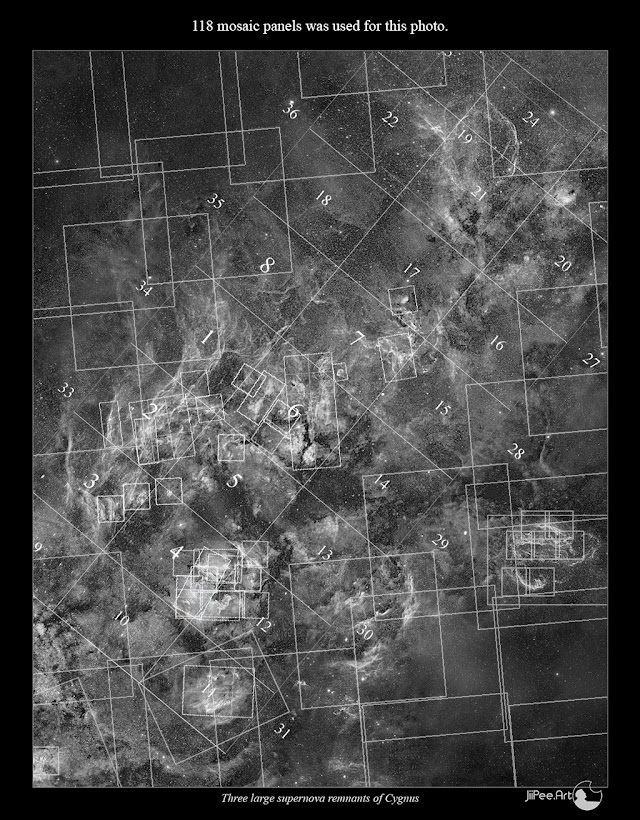
All the 112 frames used are shown in this image. Since many of the frames are originally shot as independent artworks, panel structure is very complex. Also different instruments has a different field of view and resolution, so mosaic panels are at three different size.
DETAILS
Click for a large image

Three large supernova remnants in constellation Cygnus, the Swan, are in image as colored circles
NOTE, there is an apparent size of the Moon as a scale at lower right corner in a grayscale image.
INFO
Three supernova remnants, two Wolf Rayet stars and a black hole
In the orientation image above, there are three large supernova remnants visible, first the Cygnus Shell W63 , bluish ring at middle left, secondly the large SNR G65.3+5.7 at upper right and the third is a brighter SNR, the Veil nebula at right edge of the image.
Beside three supernova remnants there are two Wolf Rayet stars with outer shell formations. NGC 6888, the Crescent Nebula at center of the image and the WR 134, it can be seen as a blue arch just right from the Crescent Nebula, near the Tulip nebula.
Next to the Tulip Nebula lays a Black hole Cygnus X-1, it's marked in small closeup image of the Tulip Nebula at center right in orientation image above.
Constellation Cygnus is an endless source of celestial wonders, both scientifically and aesthetically. For me, as an visual artist, this are of night sky is very inspiring There are endless amount of amazing shapes and structures, I can spend rest of my life just shooting images from this treasury.
Equipments used
Monday, December 13, 2021
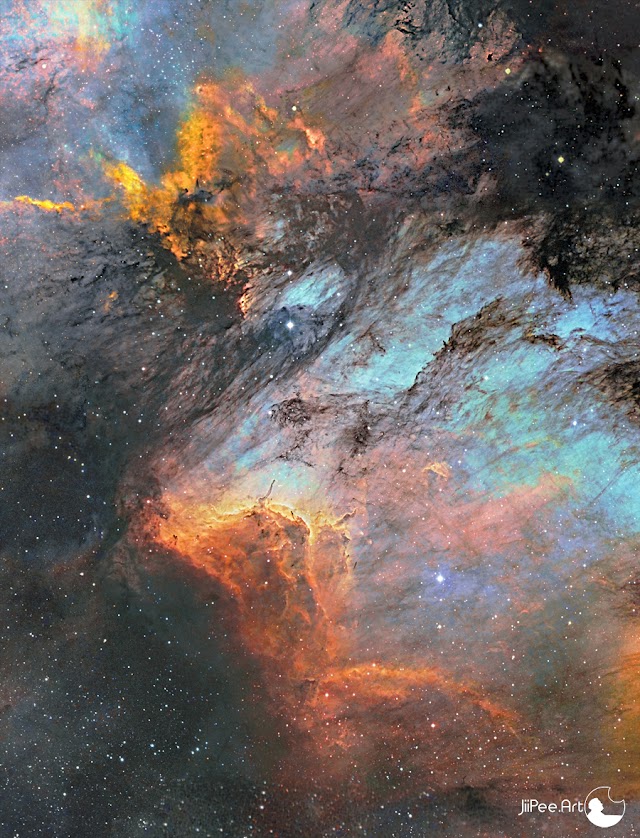
The Pelican Nebula with new data
I originally publish this nebula image at December 2016. After that, I have shot some very high resolution material from the same area of sky and I decided to upgrade my old image with better data. I'm kind of happy with the result, especially the details in dark nebulae are much sharper now and shows the complex structures of unionized gas and dust. Main reason is the long exposure time used, for H-alpha alone, there are 30 hours of exposures. Total exposure time is around 60 hours.
The dark nebula in the upper part of the photo is the gas bridge splitting visually the Pelican Nebula and the North America nebula so that the they look like two separate nebula. In reality they are actually a one large emission area.
Pelican Nebula, constellation Cygnus, the Swan
Click for a large image
The older version of this image can be seen here: https://astroanarchy.blogspot.com/2016/12/pelican-nebula-two-frame-mosaic.html
Zoomable Image
Zoomable Image
Orientation in large context

Thursday, October 7, 2021
Filaments of Veil in mapped colors
I shot most of the lights for this image back in 2016, now I have added some new material to it and reprocessed the whole image. A version in visual color palette can be seen here, https://astroanarchy.blogspot.com/2021/09/filaments-of-veil-nebula-snr.html
Photo was shot with a Celestron Edge HD 11" telescope, Astrodon naarrow band filters and Apogee Alta U16 astro camera. New data is shot with a shorter focal length instrument, Tokina AT-x 300mm f2.8 camera lens, same camera and filters. Dim background emission is taken from a new material and added to this photo.
Total exposure time is now 44 hours for the whole three frame mosaic and the resolution is 11.000 x 4000 pixels.
Filaments of central veil
Click for a large image (1100 x 2900 pixels)

Image is in mapped colors, from the emission of ionized elements, R=Sulphur, G=Hydrogen and B=Oxygen
A closeup
Click for a large image
Click for a large image

Orientation
Click for a large image

INFO
Since all of the heavier elements are born in exploding stars, we all are children of supernovae. Veil Nebula is located in the constellation Cygnus at a distance of 1500 light-years. It spans three degrees of sky, (Moon has an angular diameter of 0,5 degrees at the sky) real diameter is around 70 light-years. I collected data for the photo between 2012-2020 and I made this 3D model in 2021,exposure time is 45 hours
A 3D-study of Veil nebula SNR
3D-study of Veil Nebula Photo
Every single pixel in this 3d-animation is from the original 2D-image above. The model is based on on known scientific facts, deduction and some artistic creativity. The result is an appraised simulation of reality. Astronomical photos are showing objects as paintings on a canvas, totally flat. In reality, they are three dimensional forms floating in three dimensional space. The purpose of my 3d-experiments is to show that and Give an idea, how those distant objects might look in reality.
INFO About my 3D-transformation technique and large animation here: https://astroanarchy.blogspot.com/2021/10/unveiling-veiled.html
Subscribe to:
Posts (Atom)


