COPYRIGHT, PLEASE NOTE

All the material on this website is copyrighted to J-P Metsavainio, if not otherwise stated. Any content on this website may not be reproduced without the author’s permission.

BUY A MUSEUM QUALITY POSTER

Showing posts with label equipments. Show all posts

Saturday, September 28, 2024

NEW SETUP FOR MY ASTRONOMICAL NATURE IMAGING WORK

 I haven't publish much new images in past two three years since I have had some health problems. Now I'm good as new and can start working again. Past two years I have been slowly building a new imaging platform. I have done some shorter focal length work past six years, now it's time to go closer again.


OPTICS

System is build around Celestron EDGE 14" telescope, I selected this scope due to its light gathering capacity, 356mm diameter and 3910mm native focal length (This very large and heavy 0.7 Reducer is especially made for the EDGE 14") One main difference to normal Celestron EDGE telescope is that I have added a secondary mirror focuser (by Optec)  to get rid of a mirror flop. It can be a problem, especially with a heavy mirror. Bottom line,  this scope has an excellent optical quality. There is some optical analysis and a single full scale 20min frame at end of this post.

In future I can add a "HyperStar system" to replace secondary mirror and use this telescope as a fast f2 astrograph. 


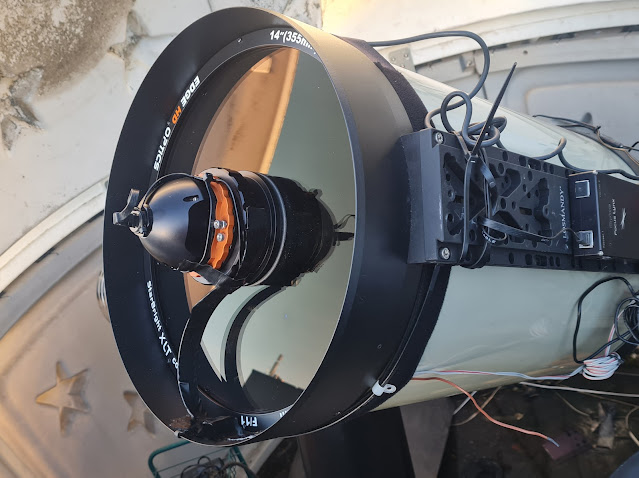
Secondary mirror focuser, Note a curved vane for the flat power/data cable, no diffraction spikes!
The focuser is made all aluminium, it's really robust and easy to collimate.


MOUNT

I ended up to a MESU Mount MARK II since it has 100kg capacity at imaging work with a periodic error less than 4 arcseconds peak-to-peak, impressive numbers indeed. It also has zero lash back due to its friction drive system. One of the nice features is the 80mm diameter channel for all of the cords, trough the Ra and Dec axes, no more dragging cords!

The pillar I ordered with the mount is bended knee pillar type, no meridian flip is needed and telescope can track whole sky without stopping. The pillar came in easy to handle parts and assembly was very straight forward, the assembled pillar is very rigid under the weight of heavy telescope, counter weights and accessories. 

Mesu mount is absolute beautiful engineering work. Support from manufacture is also very good. I had some minor problems with settings at first but they get solved in no time after we went it trough with remote connection, while on site. Bottom line, money wise this mount is a real bargain, if compared its features to any other brand or model of mount.

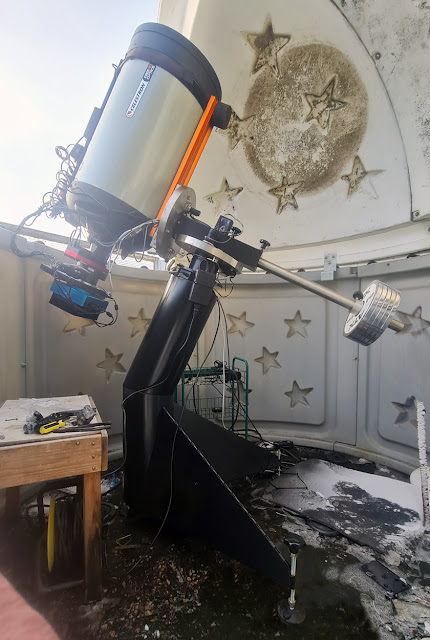
Bended Knee Pillar angle at my location 65 degree North. 
Counter weights are stainless steal weight lifting weights. (~35kg)

The 14" Telescope barely fits to my SkyShed POD


CAMERA AND ACCESSORIES


CAMERA

The Main camera is a "new" Apogee Alta U9000M with Apogee Filter wheel. It's a second hand camera originally used for the microscopic work and it looks like a bran new, There wasn't any mechanical shutter but I moved a shutter from my old Apogee Alta U16 to this new camera. (My old camera died to an old age)
The camera has 12 micron pixels, it's a perfect match to this optical configuration giving an image scale of 0.91 arcseconds per pixel. The full image spans 46.1 x 46.1 arcminutes of sky. (One degree is 60 arcminutes and Full Moon spans around 30 arcminutes of sky)

INSTRUMENT ROTATOR

At first time I have added an instrument rotator to the imaging path. I haven't use any rotator earlier since there is always some flexure. 

The Wanderer Astro Rotator Pro has absolute zero flexure by the manufacture. I was very skeptical to this since if it moves, it will flex. It turned out, that there is a patented system based on neodymium magnets around the light path holding everything tightly together when rotator moves.  

After measuring carefully everything with the CCD-inspector software from test exposures under the starfield I can say, it really has no flexures at all. It's only 18 mm thick and fit to my limited back focus nicely. The rotator can handle flawlessly all the heavy load I have placed behind it.

ACTIVE OPTIC UNIT

Maybe an overkill but I have added an active optics unit to the light path. It's SXV-AO from Starlight Xpress UK.

I have had really good experiences doing long focal length imaging with AO unit during the years. It doesn't correct the actual seeing so much but it corrects every small or big error from heat bubbles and vibrations from heavy traffic, wind, etc. and it does that really really fast. 

It's as easy to use as any OAG, especially after I had an instrument rotator. With 14" scope, I can guide around 10 HZ by using mag 11 guide star. The MESU Mount is really good but there is lots of mass to move when guiding corrections are made. With AO there is just a small refracting glass element to move instead of telescope and heavy accessories.

DATA & POWER BOX

An other new accessory is power and data box from Wanderer Astro. It makes the system less chaotic with all the data and power cords. Also controlling power and data connections can be done remotely in one software. It can handle nearly 20 amp at peak power.

DEW BUSTER

There is also my old Dew Buster installed to the telescope. it can keep the temperature just little over the dew point, this prevent the heat current. Raising warm air inside the tube will ruin the image, if heater is even slightly too warm.

FAN

I added a 70 mm computer fan to the telescopes air went to reduce the cool down time. There is an air filter in the went to prevent the dust getting inside the OTA. I can control the fan speed by the Power Box software.

QHY POLEMASTER

This is a new addition too, I was amazed how easy it was to use. Polar align took maybe 15 min and it's easy to redo at any time needed. here is a REVIEW about this little helper,


Telescope elements labeled


QHY Polemaster, lens cover removed and ready for the action.


LENS COVER

As a last item here is a lens cover for Celestron EDGE 14" telescope. It's a simple and a must accessory to prevent dust in the collector lens. How ever, in my case there is a secondary mirror focuser sticking out and it prevents to use the standard Celestron aluminium cover over the telescope. 

I solved the problem by cutting a circular hole in the lens cover. After that, I bought a steel bowl from local market ( it was just 5 € or about 5 $)  I sprayed it matt black and glued it to the cover with an elastic, rubber like, superglue. 

A steel bowl glued over the hole in the lens cover.


AN UPDATE, 09.10.2024,
THE FIRST LIGHT IMAGE
Click for a full size image, ~2000x2000 pixels

All the technical details and more image material of the first light photo can be found in this Blog Post:
https://astroanarchy.blogspot.com/2024/10/first-light-for-my-new-imaging-setup.html


OPTICAL ANALYSIS FROM THE CCDINSPECTOR APP


The optical collimation is as good as I get it in my seeing conditions and the optical tube hold it perfectly since the main mirror is always locked down and focusing is done with the Optec Secondary Mirror Focuser only.


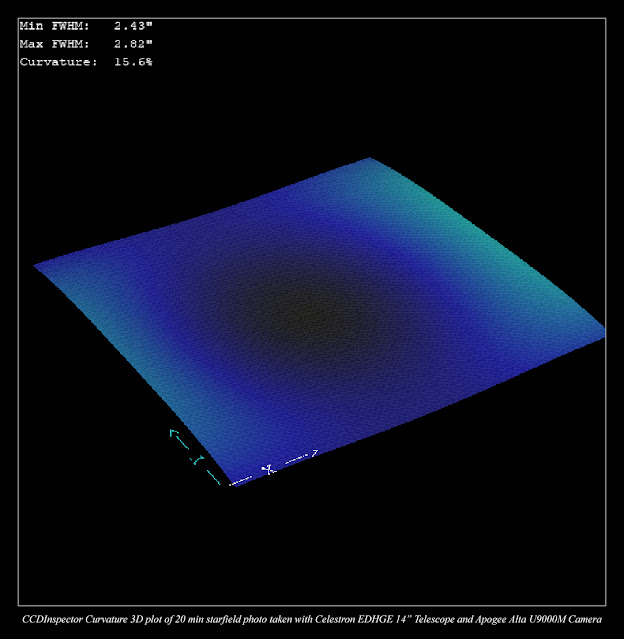
This is a 3D-plot of field curvature from the CCDInspector app of Celestron Edge 14" with 0.7 Focal Reducer and Apogee Alta U9000M with 12 micron pixels. This configuration produce a very flat field and stars are sharp from edge to edge in the whole field. This is impressive especially since the CCD in Alta U9000M is so large, about 37x37mm. 

A single full scale 20 min O-III exposure used for the optical analysis

This is one of the test shots after the collimation procedure. Exposure time is 1200s with 3nm O-III filter. Image is calibrated with Dark Frame and Bias corrected Flat Frame. Target is WR 134 in Cygnus. Stars are pinpoint from corner to corner. There is no stretching done, Click for a full scale image.


Monday, January 13, 2020

The Frankenstein monster, my current imaging setup


First time at this Winter season 2019-20 I have a clear sky and somehow functional imaging system.
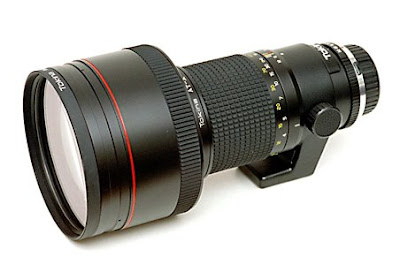
I managed to mate Apogee Alta U16 + filter wheel with my old second hand Tokina AT-x 300mm f2.8 camera lens.
Lots of self made mechanical tweaks was needed to make this work out.. (I used even an angle grinder to cut off ”unnecessary” parts of the lens to have correct back focus distance)

The result looks more like a Frankenstein monster. It’s alive!!!
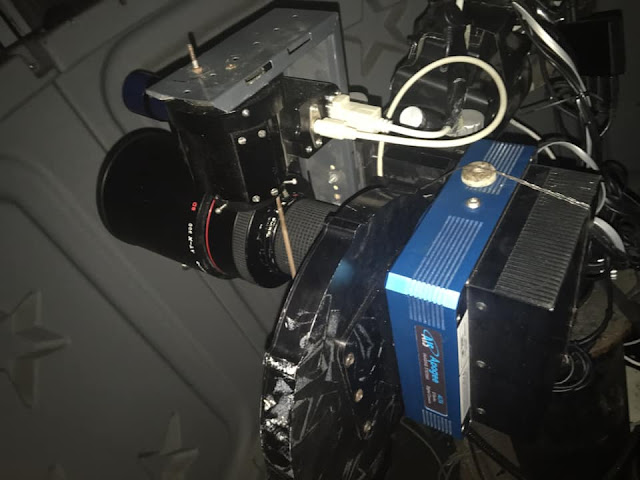

"New" imaging setup


Apogee Alta U16 with a filter wheel and Tokina AT-x f2.8 camera lens n th 10-micron 1000 mount. 
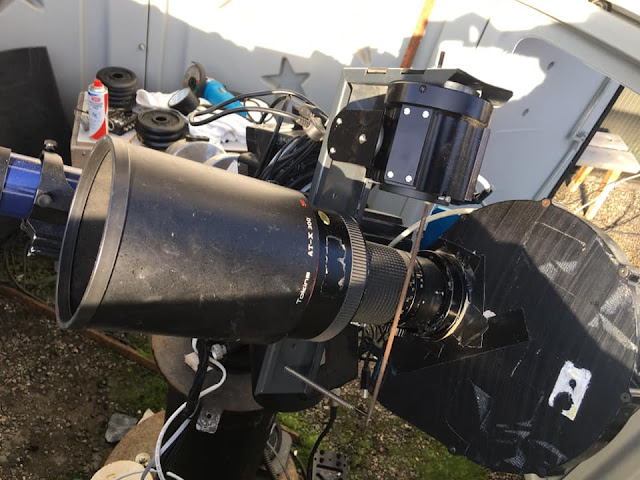


The focusing system is build around the TCF-s focuser. Focusing is done by a spring loaded round metal file over the focusing ring. This is a very accurate autofocusing system and it's temperature compensating too.
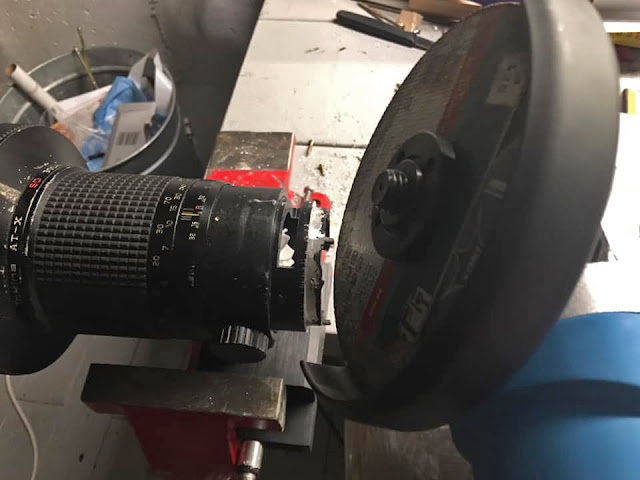


Shortening the lens, bajonet and aperture control ring are removed and I'm just about to cutting off the filter holder area.  The current imaging system is kind of crazy combination. Actually it shouldn't work at all but with a angle grinder and self made adapter I was able to mate Tokina AT-x 300mm f2.8 optics to Apogee Alta U16 camera and filter wheel. There is also a temp compensating focusing system made from TCF-s focuser, L-shape metal from an old table, round metal file and a spring from an old desk lamp. The CCD is very large, over 36 x 36 mm but for some reason the lens can lit the whole area with a very little coma at most outer corners. 
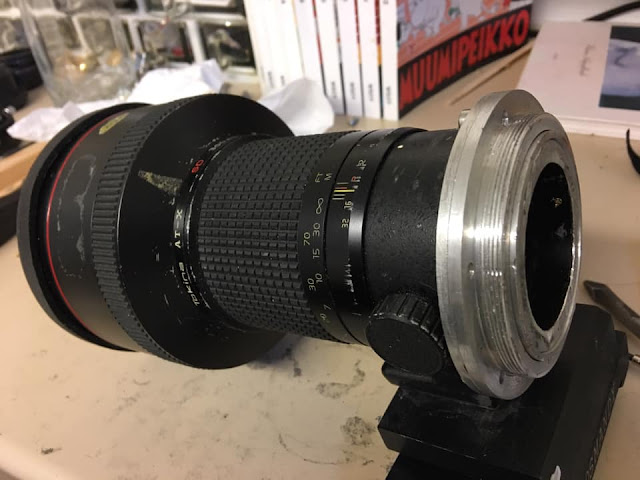


Self made adapter for the Apogee filter wheel attached.


Original untouched lens.


First light photo for this system


First light image, IC 1396. Since the Apogee Alta U16 has a very large square CCD, the Tokina lens has a very hard time to draw good stars at very outer corners. The system is very picky about he correct back focus distance and the tilt since the critical focus zone at f2.8 is just over 10 metric microns. I did crop out narrow zones from left and right to have perfect star shapes over the area.


Image analysis with CCDinspector
Click for a large image

This works way better than I thought! The whole oversize CCD is lit, there are some coma at corners but it'll be easy to crop out by removing narrow areas from left and right or from up and bottom.

Image of the full uncropped frame 
(reduced 50% due to large size) 


Monday, August 15, 2016

New imaging season about to start


The mandatory Summer pause will be over soon. We'll have astronomical darkness again at September 5. up here 65N. After that, I'll be able to shoot some new material. 

I have made a poster format collection out of my images, with different instruments. Photos are shot between 2005 and 2016. An average exposure time per photo is around 25h. The actual exposure times varies between10 to 150 hours.

My photos between years 2005 and 2016.
Images in four posters are shot with different instruments. 
Please, click the posters to see them in full scale!


Images shot with Canon EF 200mm f1.8 camera lens.
QHY9 astrocamera and the Baader narrowband filters

Info and image details for each photo can be found from HERE


Images shot with Tokina AT-X 300mm f2.8 camera lens.
QHY9 astrocamera and the Baader narrowband filters

Info and image details for each photo can be found from HERE


Images shot with Meade LX200 GPS 12" @ ~f6 telescope.
QHY9 astrocamera and the Baader narrowband filters


Images shot with Celestron Edge HD 1100 telescope.
Apogee Alta U16 and Astrodon narrowband filters


Monday, October 6, 2014

A new imaging setup starts to build up.


At beginning of the last Spring season my old imaging setup blew up

During a mandatory Summer pause I have been building a new imaging set up little by little. It starts to be ready mechanically, I need to wait for a couple of clear nights to be able to finalize the setup procedure. 

Without a help from couple of great companies this could be a mission impossible for me.


I have got the most needed help from the beloved neighbour country, Sweden! The Astro Sweden is a largish company specialized to astronomical equipments. They have support my work by equipments and technical knowhow.


Starlight Xpress CCD

I have been using many years some very clever products from the UK based company, Starlight Xpress .
I now have a new Active Optics unit from them, it supports full frame CCD cameras. With the AO-unit I'm using an OAG with the ultra sensitive guider, Lodestar X2. I used to have a smaller version of the AO-unit and Lodestar guider for many years. They really turn any poorly tracking mount to a extremely stable imaging platform. Best of all, the AO-unit works with any third party imaging camera, like the Apogee in my case.


New Setup
click for a large image


Light path

The Active Optics Unit from Starlight Xpress CCD  is attached to a large custom made adapter ring at right.

List of new equipments
  • Mount, 10-micron 1000
  • Optics, Celestron Edge HD 1100
  • Camera, Apogee U16 D09 with KAF16803 chip, 4096x4096 9 microns pixels, 36,8x36,8mm 
  • Filter Wheel, Apogee, seven square slots 50x50mm 
  • Focuser, FeatherTouch with MicroTouch control unit 
  • Heater, Dew Buster 
  • Active Optics Unit, SXV AO LF from Starlight Xpress + OAG 
  • Guider, an ultra sensitive Lodestar X2, also from Starlight Xpress 
  • Focal Reducer, Celestron reducer 0.7 for Edge 1100 (Not yet arrived) 
  • Finder, Telrad 
  • Filters, Astrodon, H-alpha 5nm, O-III 3nm, S-II 3nm. R, G, B and L
I need to wait for a clear weather to be able to finalize the setup. Few things must be done before any imaging is possible. 


To do list

  1. Polar alignment, The axis of the telescope must be exactly parallel to Earth axis 
  2. Collimation, the optical axis must be perfectly concentric 
  3. Fine tune any possible tilt in CCD to have it perfectly perpendicular to light path. 
  4. FocusMax training, ~30 V-curves to have an accurate model of the optical behavior for auto focusing. 
  5. Temperature compensation training, so that temp expansion of the optics can be compensated.


Friday, January 31, 2014

It's over, I cant do my loved astronomical imaging anymore


Sad news, my old Meade LX200 GPS 12" telescope gave up and died.

Two nights ago, when I was imaging, my telescope stopped tracking and gave an error message "Motor Stalled".
It turned to be a fatal problem, the control board of Ra motor was fried. There is no way to fix it myself, the board has several layers and lots of microscopic components. This is a very old scope and it has been under a heavy usage in a very extreme weather conditions. Replacement parts are very hard to find, since this telescope is not manufactured any more. Even if I managed to have needed parts, it'll take the rest of the season to put all up and running again.

This instrument has been way below my level as an astronomical photographer for a years. Lots of desperate looking DIY solutions was used to make this old scope work as a some kind of imaging platform. I really need a new mount and a better optics. 

I can't afford to buy any new instruments, it looks like my days are over now. I'm not going to buy any second rate stuff, I'll rather be without, than start fighting against constant malfunctions ones again. I have spent countless hours outside, soldering some bad connectors, in a freezing wind and a bellow -20 centigrade temperatures to fix my scope, not any more. 

The only way to solve this is trying to find a sponsor. It won't be easy and it might never happen. 

An update, February 02. 2014

After a careful study of damages in my scope, I found out, that not only the Ra motor controller card was toasted. Also the motherboard, Ra motor and its encoder are burned and partly smelted too. This means, that the whole system is beyond repair, least with any reasonable costs. 


Images, taken with this deceased scope can be seen HERE.


A collection of images with the Meade LX200 GPS 12" telescope, Baader narrowband filters and the QHY9 astronomical camera
(Be sure to click the image to see it in full scale)


Tuesday, April 23, 2013

An other collection of images, Meade LX200 GPS 12"


My main instrument is an old Meade LX200 GPS 12" telescope. With lots of tweaking, it works as an imaging platform. An original fork mount has a largish periodic error but I'm using the Starlight Express active optics unit, LXV-AO, with it . With an AO-unit, the tracking error is more or less zero. Since I'm using the QHY9, with kind of small diameter CCD-shell, as my imaging camera I have reduced the original f10 scope down to f5 it gives me an effective resolution of about 0.8 arc seconds/pixel. It's done by "misusing" the Celestron f6.3 reducer by adding some extra distance to recommended 110mm. There is some light coma at the corners but I can live with it for now.


A collection of images with the Meade LX200 GPS 12" telescope, Baader narrowband filters and the QHY9 astronomical camera
(Be sure to click the image to see it in full scale)

All the images in this poster can be found from my PORTFOLIO, with some technical details.

A labeled version


The instrumentation
(What a mess...)

More images and info about instruments in HERE

I'm using two camera lenses, with the Meade, the Tokina AT-X 300mm f2.8 can be seen in the image above. Canon EF 200mm f1.8 is my second camera lens for the astrowork.
Image collections with both lenses can be seen in HERE.

Couple of my favorite images with Meade LX200 12" telescope

A two frame mosaic of IC 1805, the Melotte 15 area

More information in HERE

The Bubble Nebula in Cassiopeia


Sunday, April 21, 2013

A collection of images, Canon EF 200mm f1.8 optics


I have couple of high quality camera lenses for astronomical imaging, Tokina AT-X 300mm f2.8 and Canon EF 200mm f1.8.  Both lenses are wonderful instruments for an astronomical work, I always use them both full open. 

Focusing under a  fast f-number is very difficult task due to extremely narrow critical focus zone (At f1.8 the critical focus zone is around 7 microns, 7/1000mm) I have build an automatic focusing system for all camera lenses, images of it can be seen HERE and HEREThe system also compensates the temperature drift.

An other challenge is orthogonality between CCD-shell and optics. With slower optics this is not much a problem but with extremely fast optics a micron scale accuracy is needed. I have done hundreds of iterations with the CCDInspector  software to have my Canon EF 200mm f1.8 optics perpendicular with QHY9 camera. NOTE! There is nothing wrong with any mechanical part in a camera or the lens, the needed accuracy is just so high, that micron scale errors are seen, for example a protective glass over the CCD-array has a manufacturing  tolerance of 1/100mm and that's enough to course problems in orthogonality. (Well... I'm kind of perfectionist and most photographers doesn't see any problems with fast optics, I do.)


A collection of  my images with the Canon EF 200mm f1.8 optics
Images are shot between  2009-2012

Be sure to click the image larger! Note, a large file ~6MB

Canon EF 200mm f1.8

Canon EF lens Modification for the astronomical use

Since the Canon EF 200mm f1.8 lens is electronically focused and I'm using it without Canon camera body, I had to modified the lens to it to work. Be warned, the modification image series, behind the link HERE, is not for a weak minded persons!!!

Lens in use

Largest work with the Canon lens
A 18-panel mosaic of constellation Cygnus

More information and images of this project can be seen HERE.


Cygnus mosaic in frames

More info about the framed photo:


A collection of  my images with the Tokina AT-X 300mm f2.8 optics
Images are shot between  2008-2011

Be sure to click the image larger!
I have made a collection of Tokina AT-X 300mm f2.8 image as well. Images are partly over lapping with the canon collection, since I have used both instruments, Canon and Tokina, to collect the data.


Sunday, September 23, 2012

My equipment


I'm shooting my astronomical images from downtown Oulu. This is my collection of  gears needed for my astroimaging. Canon EF 200mm camera lens can't be seen in images here.

This is a new combination from old gears. Now I'm able to shoot with two cameras at ones! QHY9 is used for longer focal length work  with my old Meade LX200 GPS 12" telescope at about f5. QHY8, a cooled single shot color imager, is used with Tokina AT- X 300mm camera lens for wide field work.
Now I can have both, a closeup and a wide filed images, from same target at same time. I'll test, if color information from QHY8 camera can be used with images taken by QHY9 camera.

As you can see, I don't have any fancy gears for my work.
Not a pretty boy...

Lots of cords. They might look unorganized but I can sure you, there is a system.

Same image labeled


Light path from the telescope to camera. There is an active optics unit at middle. (SXV-AO)


Counterweight, Meade fork mount and the dew heater control box at right.


The other side of the scope. 
The ugly yellow fabric, at top, works as an insulation for the 
heater stripe at front of the QHY8 camera. It's heated due the frost.

Images taken with Meade LX200 GPS 12" telescope


Images taken with Tokina AT-X 300mm camera lens