COPYRIGHT, PLEASE NOTE
Thursday, September 30, 2021
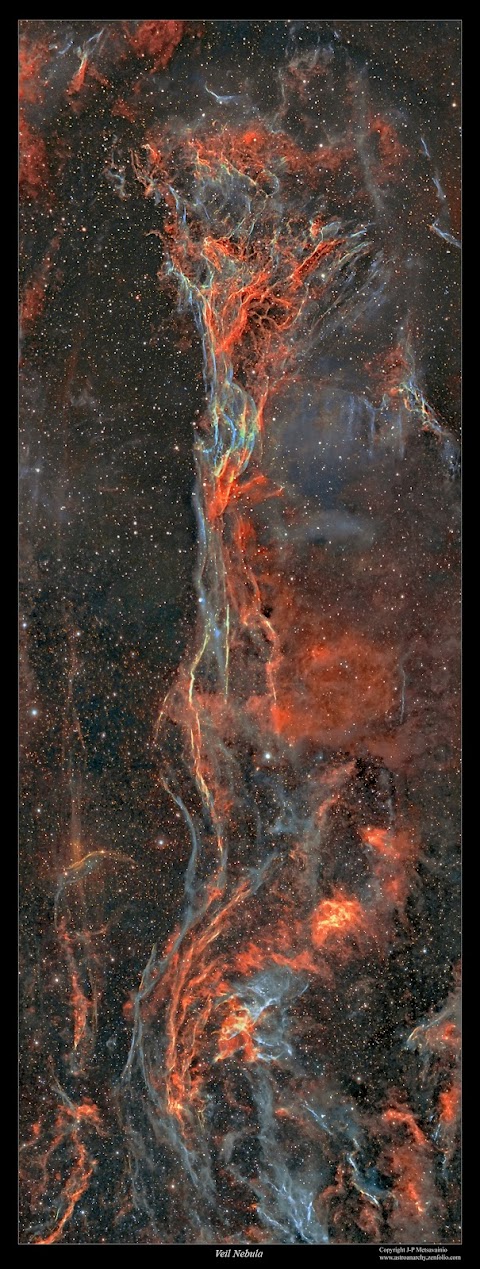
Filaments of Veil Nebula SNR
I shot most of the lights for this image back in 2016, now I have added some new material to it and reprocessed the whole image. An older mapped color version can be seen here, https://astroanarchy.blogspot.com/2016/12/filaments-of-veil-nebula.html
Photo was shot with a Celestron Edge HD 11" telescope, Astrodon naarrow band filters and Apogee Alta U16 astro camera. New data is shot with a shorter focal length instrument, Tokina AT-x 300mm f2.8 camera lens, same camera and filters. Dim background emission is taken from a new material and added to this photo.
Total exposure time is now 44 hours for the whole three frame mosaic and the resolution is 11.000 x 4000 pixels.

Image is in visual palette from emission of an ionized elements, hydrogen (H-alpha), sulfur (S-II) and oxygen (O-III). Red=Hydrogen + 33% sulfur, Green=oxygen and Blue=oxygen + 33% hydrogen to compensate otherwise missing H-beta emission.
A closeup
Click for a large image
Every single pixel in this 3d-animation is from the original 2D-image above. The model is based on on known scientific facts, deduction and some artistic creativity. The result is an appraised simulation of reality. Astronomical photos are showing objects as paintings on a canvas, totally flat. In reality, they are three dimensional forms floating in three dimensional space. The purpose of my 3d-experiments is to show that and Give an idea, how those distant objects might look in reality. More info about my 3D-technique at end of this blog post: https://astroanarchy.blogspot.com/2021/10/unveiling-veiled.html
NOTE. It looks like that the animation has less stars, than the original 2d-image. That's not true, stars is normal photo are getting projected to a same plane. In 3D-model stars are in volume and it only looks like, that there are less stars.
Tuesday, September 28, 2021
Veil nebula unveiled II
I haven't start the imaging season yet, up here 65N. Nights are still short and I haven't got my imaging rig ready after the mandatory six months Summer break.
I have reprocessed some older shots with new data, this time the Veil nebula supernova remnant in Cygnus. Original image was shot with the Canon EF 200 mm f1.8 camera optics full open, QHY9 astro camera and Baader narrowband filters at 2013.
New data is shot with Tokina 300mm f2.8 camera optics and Celestron Edge HD 11" telescope, Apogee Alta U16 astro camera with Astrodon narrowband filters.
Total exposure time is now about 45 hours. I published yesterday a Pickering's Triangle photo taken with Celestron Edge HD 11"-. It's part of this new image among other.
Veil nebula Unveiled
Click for a large image, 1250 x 1700 pixels
https://astroanarchy.blogspot.com/2013/12/veil-nebula-unveiled.html
Monday, September 27, 2021
Pickering's Triangle in Visual palette
I have reprocessed some older data and made a new composition out of it. Pickering's Triangle is part of the Veil nebula supernova remnant in constellation Cygnus. It has an amazing structure of complex gas filaments. This image is one of the most detailed presentations, showing the whole triangle shape formation, I have seen so far.
Image is in visual palette from emission of an ionized elements, hydrogen (H-alpha), sulfur (S-II) and oxygen (O-III). Red=Hydrogen + 33% sulfur, Green=oxygen and Blue=oxygen + 33% hydrogen to compensate otherwise missing H-beta emission. (H-beta and H-alpha has a same shape but H-beta is weaker. H-alpha emits red light and H-beta emits blue light.) Exposure time ~20 hours.
here you can see ta mapped color image from same data, https://astroanarchy.blogspot.com/2021/08/pickerings-triangle-reprocessed-with.html
click for a large image
A Closeup
click for a large image
Orientation in Veil nebula SNR
click for a large image
Tuesday, September 21, 2021
Supernova Remnant Simeis 147, new data added
I have made a new version of my NASA APOD and National Geographic Image of the Week photo. Simeis 147 is a large and very dim supernova remnant in constellation Taurus.
I combined an old data with a new data, with different optics and camera, together.
As a result I have more details, vivid colors and better overall signal in the new photo. An
older photo is from 2011 and the new photo from 2020. Total exposure time in this new composition is over 45 hours.
Simeis 147 SNR
Click for a large image, 1700 x 1200 pixels
An Experimental Starless Version
How long it'll takes to this supernova remnant to expand 1% large when the diameter is 160 light years and it expands at speed of 1000 km/second.
(1% of diameter 160/100= 16, as kilometers ~151.372.800.000.00, = Y, km,
1000 km/second is ~315.360.000.00, = Z, kilometers/year.
So, X x Z = Y and X=Z/Y, X = 480 years with given values)
Every single element in Vision series photos are from my original astronomical photos. I have been using the Overlapping Lightning Method (Multi Exposure Method) to create my Vision series photographs. By this method the forms and structures in astronomical object get multiplied, they are now forming a new visual dimension beyond our physical universe.
Photo from 2011
H-alpha 42x1200s, binned 1x1
Thursday, September 16, 2021
Viral Nebula Rocks
IC1396 converted to 3D animation, very first of its kind
NOW on SuperRare
I turned my photo of IC1396 to a 3d-model at 2012 to show that it’s actually a three-dimensional volume floating in three-dimensional space. This artwork is not just a guess work, it’s based on scientific data about the structure of emission nebulae and real distance information.
This animation went viral and it was published by several news media and major websites globally at 2012, links after the photos
Original photo used for the animation
My original photo of emission nebula IC1396
PETAPIXEL, Michael Zhang
Amazing Animated GIFs Capture Nebulae in 3D Using Artificial Parallax
https://petapixel.com/2013/02/20/amazing-animated-gifs-capture-nebulae-in-3d-using-artificial-parallax/
This animation was selected to a Moving the Still exhibition in Miami Art Week 2012
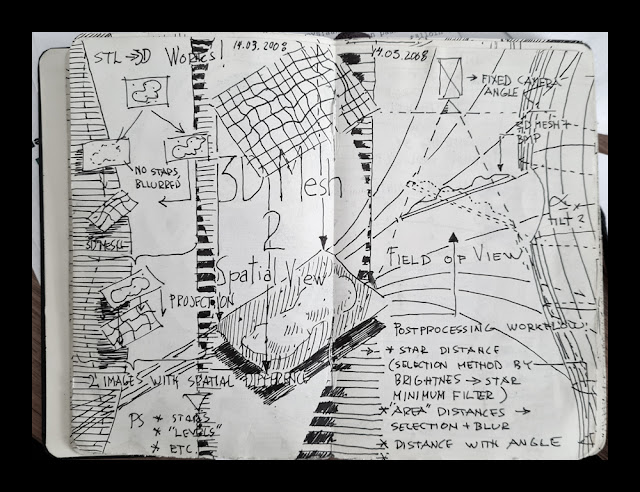
How the 3D-model is made My Moleskine notebook pages from 2008, I planned how to convert nebulae to 3D
For as long as I have captured images of celestial objects, I have always seen hem three-dimensionally in my head. The scientific information makes my inner visions much more accurate, and the 3-D technique I have developed enables me to share those beautiful visions with others.
How accurate my 3-D-visions are depending on how much information I have and how well I implement it.
The final 3-D-image is always an appraised simulation of reality based on known scientific facts, deduction, and some artistic creativity.
After I have collected all the necessary scientific information about my target, I start my 3-D conversion from stars. Usually there is a recognizable star cluster which is responsible for ionizing the nebula. We don’t need to know its absolute location since we know its relative location. Stars ionizing the nebula have to be very close to the nebula structure itself. I usually divide up the rest of the stars by their apparent brightness, which can then be used as an indicator of their distances, brighter being closer. If true star distances are available, I use them, but most of the time my rule of thumb is sufficient. By using a scientific estimate of the distance of the Milky Way object, I can locate the correct number of stars in front of it and behind it.
Emission nebulae are not lit up directly by starlight; they are usually way too large for that. Rather, stellar radiation ionizes elements within the gas cloud and the nebula itself is glowing light, the principle is very much the same as in fluorescent tubes. The thickness of the nebula can be estimated from its brightness, since the whole volume of gas is glowing, brighter means thicker.
By this means, forms of the nebula can be turned to a real 3-D shape. Nebulae are also more or less transparent, so we can see both sides of it at the same time, and this makes model-making a little easier since not much is hidden.
The local stellar wind, from the star cluster inside the nebula, shapes the nebula by blowing away the gas around the star cluster. The stellar wind usually forms a kind of cavity in the nebulosity. The same stellar wind also initiates the further collapse of the gas cloud and the birth of the second generation of stars in the nebula. The collapsing gas can resist the stellar wind and produces pillar like formations which must point to a cluster.
Ionized oxygen (O-III) glows with a bluish light, and since oxygen needs a lot of energy to ionize it, this can only be achieved relatively close to the star cluster in the nebula. I use this information to position the O-III area (the bluish glow) at the correct distance relative to the heart of the nebula.
Many other small indicators can be found by carefully studying the image itself. For example, if there is a dark nebula in the image, it must be located in front of the emission one, otherwise we couldn’t see it at all.
Using the known data in this way I build a kind of skeleton model of the nebula. Then the artistic part is mixed with the scientific and logical elements, and after that the rest is very much like creating a sculpture on a cosmic scale
Monday, September 13, 2021
Beyond the astronomical photography
NOTE. Vision series artworks are soon to be sold as NFT @SuperRare
I’m an astrophotographer but first of all I’m a visual artist, as an artist, I’m dazzled by all the forms I’m able to capture in my photos of cosmic objects, nebulae, supernova remnants, galaxies, etc. Colors from ionized elements are connected to the shapes and textures, they form a physical reality around us.
I’m telling a story with my photos, and many times my artworks are also personal notes. The Vision series of photos are forming visual notes about shapes, structures, textures, and colors I have seen and captured during my couple of decades-long journey as an astronomical nature photographer.
Every single element in Vision series photos are from my original astronomical photos. I have been using the Overlapping Lightning Method (Multi Exposure Method) to create my Vision series photographs. By this method the forms and structures in astronomical object get multiplied, they are now forming a new visual dimension beyond our physical universe.
The photographic method I'm using was fashionable back in the 1920s among avant-gardists and surrealistic photographers. At the time the work was done in a darkroom, I’m using about the same technique but instead of a darkroom, I’m using digital image processing.
The original photo is rotated, moved, and/or mirrored as I like, and then multiple layers stacked back together so that the original brightness is maintained. For this task, I use Photoshop and various astronomical stacking methods and applications.
Few samples of my Vision Series, the original astronomical photo I used to create them at end of the page.
Visions of Veil
Please, click for a large image
Visions of Veil series is based on my original photo


