
Showing posts sorted by date for query 3d. Sort by relevance Show all posts
Showing posts sorted by date for query 3d. Sort by relevance Show all posts
Tuesday, May 3, 2016
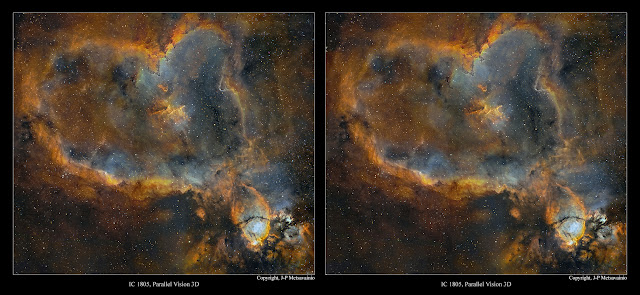
An experimental 3D-stereo pictures of IC 1805, the Heart Nebula
Images are for two different viewing methods, the first set of images is for the Parallel Vision method and the second set for the Cross Vision method. Viewing instructions can be seen HERE.
NOTE! This is a personal vision about forms and shapes, based on some scientific facts, deduction and an artistic impression. A short explanation, about the method used for the 3D conversion of my astrophoto, at the end of this post.
heart nebula, IC 1805, as a freeview stereo pairs
Click for a large image
For a parallel viewing method (Eyes parallel to each other)

For a parallel viewing method (Eyes parallel to each other)
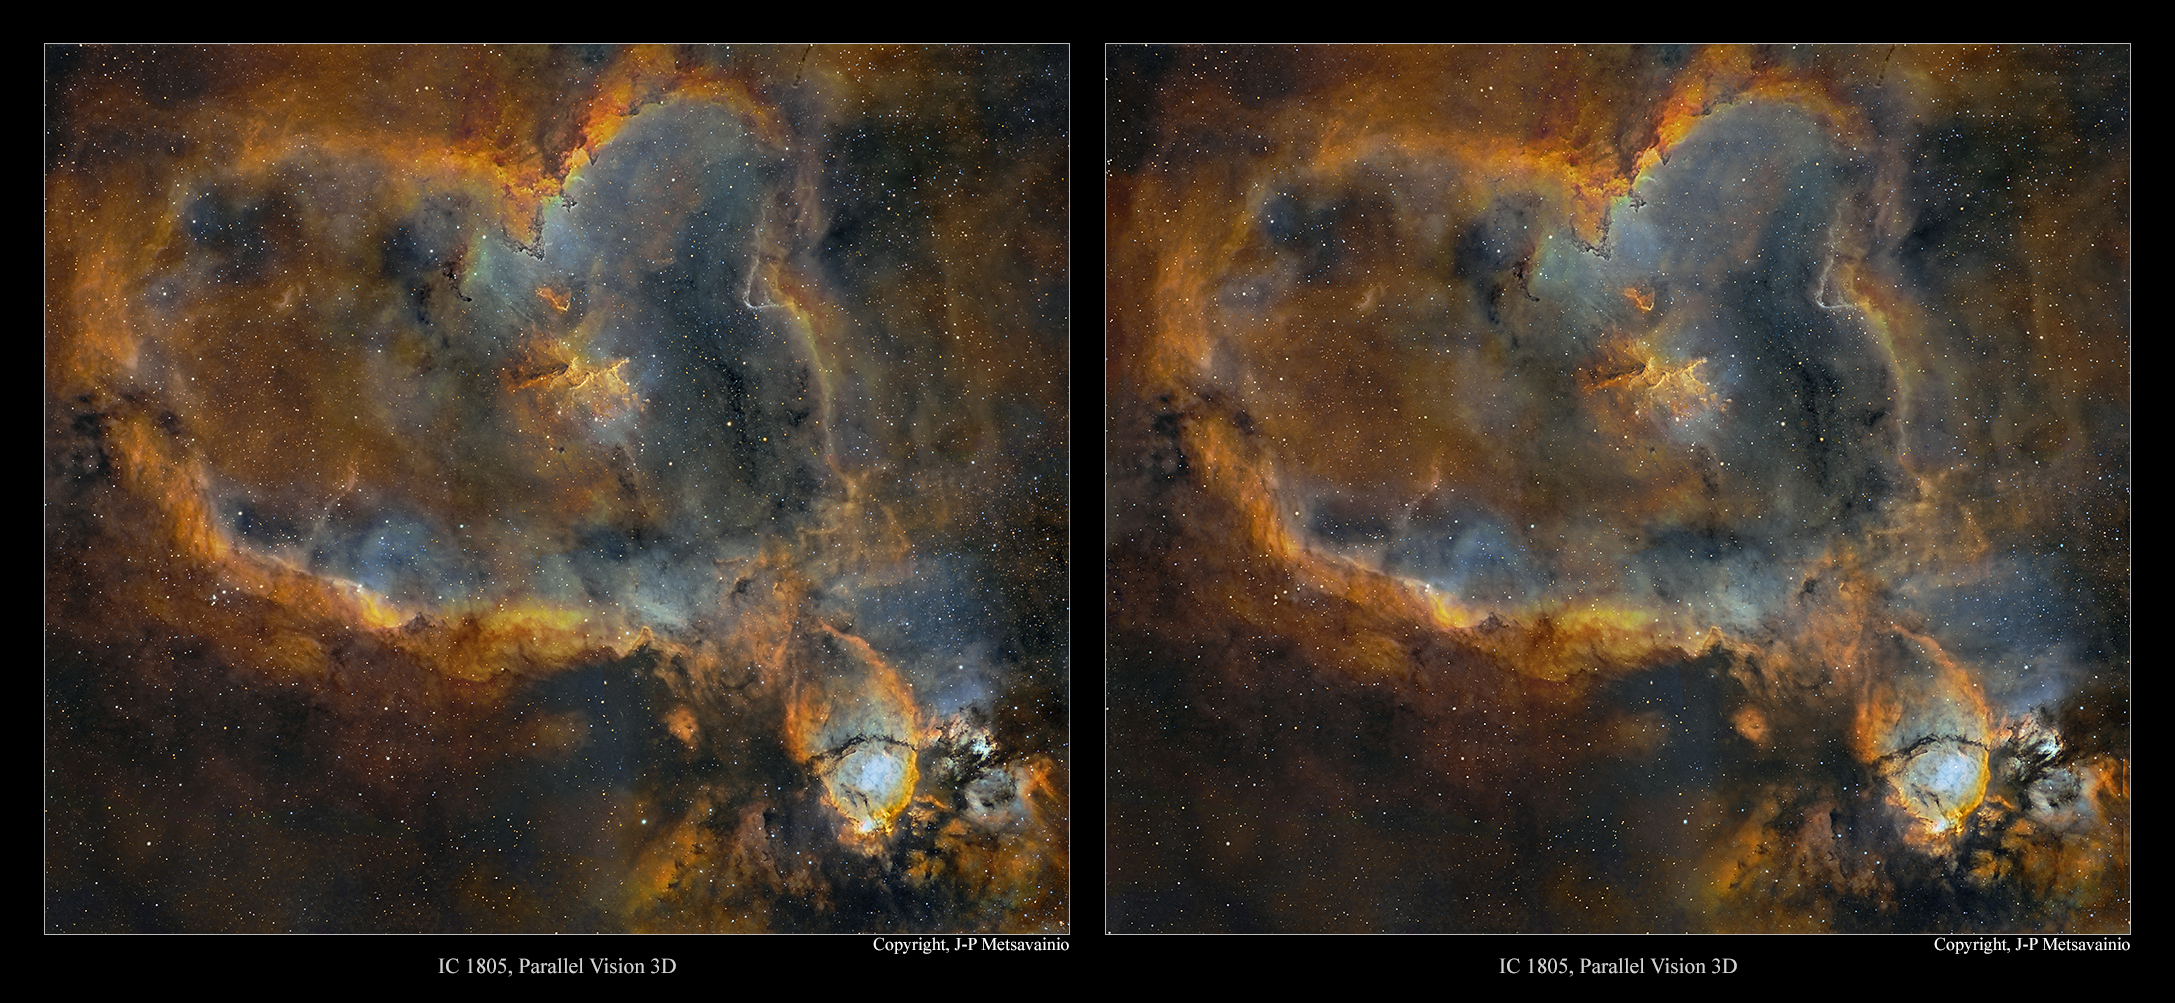
Image pair for the Parallel Vision viewing method, click for a large image.
Original 2D-image and technical details can be seen HERE.
For a cross vision viewing method (Eyes crossed)

Image pair for the Cross Vision viewing method, click for a large image.
Original 2D-image and technical details can be seen HERE.
HOW?
All the original 2D-images are imaged by me, if not otherwise stated.
Due the huge distances, no real parallax can be imaged for a volumetric information.
I have developed a method to turn any 2D-astronomical image to a various 3D-formats. The result is always an approximation of the reality, based on some known scientific facts, deduction and an artistic impression.
What are the known facts?
By using a scientifically estimated distance of the object, I can organize right amount of stars front and behind the object. (as then we know the absolute position of the object at our Milky-way)
Stars are divided to groups by apparent brightness, that can be used as a draft distance indicator, brighter the closer. There is usually a known star cluster or a star(s) coursing the ionization and they can be placed in right relative position to the nebula itself .
Generally emission nebulae are not lit by the starlight directly but radiation from stars ionizing gases in the nebula. Hence the nebula itself is emitting its own light, at wavelength typical to each element. Due to that, the thickness of the nebula can be estimated by its brightness, thicker = brighter. Nebulae are also more or less transparent, so we can see "both sides" at the same time.
Many other relative distances can be figured out just carefully studying the image, like dark nebulae must be front of bright ones. The local stellar wind, radiation pressure, from the star cluster, shapes the nebula, For that reason, pillar like formations must point to a cluster. Same radiation pressure usually forms kind of cavitation, at the nebulosa, around the star cluster, by blowing away all the gas around the source of stellar wind. The ionized oxygen, O-III, emits bluish light, it requires lots of energy to ionize. Due to that, the blue glowing area locates usually near the source of ionization, at the heart of the nebula. This and many other small indicators can be found by carefully studying the image itself.
Using the known data, I can build a kind of skeleton model of the nebula. Then the artistic part is mixed to a scientific part, rest is very much like a sculpting.

Friday, April 29, 2016
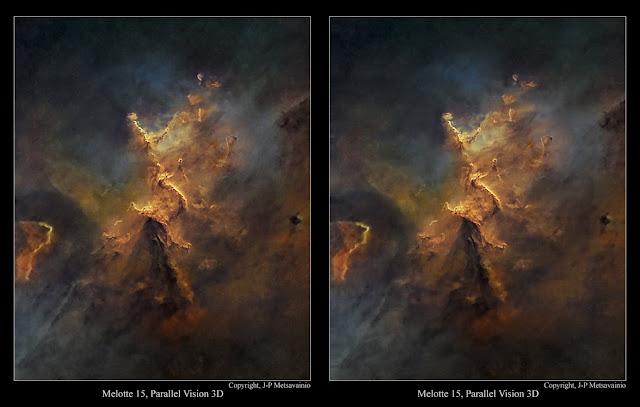
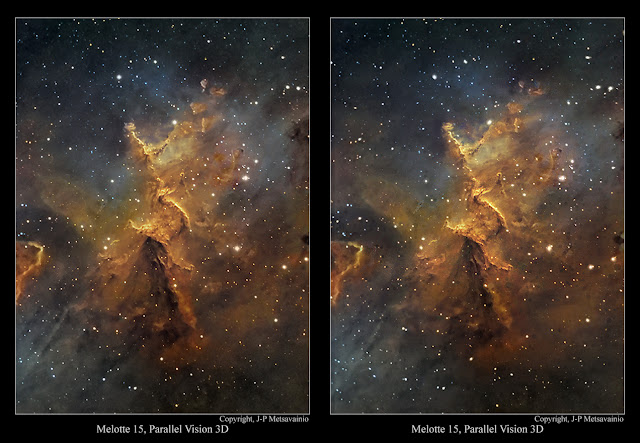
An experimental 3D-stereo pictures of Melotte 15
Images are for two different viewing methods, the first set of images is for the Parallel Vision method and the second set for the Cross Vision method. Viewing instructions can be seen HERE.
NOTE! This is a personal vision about forms and shapes, based on some scientific facts, deduction and an artistic impression. A short explanation, about the method used for the 3D conversion of my astrophoto, at the end of this post.
Melotte 15 as a freeview stereo pairs with no Stars
Click for a large image
For a parallel viewing method (Eyes parallel to each other)
For a cross vision viewing method (Eyes crossed)

For a parallel viewing method (Eyes parallel to each other)
For a cross vision viewing method (Eyes crossed)

For a parallel viewing method (Eyes parallel to each other)

Image pair for the Parallel Vision viewing method, click for a large image.
Original 2D-image and technical details can be seen HERE.
For a cross vision viewing method (Eyes crossed)
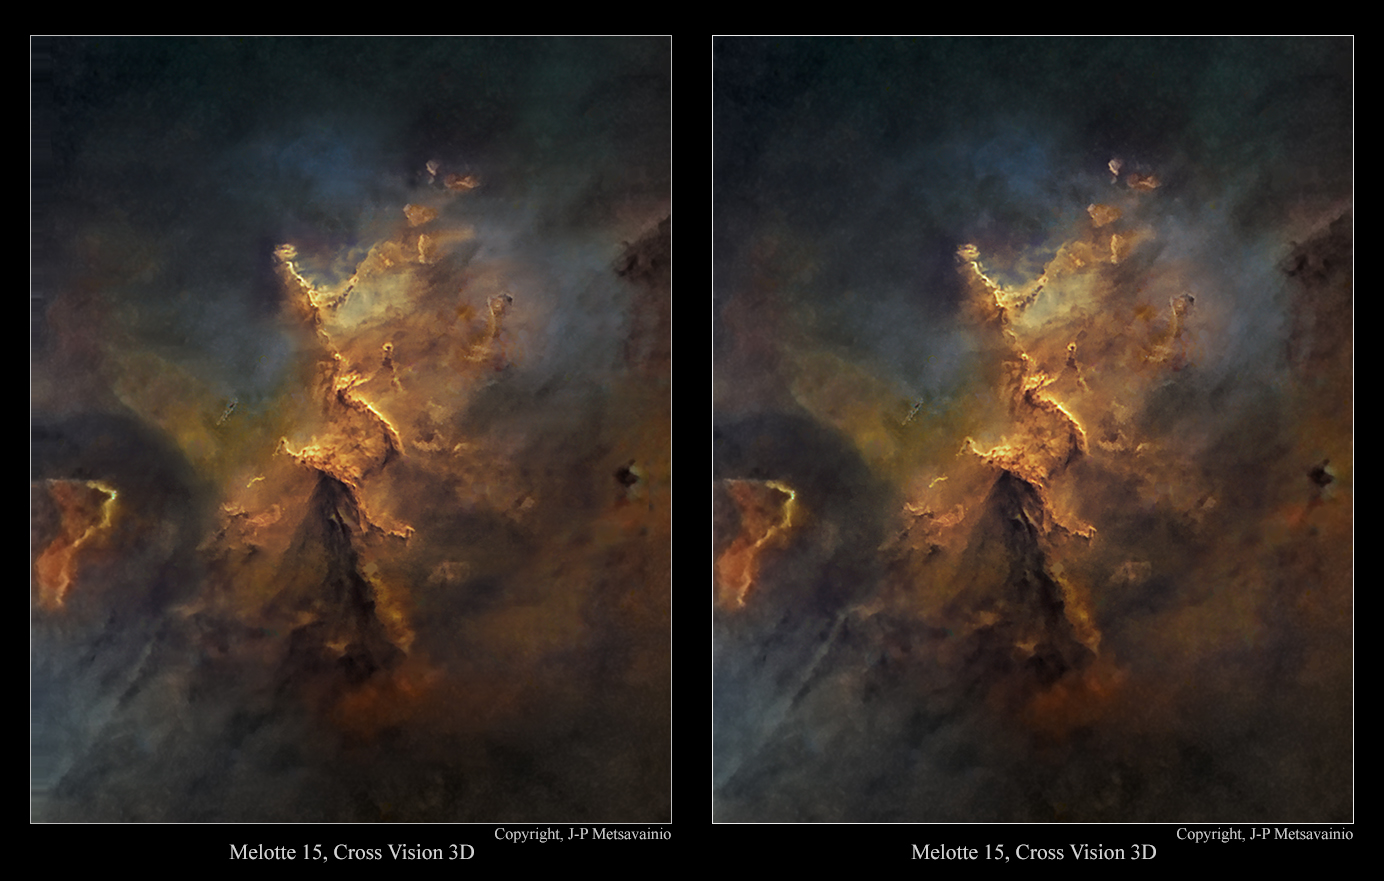
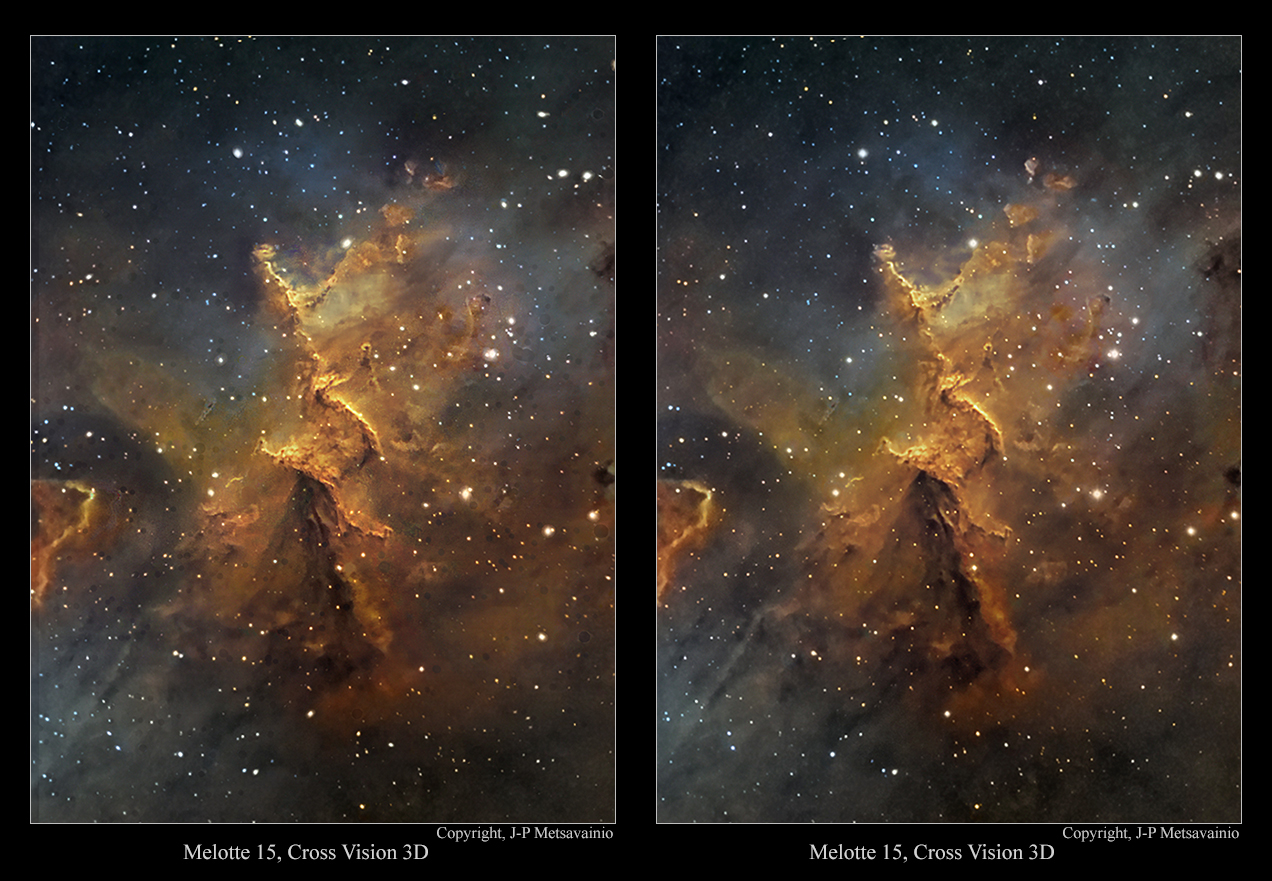
Melotte 15 as a freeview stereo pairs with Stars
Click for a large image
For a parallel viewing method (Eyes parallel to each other)
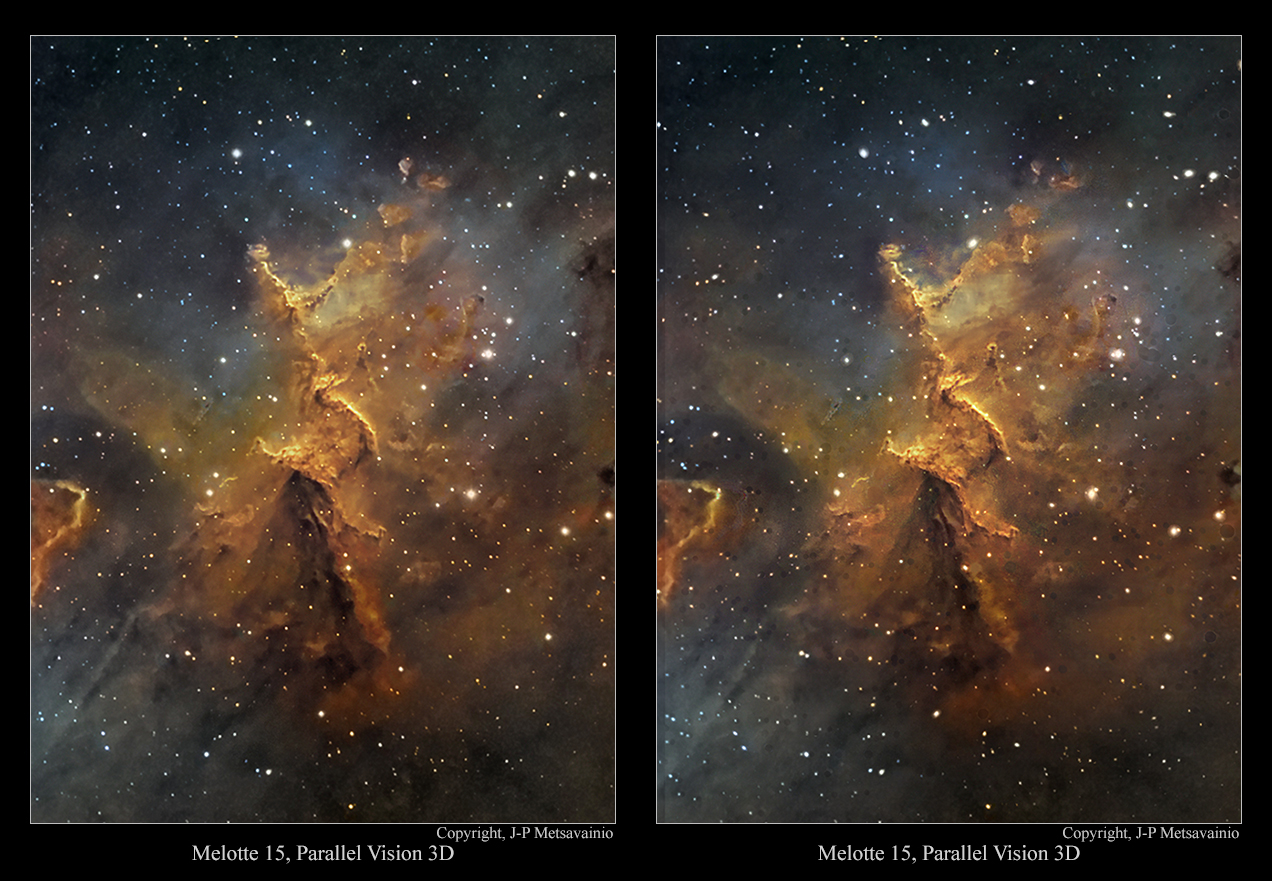
Image pair for the Parallel Vision viewing method, click for a large image.
For a cross vision viewing method (Eyes crossed)
HOW?
All the original 2D-images are imaged by me, if not otherwise stated.
Due the huge distances, no real parallax can be imaged for a volumetric information.
I have developed a method to turn any 2D-astronomical image to a various 3D-formats. The result is always an approximation of the reality, based on some known scientific facts, deduction and an artistic impression.
What are the known facts?
By using a scientifically estimated distance of the object, I can organize right amount of stars front and behind the object. (as then we know the absolute position of the object at our Milky-way)
Stars are divided to groups by apparent brightness, that can be used as a draft distance indicator, brighter the closer. There is usually a known star cluster or a star(s) coursing the ionization and they can be placed in right relative position to the nebula itself .
Generally emission nebulae are not lit by the starlight directly but radiation from stars ionizing gases in the nebula. Hence the nebula itself is emitting its own light, at wavelength typical to each element. Due to that, the thickness of the nebula can be estimated by its brightness, thicker = brighter. Nebulae are also more or less transparent, so we can see "both sides" at the same time.
Many other relative distances can be figured out just carefully studying the image, like dark nebulae must be front of bright ones. The local stellar wind, radiation pressure, from the star cluster, shapes the nebula, For that reason, pillar like formations must point to a cluster. Same radiation pressure usually forms kind of cavitation, at the nebulosa, around the star cluster, by blowing away all the gas around the source of stellar wind. The ionized oxygen, O-III, emits bluish light, it requires lots of energy to ionize. Due to that, the blue glowing area locates usually near the source of ionization, at the heart of the nebula. This and many other small indicators can be found by carefully studying the image itself.
Using the known data, I can build a kind of skeleton model of the nebula. Then the artistic part is mixed to a scientific part, rest is very much like a sculpting.
Tuesday, April 26, 2016
Sharpless 114, the Flying Dragon Nebula, as an experimental 3D-stereo pictures.
Images are for two different viewing methods, the first set of images is for the Parallel Vision method and the second set for the Cross Vision method. Viewing instructions can be seen HERE.
NOTE! This is a personal vision about forms and shapes, based on some scientific facts, deduction and an artistic impression. A short explanation, about the method used for the 3D conversion of my astrophoto, at the end of this post.
Flying Dragon nebula, Sh2-114, as a freeview stereo pairs
Click for a large image
For a parallel viewing method (Eyes parallel to each other)

For a cross vision viewing method (Eyes crossed)
 Image pair for the Cross Vision viewing method, click for a large image.
For a parallel viewing method (Eyes parallel to each other)

Image pair for the Parallel Vision viewing method, click for a large image.
For a cross vision viewing method (Eyes crossed)

HOW?
All the original 2D-images are imaged by me, if not otherwise stated.
Due the huge distances, no real parallax can be imaged for a volumetric information.
I have developed a method to turn any 2D-astronomical image to a various 3D-formats. The result is always an approximation of the reality, based on some known scientific facts, deduction and an artistic impression.
What are the known facts?
By using a scientifically estimated distance of the object, I can organize right amount of stars front and behind the object. (as then we know the absolute position of the object at our Milky-way)
Stars are divided to groups by apparent brightness, that can be used as a draft distance indicator, brighter the closer. There is usually a known star cluster or a star(s) coursing the ionization and they can be placed in right relative position to the nebula itself .
Generally emission nebulae are not lit by the starlight directly but radiation from stars ionizing gases in the nebula. Hence the nebula itself is emitting its own light, at wavelength typical to each element. Due to that, the thickness of the nebula can be estimated by its brightness, thicker = brighter. Nebulae are also more or less transparent, so we can see "both sides" at the same time.
Many other relative distances can be figured out just carefully studying the image, like dark nebulae must be front of bright ones. The local stellar wind, radiation pressure, from the star cluster, shapes the nebula, For that reason, pillar like formations must point to a cluster. Same radiation pressure usually forms kind of cavitation, at the nebulosa, around the star cluster, by blowing away all the gas around the source of stellar wind. The ionized oxygen, O-III, emits bluish light, it requires lots of energy to ionize. Due to that, the blue glowing area locates usually near the source of ionization, at the heart of the nebula. This and many other small indicators can be found by carefully studying the image itself.
Using the known data, I can build a kind of skeleton model of the nebula. Then the artistic part is mixed to a scientific part, rest is very much like a sculpting.
Monday, April 25, 2016
Filaments of the central Cygnus as an experimental 3D-stereo pictures
Images are for two different viewing methods, the first set of images is for the Parallel Vision method and the second set for the Cross Vision method. Viewing instructions can be seen HERE.
NOTE! This is a personal vision about forms and shapes, based on some scientific facts, deduction and an artistic impression. A short explanation, about the method used for the 3D conversion of my astrophoto, at the end of this post.
Filaments of the Central Cygnus as a freeview stereo pairs
Click for a large image
For a parallel vision viewing method (Eyes parallel to each other)
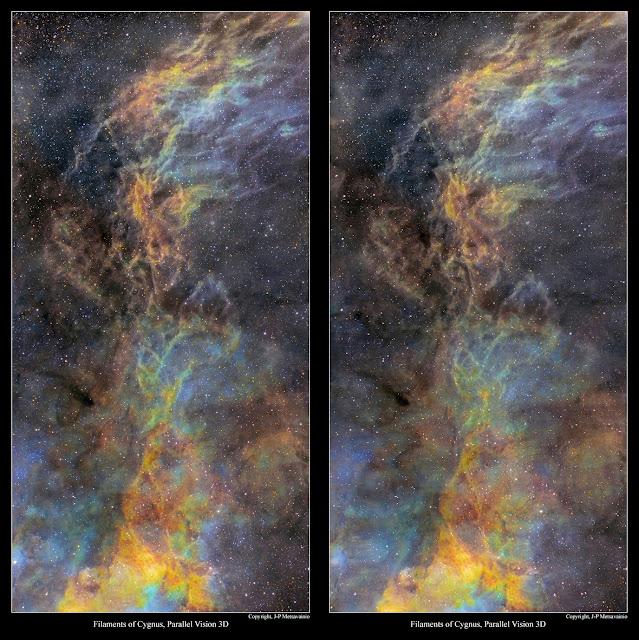
For a parallel vision viewing method (Eyes parallel to each other)
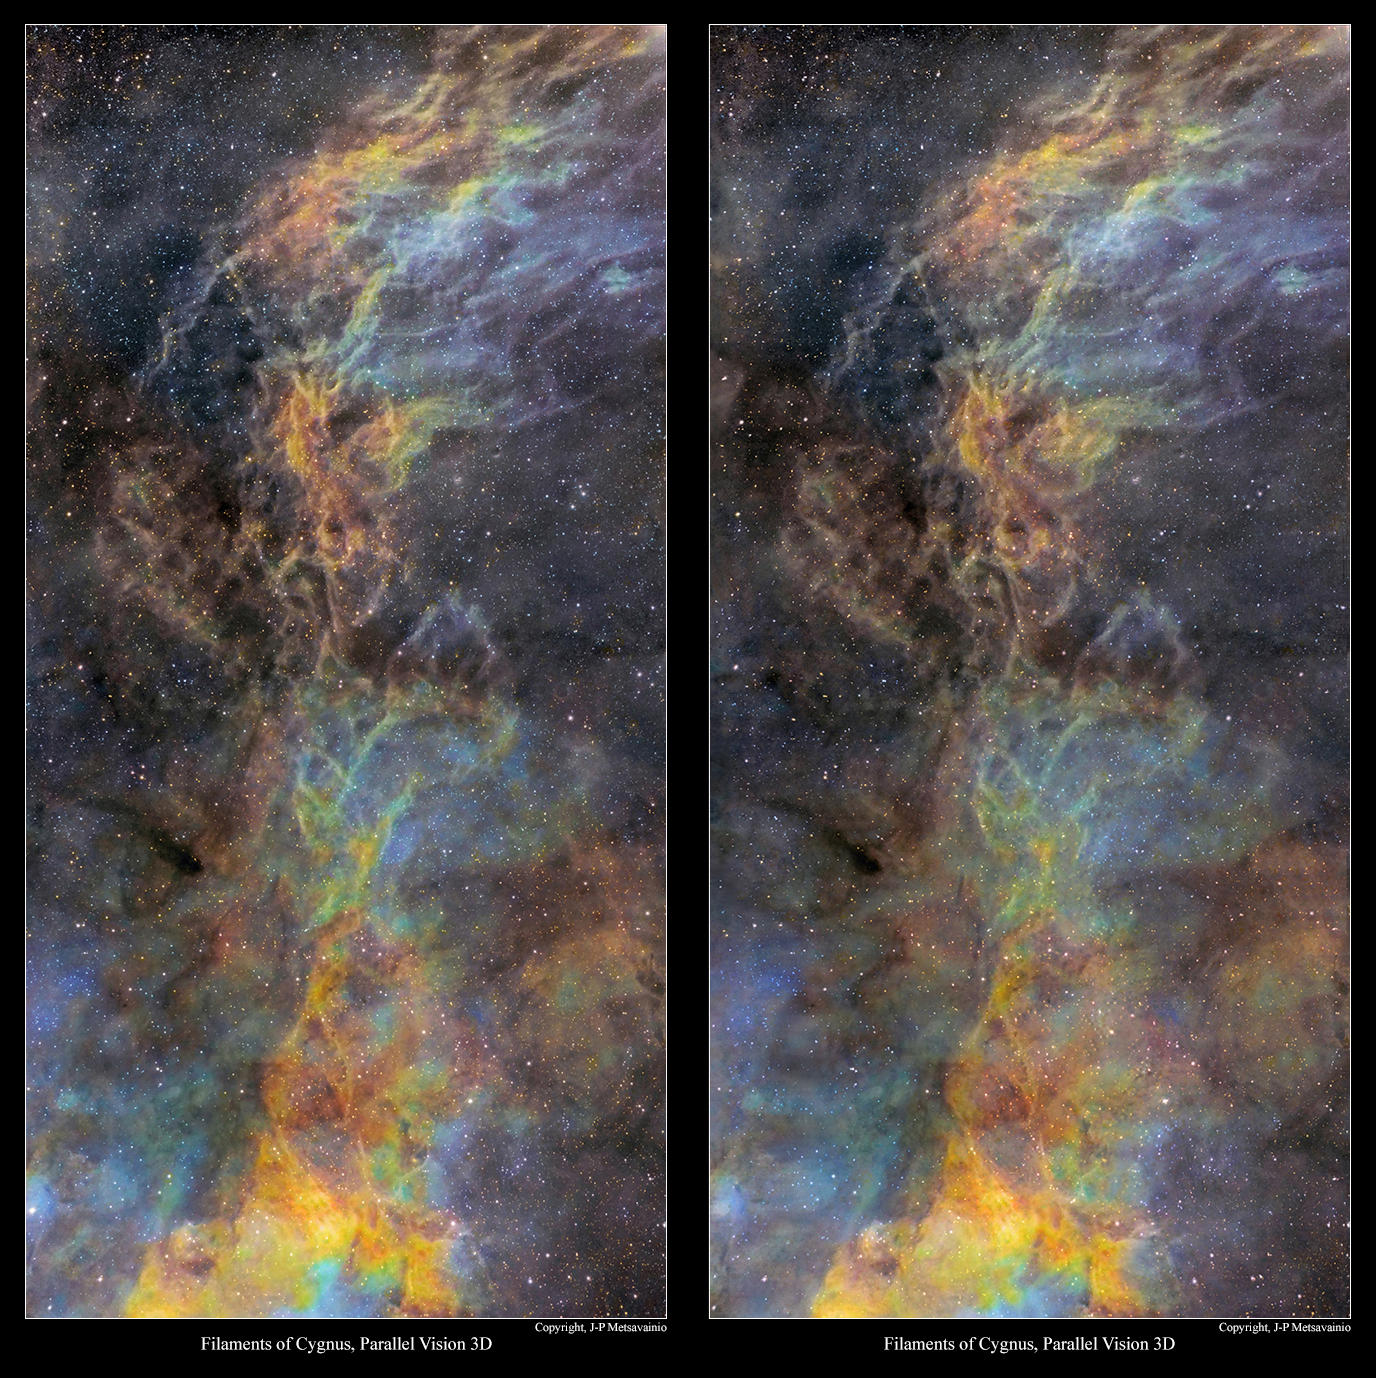
Image pair for the Parallel Vision viewing method, click for a large image.
For a cross vision viewing method (Eyes crossed)

Image pair for the Cross Vision viewing method, click for a large image.
Original 2D-image and technical details can be seen HERE.
Location in Cygnus

More info about this photo can be found HERE.
Sunday, April 24, 2016
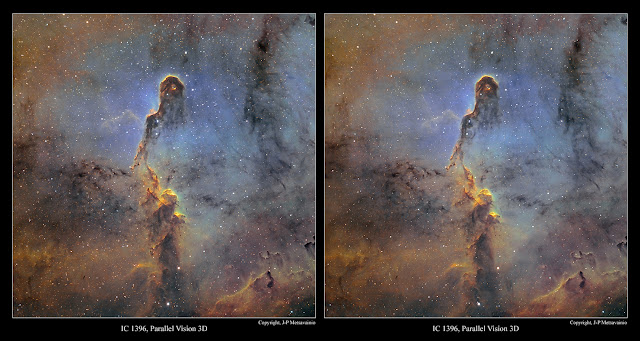
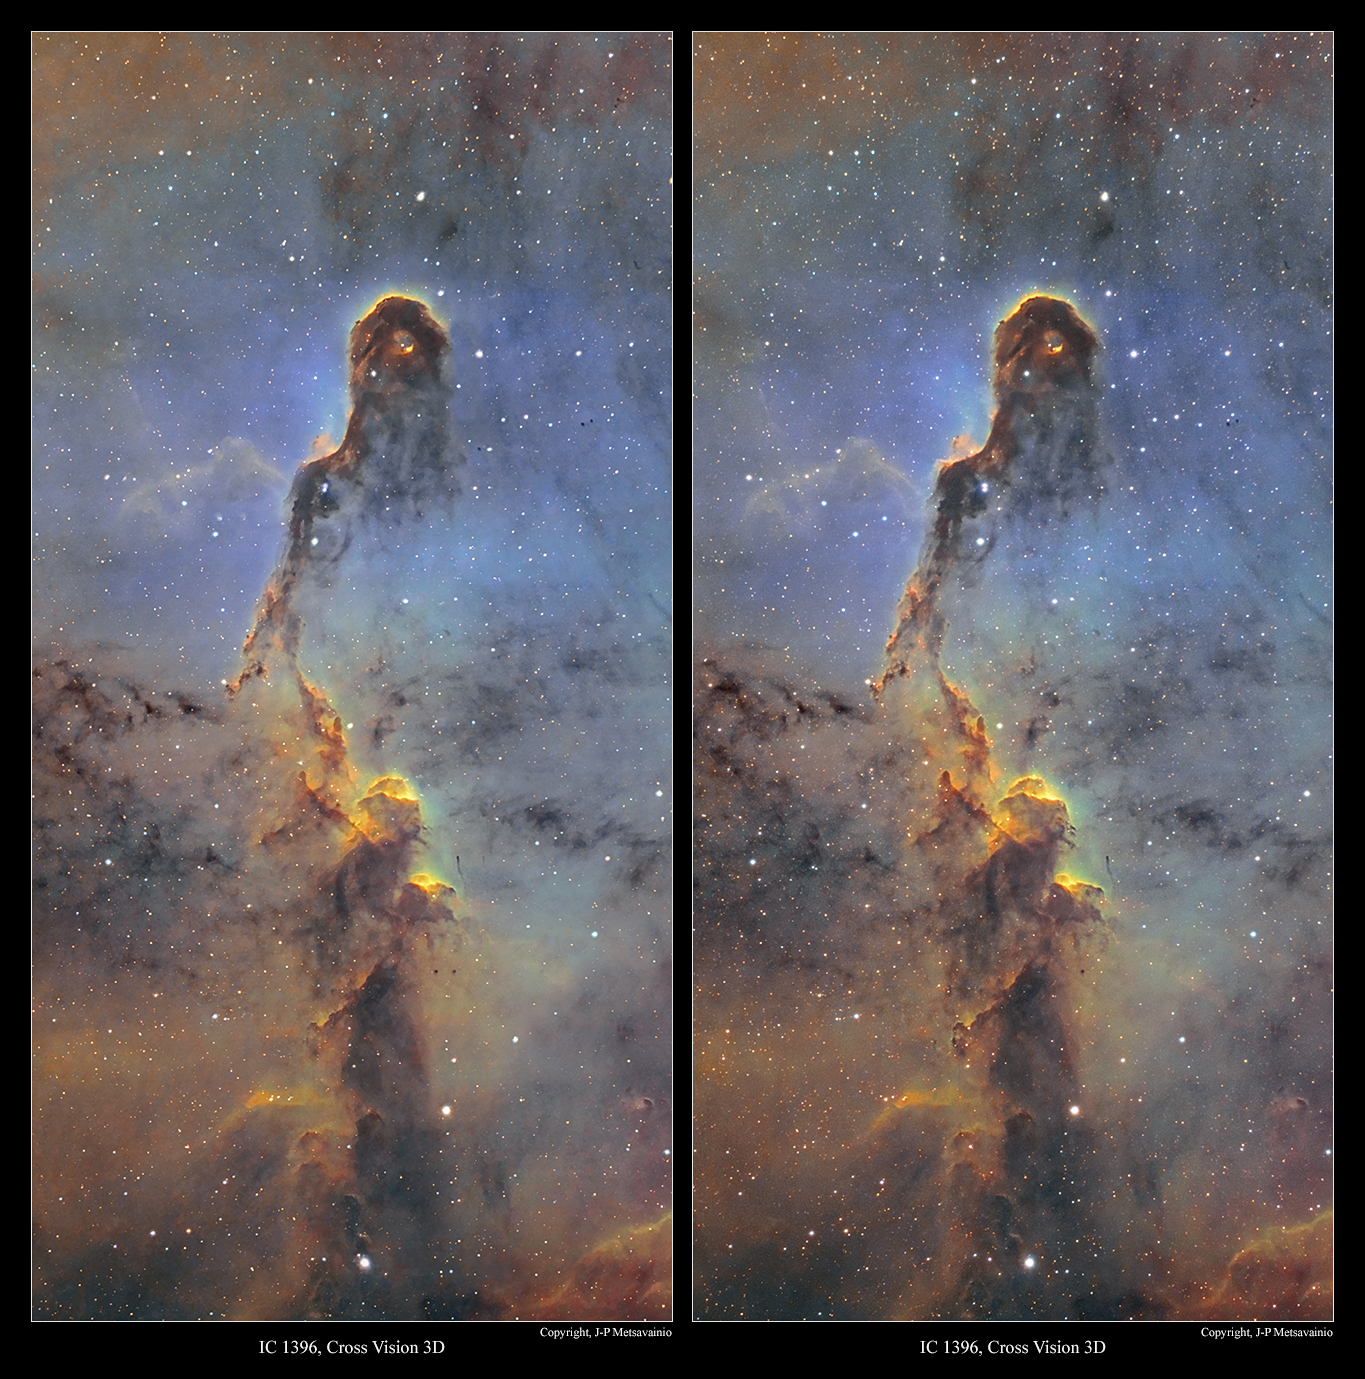
The Elephant's Trunk in IC 1396 as an experimental 3D-stereo pictures.
Images are for two different viewing methods, the first set of images is for the Parallel Vision method and the second set for the Cross Vision method. Viewing instructions can be seen HERE.
NOTE! This is a personal vision about forms and shapes, based on some scientific facts, deduction and an artistic impression. A short explanation, about the method used for the 3D conversion of my astrophoto, at the end of this post.
Elephant's Trunk nebula as a freeview stereo pairs
Click for a large image
For a parallel viewing method (Eyes parallel to each other)

Closeup

For a parallel viewing method (Eyes parallel to each other)

Image pair for the Parallel Vision viewing method, click for a large image.
Original 2D-image and technical details can be seen HERE.
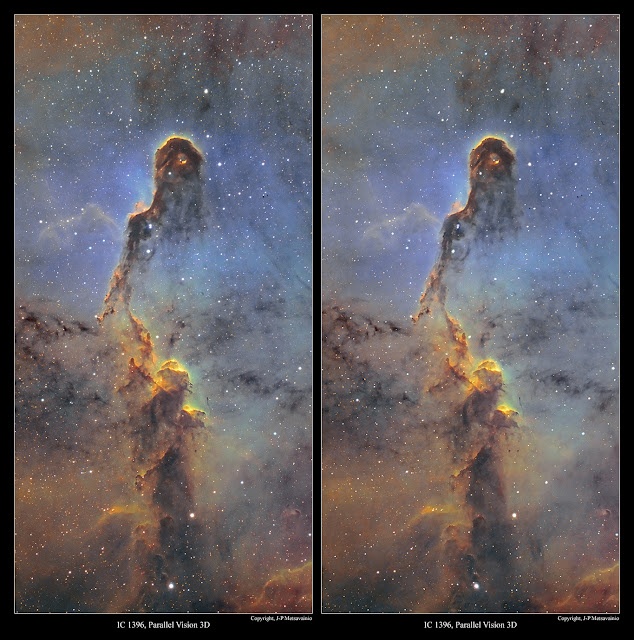
Closeup

For a cross vision viewing method (Eyes crossed)
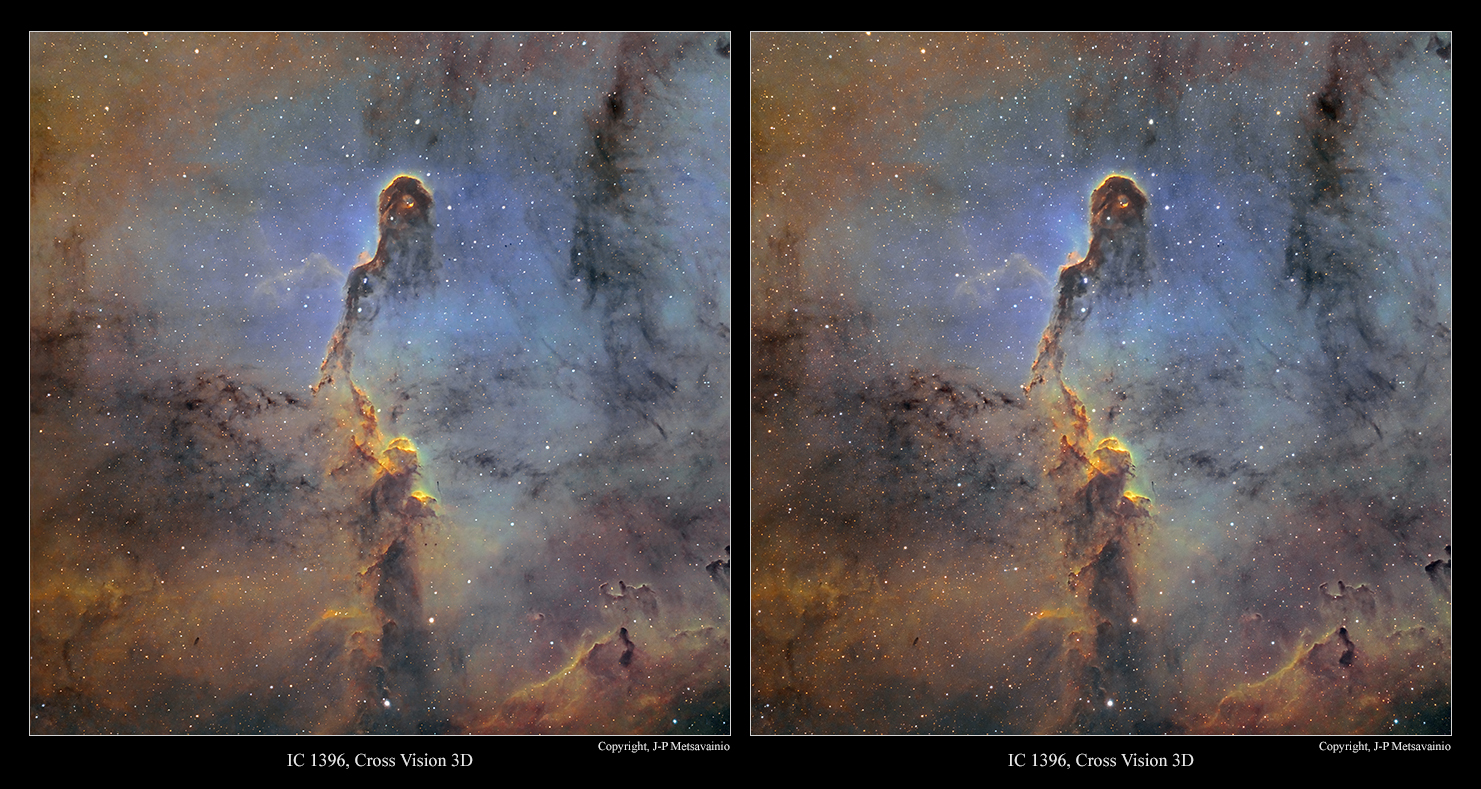
Image pair for the Cross Vision viewing method, click for a large image.
Original 2D-image and technical details can be seen HERE.
Closeup
HOW?
All the original 2D-images are imaged by me, if not otherwise stated.
Due the huge distances, no real parallax can be imaged for a volumetric information.
I have developed a method to turn any 2D-astronomical image to a various 3D-formats. The result is always an approximation of the reality, based on some known scientific facts, deduction and an artistic impression.
What are the known facts?
By using a scientifically estimated distance of the object, I can organize right amount of stars front and behind the object. (as then we know the absolute position of the object at our Milky-way)
Stars are divided to groups by apparent brightness, that can be used as a draft distance indicator, brighter the closer. There is usually a known star cluster or a star(s) coursing the ionization and they can be placed in right relative position to the nebula itself .
Generally emission nebulae are not lit by the starlight directly but radiation from stars ionizing gases in the nebula. Hence the nebula itself is emitting its own light, at wavelength typical to each element. Due to that, and the thickness of the nebula can be estimated by its brightness, thicker = brighter. Nebulae are also more or less transparent, so we can see "both sides" at the same time.
Many other relative distances can be figured out just carefully studying the image, like dark nebulae must be front of bright ones. The local stellar wind, radiation pressure, from the star cluster, shapes the nebula, For that reason, pillar like formations must point to a cluster. ( Look previous image, above this text.) Same radiation pressure usually forms kind of cavitation, at the nebulosa, around the star cluster, by blowing away all the gas around the source of stellar wind. The ionized oxygen, O-III, emits blueish light, it requires lots of energy to ionize. Due to that, the blue glowing area locates usually near the source of ionization, at the heart of the nebula. This and many other small indicators can be found by carefully studying the image itself.
Using the known data, I can build a kind of skeleton model of the nebula. Then the artistic part is mixed to a scientific part, rest is very much like a sculpting.
Wednesday, April 20, 2016
Filaments of the Western Cygnus in stereo, an experimental 3D-study
Images are for two different viewing methods, the first set of images is for the Parallel Vision method and the second set for the Cross Vision method. Viewing instructions can be seen HERE.
NOTE! This is a personal vision about forms and shapes, based on some scientific facts, deduction and an artistic impression. A short explanation, about the method used for the 3D conversion of my astrophoto, at the end of this post.
Sh2-224 as a freeview stereo pairs
Click for a large image
For a parallel viewing method (Eyes parallel to each other)
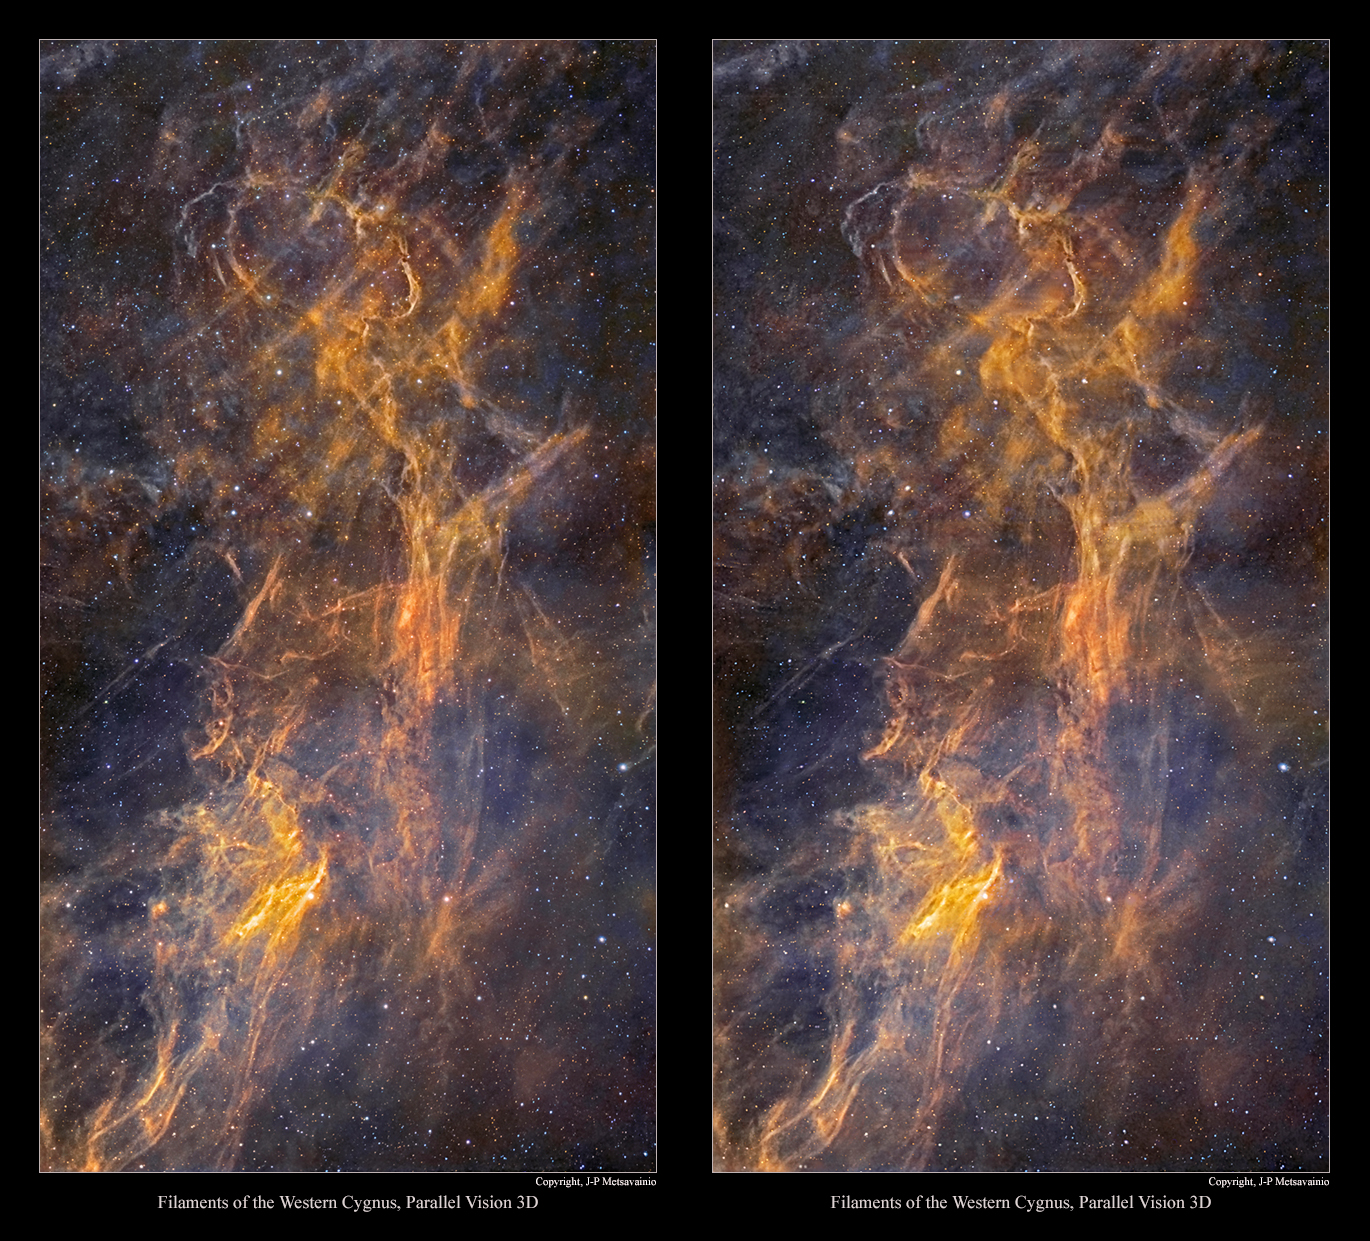
Image pair for the Parallel Vision viewing method, click for a large image.
Original 2D-image and technical details can be seen HERE.
For a cross vision viewing method (Eyes crossed)
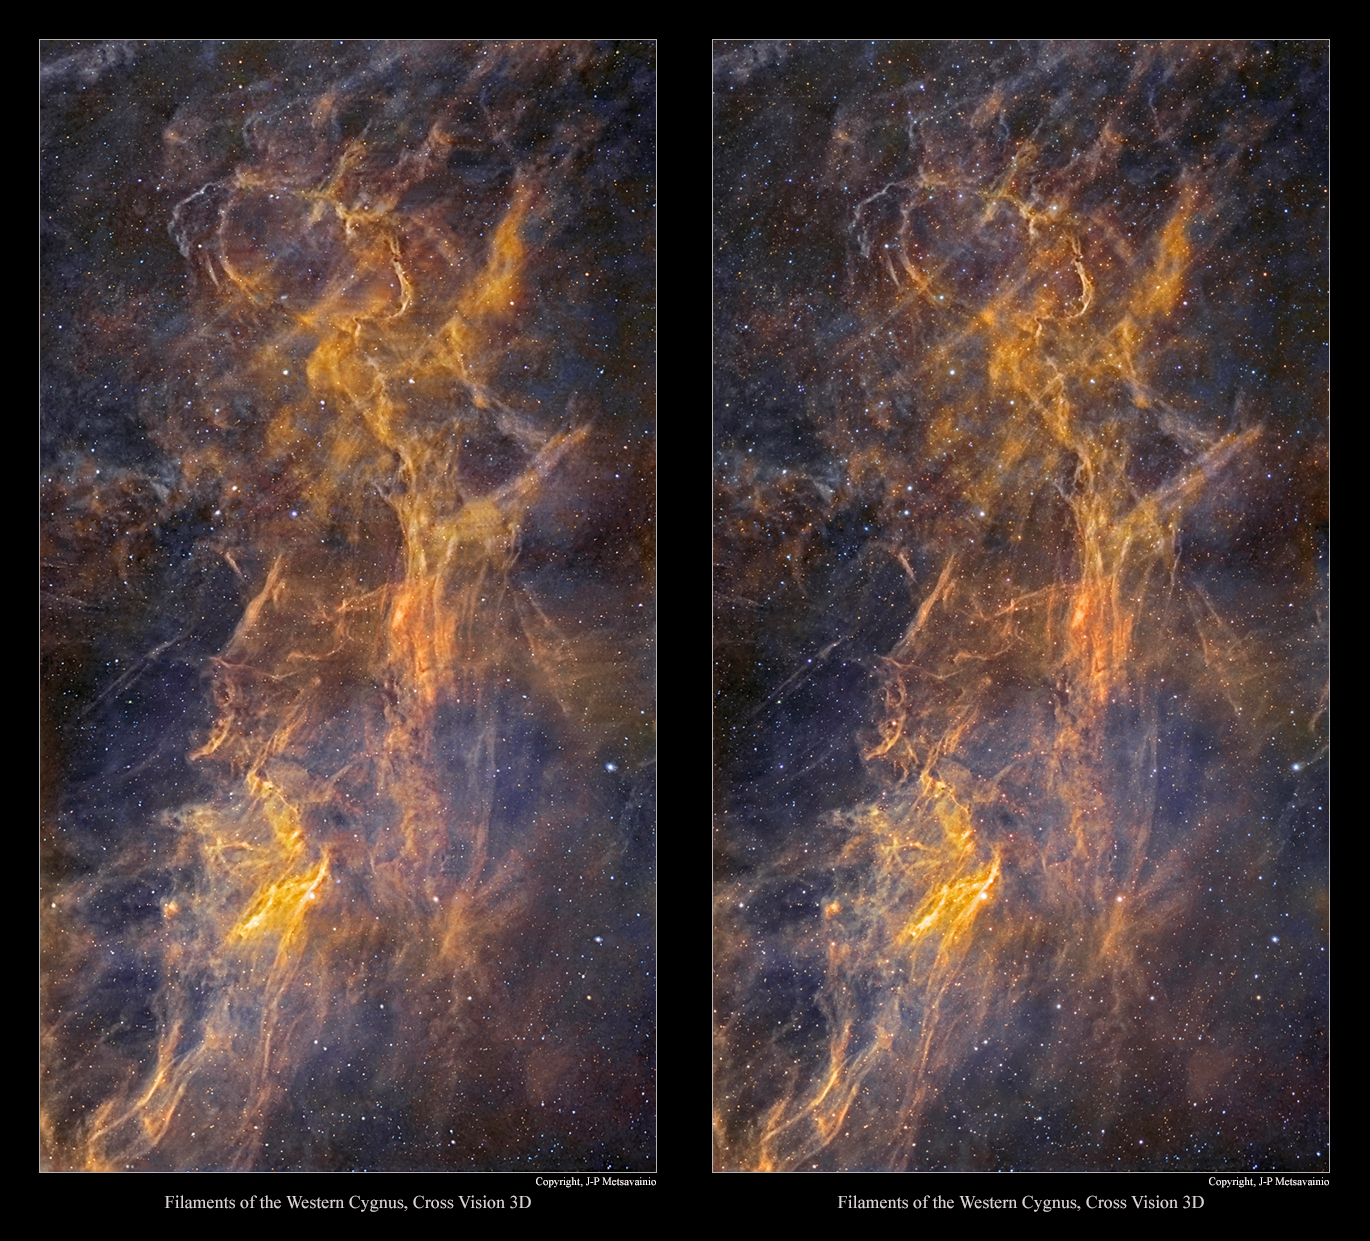
Image pair for the Cross Vision viewing method, click for a large image.
Original 2D-image and technical details can be seen HERE.
HOW?
All the original 2D-images are imaged by me, if not otherwise stated.
Due the huge distances, no real parallax can be imaged for a volumetric information.
I have developed a method to turn any 2D-astronomical image to a various 3D-formats. The result is always an approximation of the reality, based on some known scientific facts, deduction and an artistic impression.
What are the known facts?
By using a scientifically estimated distance of the object, I can organize right amount of stars front and behind the object. (as then we know the absolute position of the object at our Milky-way)
Stars are divided to groups by apparent brightness, that can be used as a draft distance indicator, brighter the closer. There is usually a known star cluster or a star(s) coursing the ionization and they can be placed in right relative position to the nebula itself .
Generally emission nebulae are not lit by the starlight directly but radiation from stars ionizing gases in the nebula. Hence the nebula itself is emitting its own light, at wavelength typical to each element. Due to that, and the thickness of the nebula can be estimated by its brightness, thicker = brighter. Nebulae are also more or less transparent, so we can see "both sides" at the same time.
Many other relative distances can be figured out just carefully studying the image, like dark nebulae must be front of bright ones. The local stellar wind, radiation pressure, from the star cluster, shapes the nebula, For that reason, pillar like formations must point to a cluster. ( Look previous image, above this text.) Same radiation pressure usually forms kind of cavitation, at the nebulosa, around the star cluster, by blowing away all the gas around the source of stellar wind. The ionized oxygen, O-III, emits blueish light, it requires lots of energy to ionize. Due to that, the blue glowing area locates usually near the source of ionization, at the heart of the nebula. This and many other small indicators can be found by carefully studying the image itself.
Using the known data, I can build a kind of skeleton model of the nebula. Then the artistic part is mixed to a scientific part, rest is very much like a sculpting.
Monday, April 18, 2016
Supernova remnant Sharpless 224 in stereo, an experimental 3D-study
Images are for two different viewing methods, the first set of images is for the Parallel Vision method and the second set for the Cross Vision method. Viewing instructions can be seen HERE.
NOTE! This is a personal vision about forms and shapes, based on some scientific facts, deduction and an artistic impression. A short explanation, about the method used for the 3D conversion of my astrophoto, at the end of this post.
Sh2-224 as a freeview stereo pairs
For a parallel viewing method (Eyes parallel to each other)

Original 2D-image and technical details can be seen HERE.
For a cross vision viewing method (Eyes crossed)
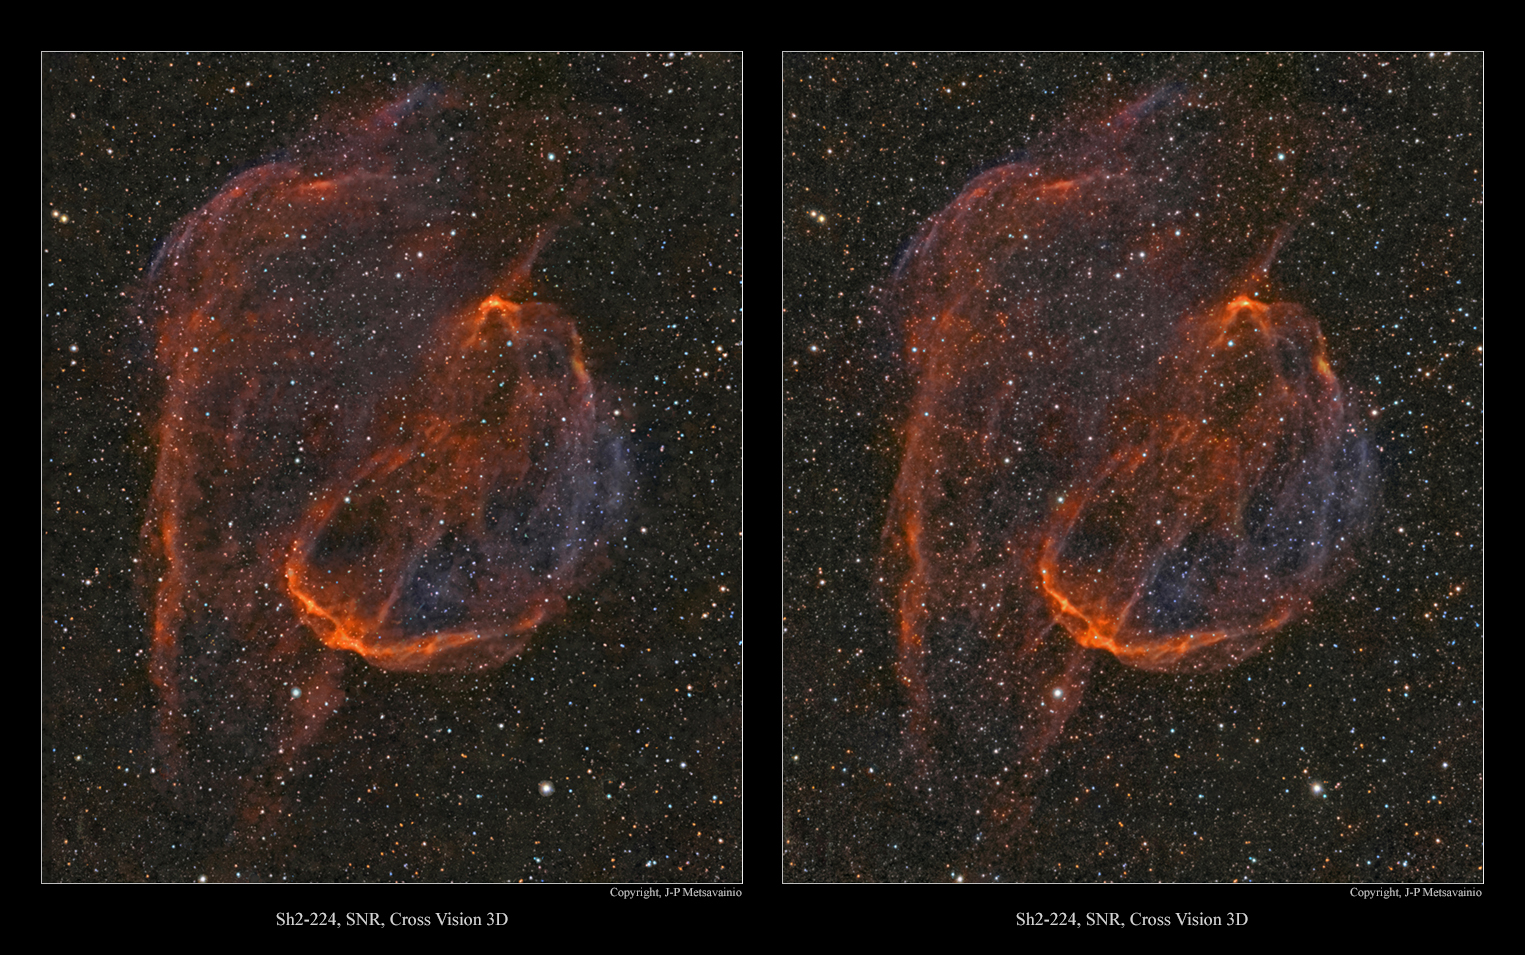
Original 2D-image and technical details can be seen HERE.
HOW?
All the original 2D-images are imaged by me, if not otherwise stated.
Due the huge distances, no real parallax can be imaged for a volumetric information.
I have developed a method to turn any 2D-astronomical image to a various 3D-formats. The result is always an approximation of the reality, based on some known scientific facts, deduction and an artistic impression.
What are the known facts?
By using a scientifically estimated distance of the object, I can organize right amount of stars front and behind the object. (as then we know the absolute position of the object at our Milky-way)
Stars are divided to groups by apparent brightness, that can be used as a draft distance indicator, brighter the closer. There is usually a known star cluster or a star(s) coursing the ionization and they can be placed in right relative position to the nebula itself .
Generally emission nebulae are not lit by the starlight directly but radiation from stars ionizing gases in the nebula. Hence the nebula itself is emitting its own light, at wavelength typical to each element. Due to that, and the thickness of the nebula can be estimated by its brightness, thicker = brighter. Nebulae are also more or less transparent, so we can see "both sides" at the same time.
Many other relative distances can be figured out just carefully studying the image, like dark nebulae must be front of bright ones. The local stellar wind, radiation pressure, from the star cluster, shapes the nebula, For that reason, pillar like formations must point to a cluster. ( Look previous image, above this text.) Same radiation pressure usually forms kind of cavitation, at the nebulosa, around the star cluster, by blowing away all the gas around the source of stellar wind. The ionized oxygen, O-III, emits blueish light, it requires lots of energy to ionize. Due to that, the blue glowing area locates usually near the source of ionization, at the heart of the nebula. This and many other small indicators can be found by carefully studying the image itself.
Using the known data, I can build a kind of skeleton model of the nebula. Then the artistic part is mixed to a scientific part, rest is very much like a sculpting.
Saturday, April 16, 2016
An experimental 3D-study of the NGC 1499, the California Nebula
Images are for two different viewing methods, the first set of images is for the Parallel Vision method and the second set for the Cross Vision method. Viewing instructions can be seen HERE.
NOTE! This is a personal vision about forms and shapes, based on some scientific facts, deduction and an artistic impression. A short explanation, about the method used for the 3D conversion of my astrophoto, at the end of this post.
NGC 1499 as a freeview stereo pairs
For a parallel viewing method (Eyes parallel to each other)

Original 2D-image and technical details can be seen HERE.
For a cross vision viewing method (Eyes crossed)

Original 2D-image and technical details can be seen HERE.
HOW?
I have been asked many times, how my 3D-images are done, so here it goes!
All the original 2D-images are imaged by me, if not otherwise stated.
Due the huge distances, no real parallax can be imaged for a volumetric information.
I have developed a method to turn any 2D-astronomical image to a various 3D-formats. The result is always an approximation of the reality, based on some known scientific facts, deduction and an artistic impression.
What are the known facts?
By using a scientifically estimated distance of the object, I can organize right amount of stars front and behind the object. (as then we know the absolute position of the object at our Milky-way)
Stars are divided to groups by apparent brightness, that can be used as a draft distance indicator, brighter the closer. There is usually a known star cluster or a star(s) coursing the ionization and they can be placed in right relative position to the nebula itself .
Generally emission nebulae are not lit by the starlight directly but radiation from stars ionizing gases in the nebula. Hence the nebula itself is emitting its own light, at wavelength typical to each element. Due to that, and the thickness of the nebula can be estimated by its brightness, thicker = brighter. Nebulae are also more or less transparent, so we can see "both sides" at the same time.
Many other relative distances can be figured out just carefully studying the image, like dark nebulae must be front of bright ones. The local stellar wind, radiation pressure, from the star cluster, shapes the nebula, For that reason, pillar like formations must point to a cluster. ( Look previous image, above this text.) Same radiation pressure usually forms kind of cavitation, at the nebulosa, around the star cluster, by blowing away all the gas around the source of stellar wind. The ionized oxygen, O-III, emits blueish light, it requires lots of energy to ionize. Due to that, the blue glowing area locates usually near the source of ionization, at the heart of the nebula. This and many other small indicators can be found by carefully studying the image itself.
Using the known data, I can build a kind of skeleton model of the nebula. Then the artistic part is mixed to a scientific part, rest is very much like a sculpting.
WHY?
Firstly, they are great fun to do. Secondly, just because I can.
Many times images of nebulae looks like paintings on the canvas. I like to show a real nature of those distant objects as a three dimensional shapes floating in a three dimensional volume. This is a great way to show, how I personally see astronomical targets as a 3D-forms inside my head.
3D-experiments seems to increase a public interest to a subject, as you might have noticed.
I have studied my astronomical images much deeper, than ever without 3D-modeling.
3D-studies has really added a new dimension to my work as an astronomical photographer. (pun intended)
Wednesday, March 16, 2016
4D video of the Veil Nebula SNR
The weather up here 65N has been cloudy for months. I played with my older images and made couple of experimental 3D animations out of them. Here is the first one, the Veil Nebula SNR in Cygnus. This is actually a 4D animation since it shows the time too... I made this just for fun, this is not an accurate model of reality but close enough for me.
4D video of the Veil Nebula supernova remnant
Click to start and stop the movie
Watch in Youtube, HD 1080p: https://www.youtube.com/watch?v=kWt9BqAtyKIOriginal 2D image of the Veil Nebula can be seen here:
http://astroanarchy.blogspot.fi/2013/12/veil-nebula-unveiled.html
Saturday, February 20, 2016
Two high resolution, cinemascope format, panoramas from my astro photos
I have worked with a cinemascope format movie for a movie theatre presentation from my photos. This is an extra wide ~21:9 format used in theaters. The actual film is not ready yet but I have some of my images converted to this ultra wide format. I think they will look great at a large movie screen! I'll publish some of individual panoramic format photos here, images are downscaled for the web.
Half a Moon with a 3D twist
Please, be sure to click for a full resolution images, ~2600 x 1200 pixels

Image details can be seen HERE
Lagoon Nebula
Please, be sure to click for a full resolution images, ~2600 x 1200 pixels

Image details can be seen HERE
Published sets of cinemascope format astro images
http://www.astroanarchy.blogspot.fi/2016/02/more-high-resolution-cinemascope-format.html
http://www.astroanarchy.blogspot.fi/2016/02/high-resolution-cinemascope-format.html
http://www.astroanarchy.blogspot.fi/2016/02/cinemascope-format-panoramas-from-my.html
http://www.astroanarchy.blogspot.fi/2016/02/i-have-worked-with-cinemascope-format.html
Tuesday, December 29, 2015
Astro Anarchy, the year 2015
HAPPY NEW YEAR
This post is about all of my astronomical photos from the year 2015
All my photos from the Spring and Autumn seasons of 2015 are taken with my new imaging setup. Celestron Edge HD 1100 with 0.7 reducer at 10-micron mount. Apogee Alta U16 camera with Astrodon filters and an active optics unit, SXV AO LF, from Starlight Xpress.
My humble thanks to the supporters, they made my work possible!
All companies are offering the first class products and service!
Year 2015 as an image poster
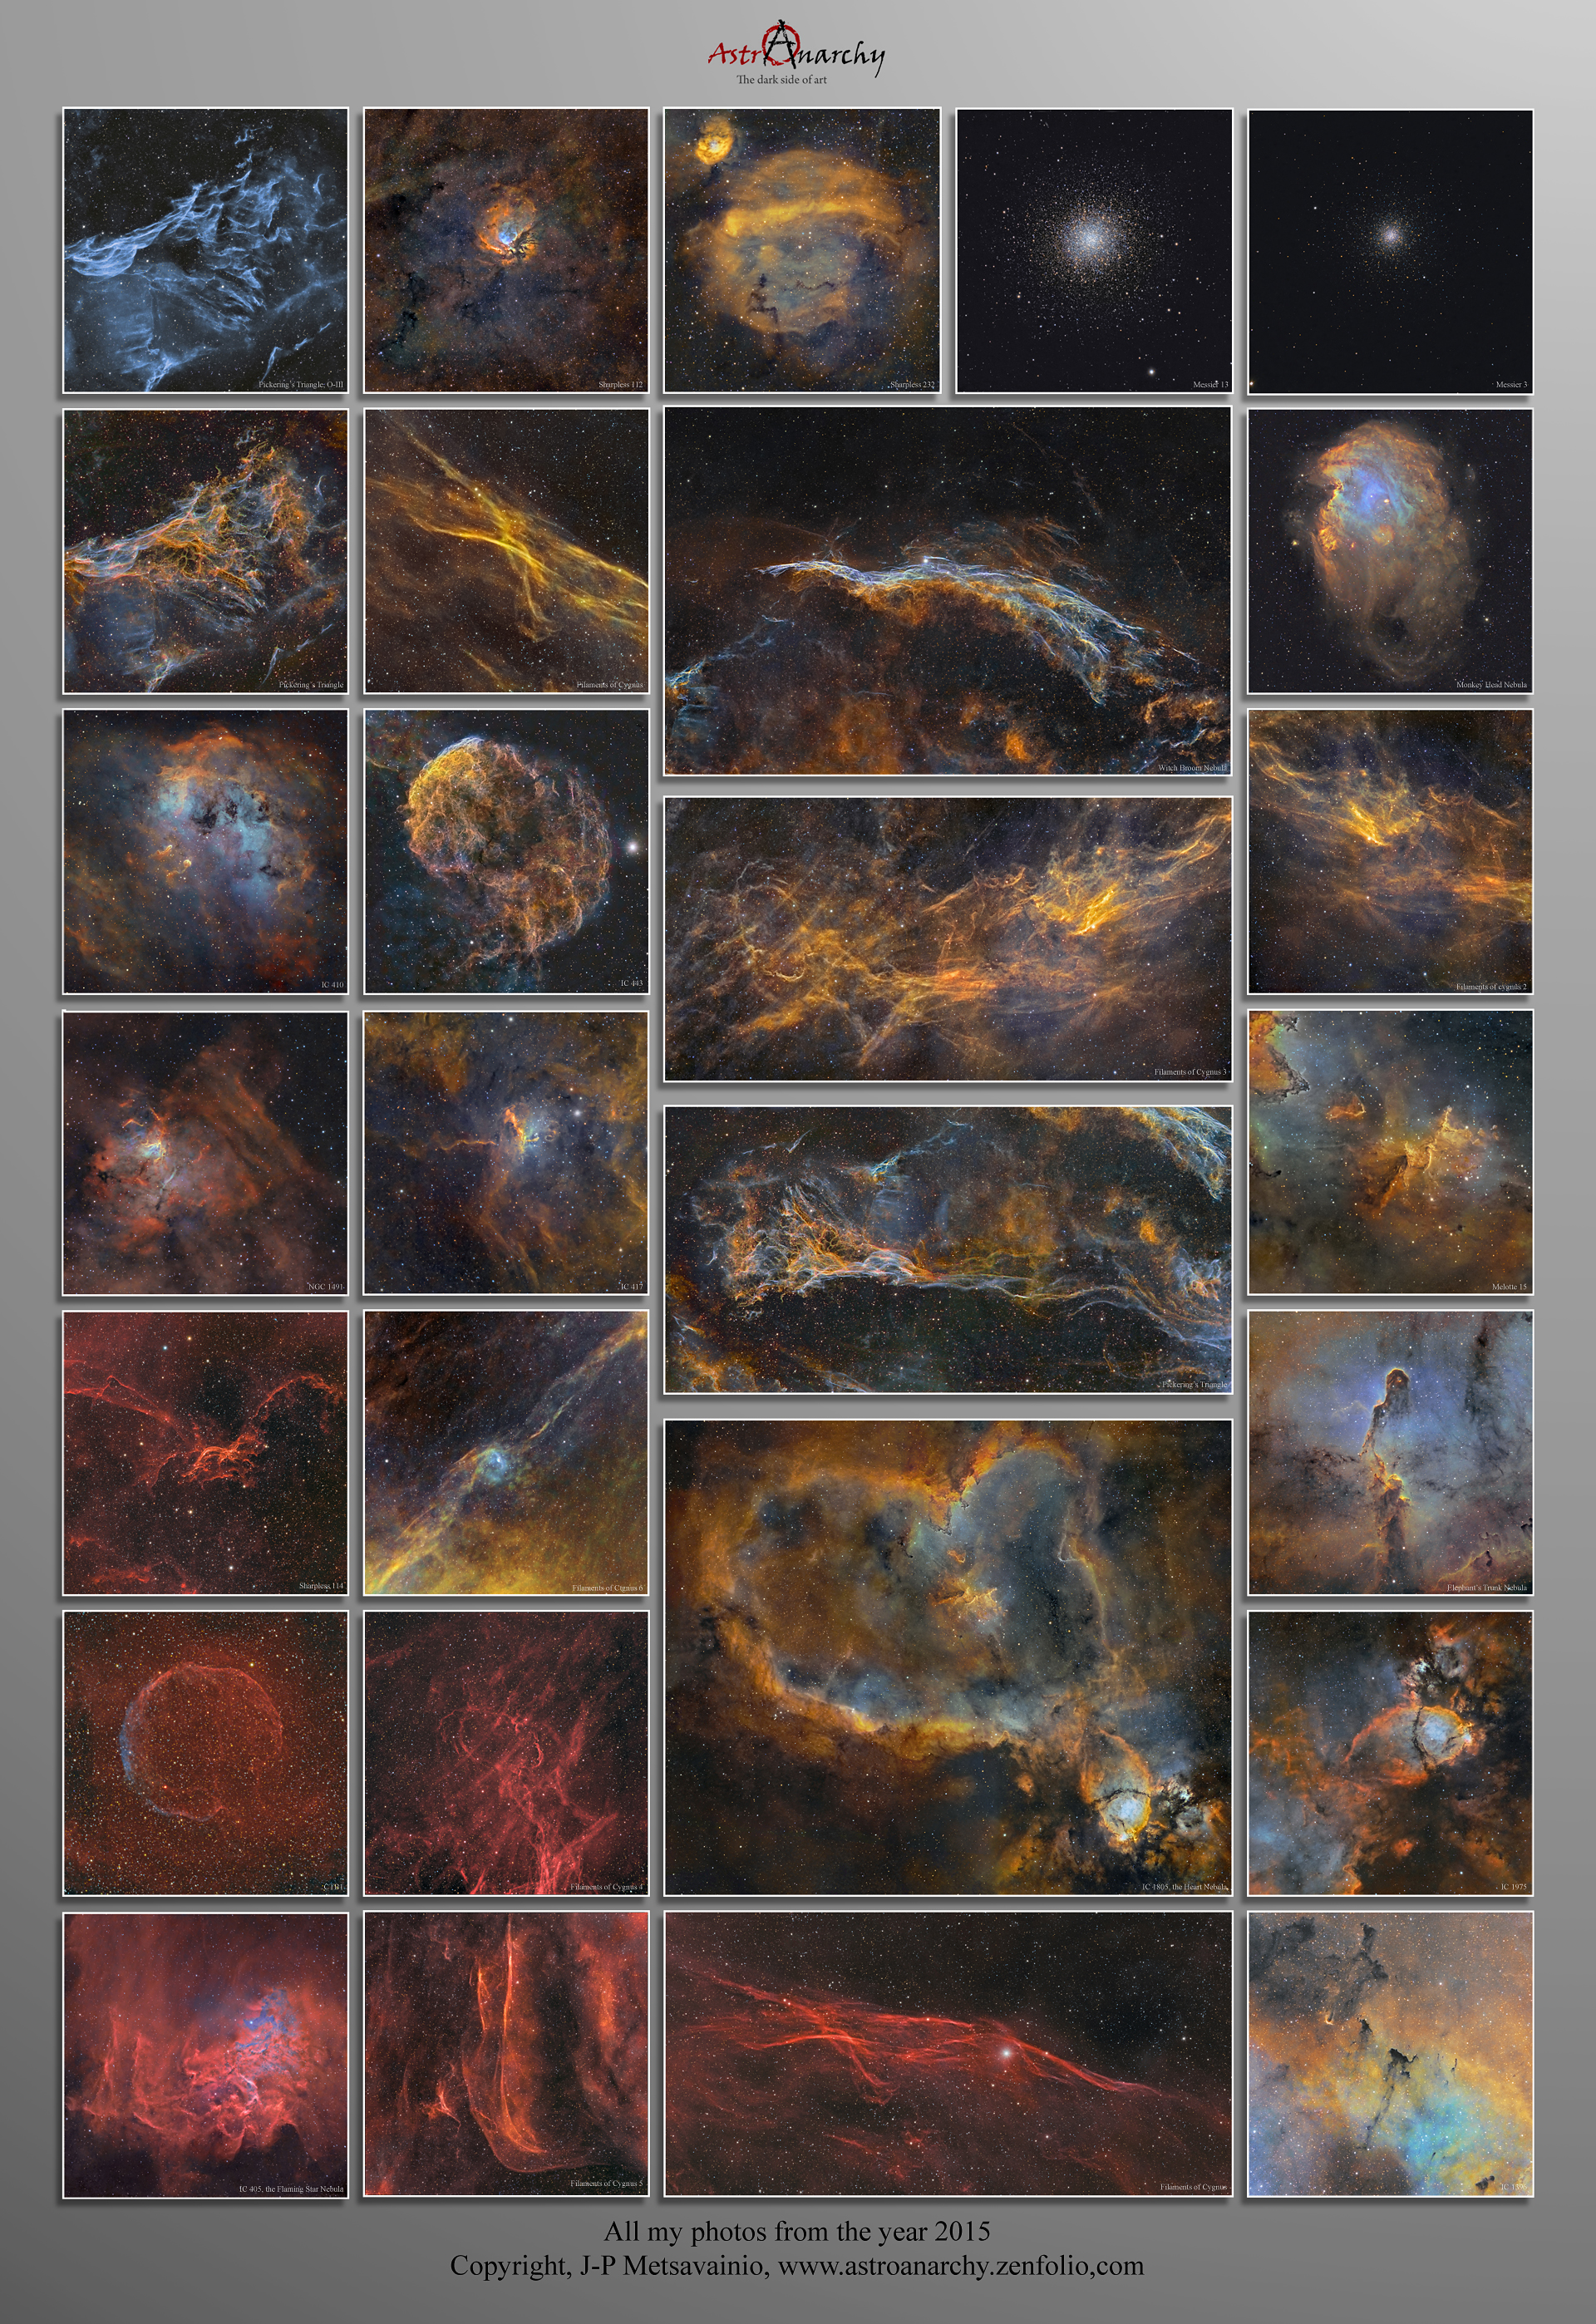
Pickering's Triangle in O-III, http://www.astroanarchy.blogspot.fi/2015/02/a-two-frame-mosaic-of-veil-nebula.html
Sharpless 232, http://www.astroanarchy.blogspot.fi/2015/03/sharpless-232-sh2-232-and-companions-in.html
Pickering's Triangle, http://www.astroanarchy.blogspot.fi/2015/09/pickerings-triangle-my-first-light-for.html NASA APOD
Filaments of Cygnus, http://www.astroanarchy.blogspot.fi/2015/10/filaments-of-western-cygnus.html
Witch Broom Nebula, http://www.astroanarchy.blogspot.fi/2015/10/a-new-image-witchs-broom-nebula.html
Monkey Head nebula, http://www.astroanarchy.blogspot.fi/2015/03/ngc-2174-monkey-head-nebula-project.html
Filaments of Cygnus, http://www.astroanarchy.blogspot.fi/2015/10/filaments-of-cygnus-project-continues.html
Filaments of Cygnus, http://www.astroanarchy.blogspot.fi/2015/11/more-filaments-of-cygnus-and-couple-of.html
Elephant's Trunk Nebula, http://www.astroanarchy.blogspot.fi/2015/10/elephants-trunk-nebula-in-ic-1396.html
Flaming Star Nebula, http://www.astroanarchy.blogspot.fi/2015/02/ic-405-flaming-star-nebula.html
Filaments of Cygnus, http://www.astroanarchy.blogspot.fi/2015/11/filaments-of-cygnus.html
Filaments of Cygnus, http://www.astroanarchy.blogspot.fi/2015/10/filaments-of-western-cygnus.html
(I tested some morphing algorithm, duration 2:58)
Portfolio: http://astroanarchy.zenfolio.com/
Facebook: https://www.facebook.com/jp.metsavainio
Youtube: https://www.youtube.com/channel/UCivFr6kAAYZqMVE2doG9uDQ/videos
Astrobin: http://www.astrobin.com/users/Metsavainio/
Astrobin: http://www.astrobin.com/users/Metsavainio/
As usually, I made my experimental 3d-studies out of my astrophotos. Here is a collection out of them.
A deep deep space
A HD video, ~11 min.
A deep deep space
A HD video, ~11 min.
Original movie is in HD 1080p resolution. Please, click the Youtube logo at lower right to see this video in Youtube. Click the Gear symbol, at lower right in Youtube window, and select the Quality to 1080p.
Then watch the video in full screen for the best viewing experience.
More info about technique used, http://www.astroanarchy.blogspot.fi/2015/08/a-large-collection-of-my-experimental.html
Some highlights of the year 2015
In reversed chronological order
- The apophenia of nebulae, Astro Anarchy gets published by CNET


- I was a speaker in Opticfestival, Skara, Sweden

- A gallery exhibition in Galleria Kajaste, Oulu, Finland


- APOD by NASA (Astronomy Picture of the Day)


- I was a one of the speakers in Panhellenic Conference of Astronomy in Sparta, Greece

Dr.Ioannis - Hugh Seiradakis Professor of the Physics Department of AUTH
J-P Metsavainio Finnish astrophotographer
J-P Metsavainio Finnish astrophotographer
The Dr.Fiori Anastasia Metallinou is an associate of the Institute of Astronomy, Astrophysics, Space Applications and Remote Sensing of the National Observatory of Athens.
Dr.Kosmas gauze is Lecturer of the Department of Astrophysics, Astronomy and Mechanics, University of Athens
- A gallery exhibition in Helsinki, Finland, Galleria Kajaste


Two concerts with two vocal ensemble Cappella pro Vocale from Oulu and Punctum from Rovaniemi. Thousand year old vocal music with my astronomical photos turned to be a timeless combination.
My imageshow was matched with music and it was projected on the walls and ceiling with four power projectors. Concert took place in two places, first one was in Oulu, Finland at the Church of St Thomas, the second one took place in Rovaniemi in Northern Finland at the Chapel of Korkalovaara.

Concert in Rovaniemi, Chapel of Korkalovaara at Polar Circle (Image is taken during rehearsal)

Concert in my hometown Oulu at Church of St Thomas

Concert in my hometown Oulu at Church of St Thomas

Concert in Rovaniemi, Chapel of Korkalovaara at Polar Circle (Image is taken during rehearsal)

Concert in Rovaniemi, Chapel of Korkalovaara at Polar Circle (Image is taken during rehearsal)
Subscribe to:
Posts (Atom)


