
Wednesday, September 23, 2015
Messier 31, M31, the Great Galaxy of Andromeda
Another collaboration image, this time with David Lane. He is also a master of landscape astrophotographing, please, have a look at his homepage: http://www.davelaneastrophotography.com/
Image acquisition is made by David Lane. He sent a massive amount of data to me to process and here is the first result, the Great Galaxy of Andromeda with 37 hours of exposure time.
Messier 31, M31, the Galaxy of Andromeda
Click for a large image

A deep H-alpha boosted LRGB exposure of the Galaxy of Andromeda
Large resolution detail from the image above
Click for a large image

Dust lanes of Andromeda
A starless view
Click for a large image

A vertical composition of M31

A poster format view to the M31
INFO
The Andromeda Galaxy, also known as Messier 31, M31, or NGC 224, is a spiral galaxy approximately 2.5 million light years from Earth. It is the nearest major galaxy to the Milky Way.
The Milky Way and Andromeda are expected to collide in 3.75 billion years, eventually merging to form a giant elliptical galaxy or perhaps a large disk galaxy.
At 3.4, the apparent magnitude of the Andromeda Galaxy is one of the brightest of any of the Messier objects, making it visible to the naked eye on moonless nights even when viewed from areas with moderate light pollution. It has an apparent diameter of six times as wide as the full Moon
An experimental test

This funny looking image is just stretched vertically to try to show the actual round shape of the galaxy.
It looks like a barred spiral to me.
Technical details
Data acquisition, David Lane
Image processing, J-P Metsavainio
Processing workflow
Deconvolution with a CCDStack2 Positive Constraint, 27 iterations, added at 33% weight
Color combine in PS CS3
Levels and curves in PS CS3.
Imaging optics
William Optics GT81
Camera
SBIG STL-1100 3 CCD
Exposure times
Luminance, 18h
H-alpha, 1h
Red = ~6h
Green = ~6h
Blue = ~6h
Total 37h

Thursday, September 17, 2015
APOD by NASA, Astro Anarchy gets published

Astronomy Picture of the Day
My shot of the Pickering's Triangle in Veil Nebula was selected today as an APOD (Astronomy Picture of the Day) by NASA. You can see the NASA page here: http://apod.nasa.gov/apod/ap150917.html
Pickering's Triangle
Be sure to click for a large image!
Be sure to click for a large image!

INFO
Original blog post about this image, with technical details, can be seen here:
You can buy a real, museum quality, photographic print from HERE
This is my eighth APOD, older ones can be seen here:
http://apod.nasa.gov/apod/ap141115.html
http://apod.nasa.gov/apod/ap131214.html
http://apod.nasa.gov/apod/ap110218.htmlhttp://apod.nasa.gov/apod/ap141115.html
http://apod.nasa.gov/apod/ap131214.html
Tuesday, September 15, 2015
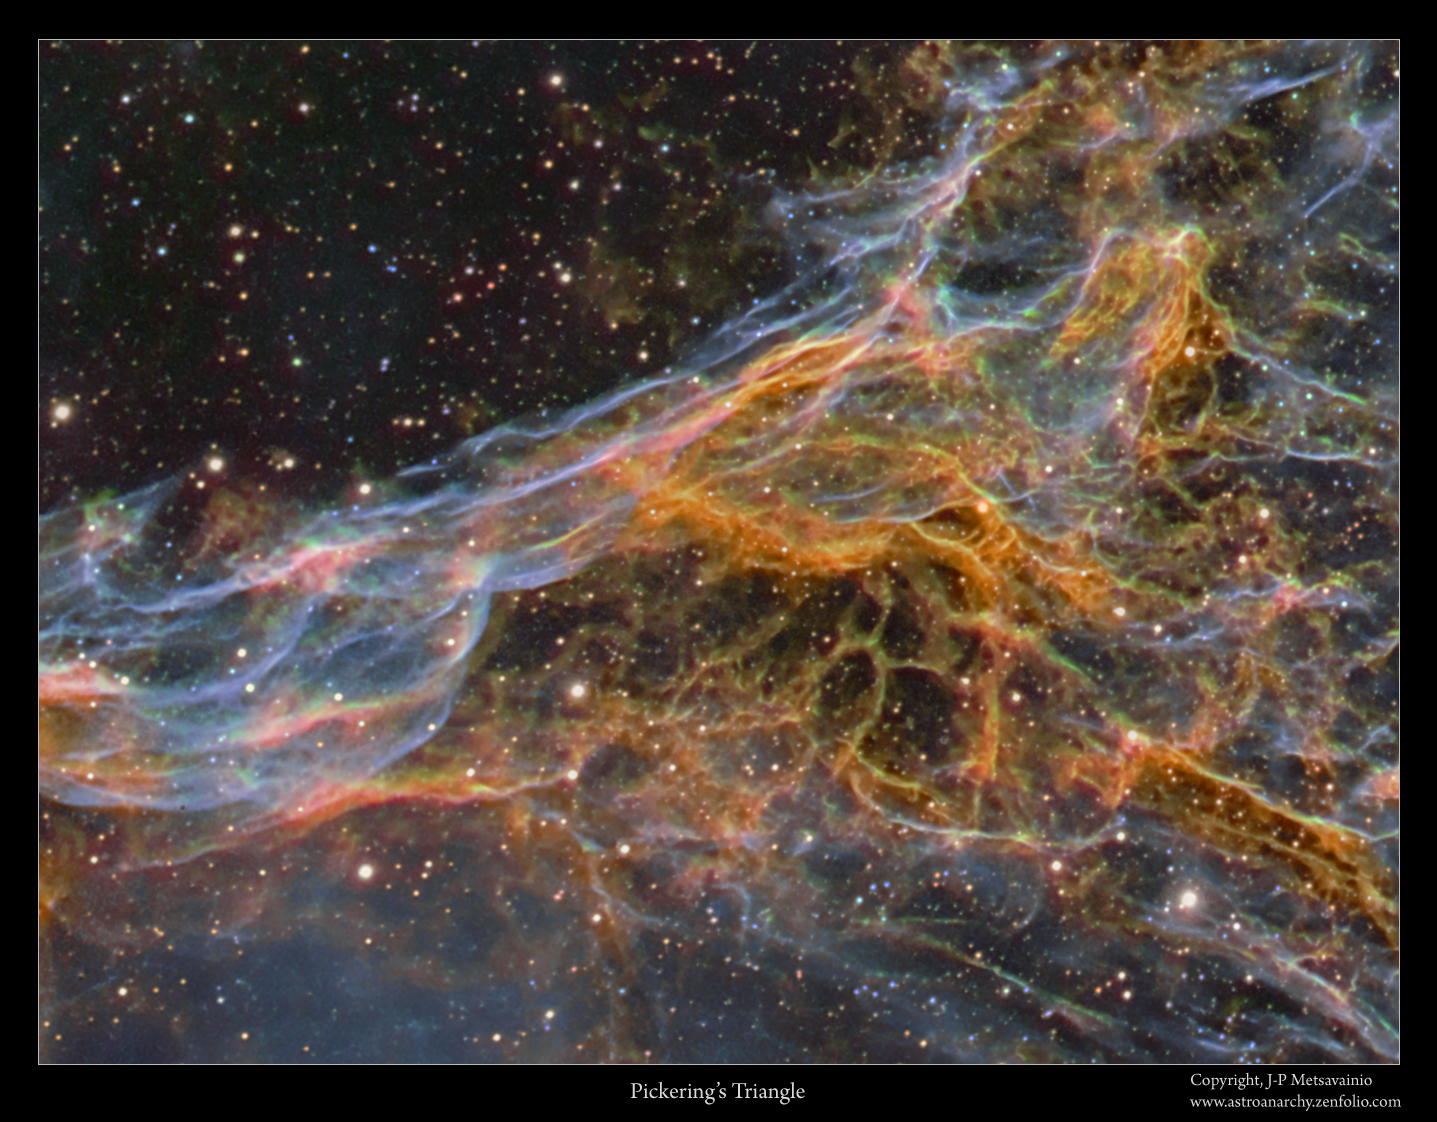
Pickering's Triangle, my first light for the Autumn season 2015
This is my opening photo for the Autumn season 2015. I started this imaging project a year ago, at Autumn 2014. Back then I shot 12h of the light form an ionized oxygen, O-III. This is a two frame mosaic of the Veil Nebula supernova remnant. This Autumn I shot 5h of light from an ionized hydrogen, H-alpha. I was able to make a Hubble palette image by using the S-II from my older wide field photo of the Veil Nebula.
Pickering's Triangle
Be sure to click for a large image!
Colors are from the ionized elements, Hydrogen, Sulfur and Oxygen.
S-II = Red, H-alpha = Green and O-III = Blue.
(A content of this O-III image can be seen as a blueish color at image above.)

A closeup
Click for a large image
A less zoomed version
Click for a large image

The whole two frame mosaic
Click for a large image

A two frame mosaic of the Pickering's Triangle
A wide field photo of the Veil Nebula supernova remnant
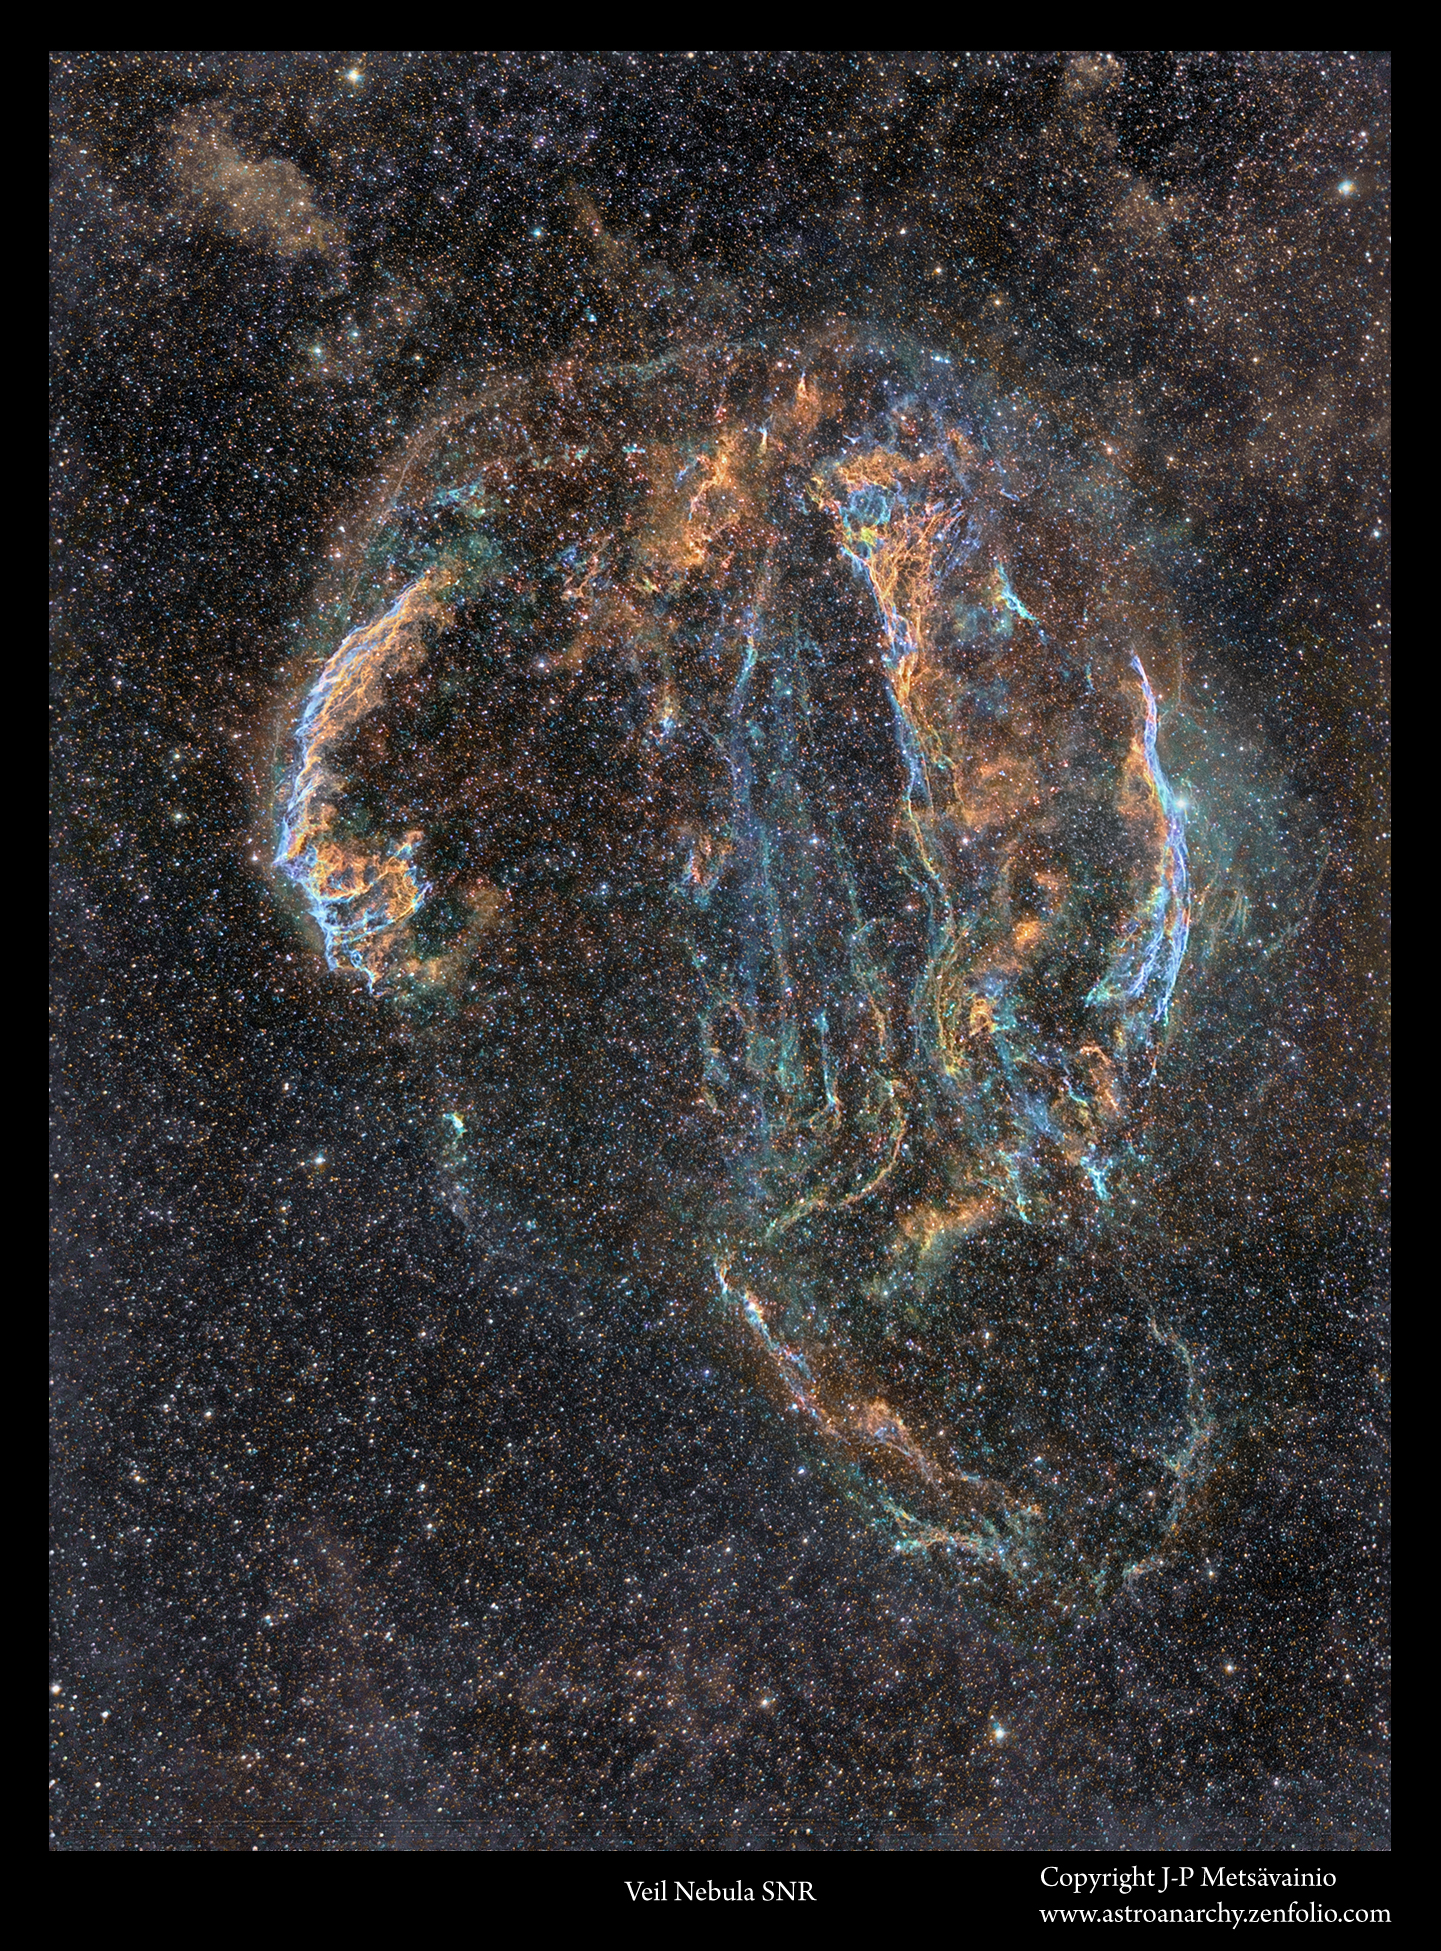
The Pickering's Triangle can be see at one o'clock position.
My blog post about the wide field shot can be seen HERE.
Technical details
Processing work flow
Image acquisition, MaxiDL v5.07.
Stacked and calibrated in CCDStack2.
Deconvolution with a CCDStack2 Positive Constraint, 33 iterations, added at 33% weight
Color combine in PS CS3
Levels and curves in PS CS3.
Imaging optics
Celestron Edge HD 1100 @ f7 with 0,7 focal reducer for Edge HD 1100 telescope
Mount
10-micron 1000
Cameras and filters
Imaging camera Apogee Alta U16 and Apogee seven slot filter wheel
Guider camera, Lodestar x2 and SXV-AOL
Astrodon filter, 5nm H-alpha
Astrodon filter, 3nm O-III
Astrodon filter, 3nm S-II
Exposure times
H-alpha, 15 x 1200s = 5h
O-III, 36 x 1200s binned = 12h (Autumn 2014)
S-II, from my older wide field photo of the Veil Nebula = 3h
Total 20h
Tuesday, September 8, 2015
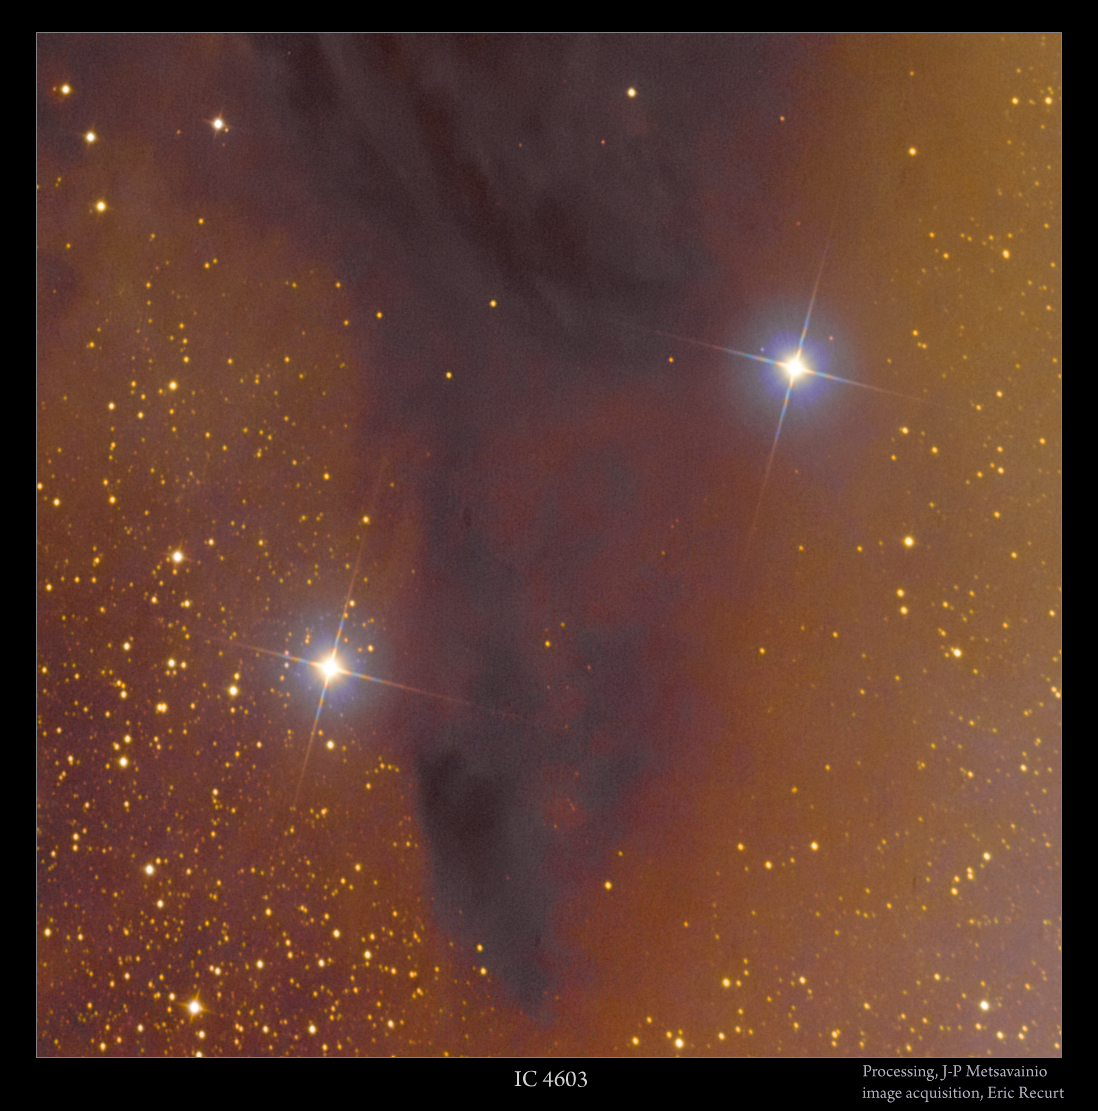
IC 4603, at the core of the colorful Scorpion
This is a third image produced as a collaboration with me and Eric Recurt. The data is shot from his observatory at Tenerife. The Observatory locates at 2400 m altitude and at 28 degrees North. The site has excellent seeing conditions, 0.8 " on average and can be below 0.3 "
IC 4603, the core region of the Rho Ophiuchi complex in the constellation Scorpion
Click for a full size image
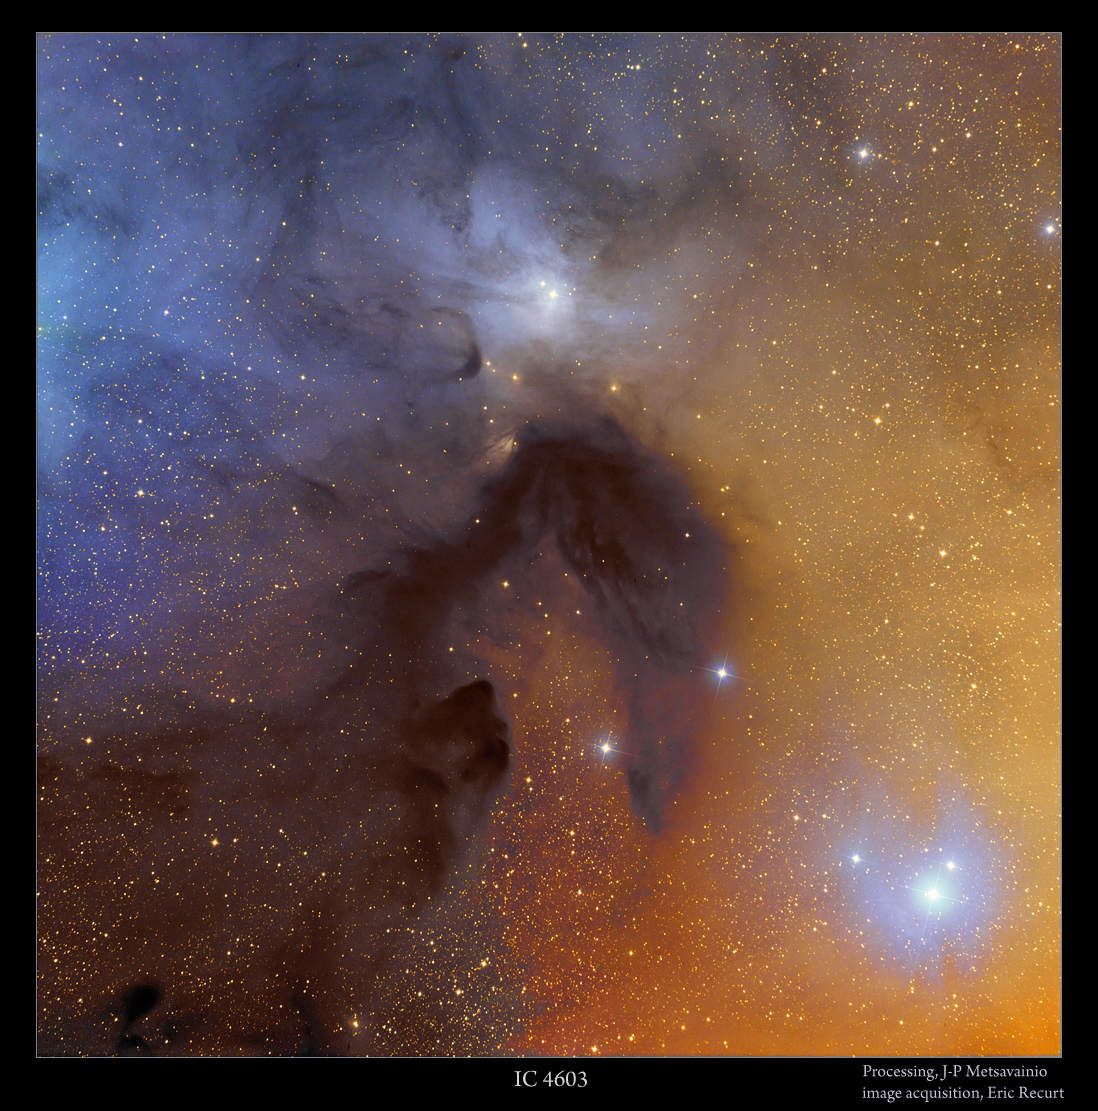 This is a broadband LRGB natural color image of the IC 4603 from a remote observatory in Tenerife.
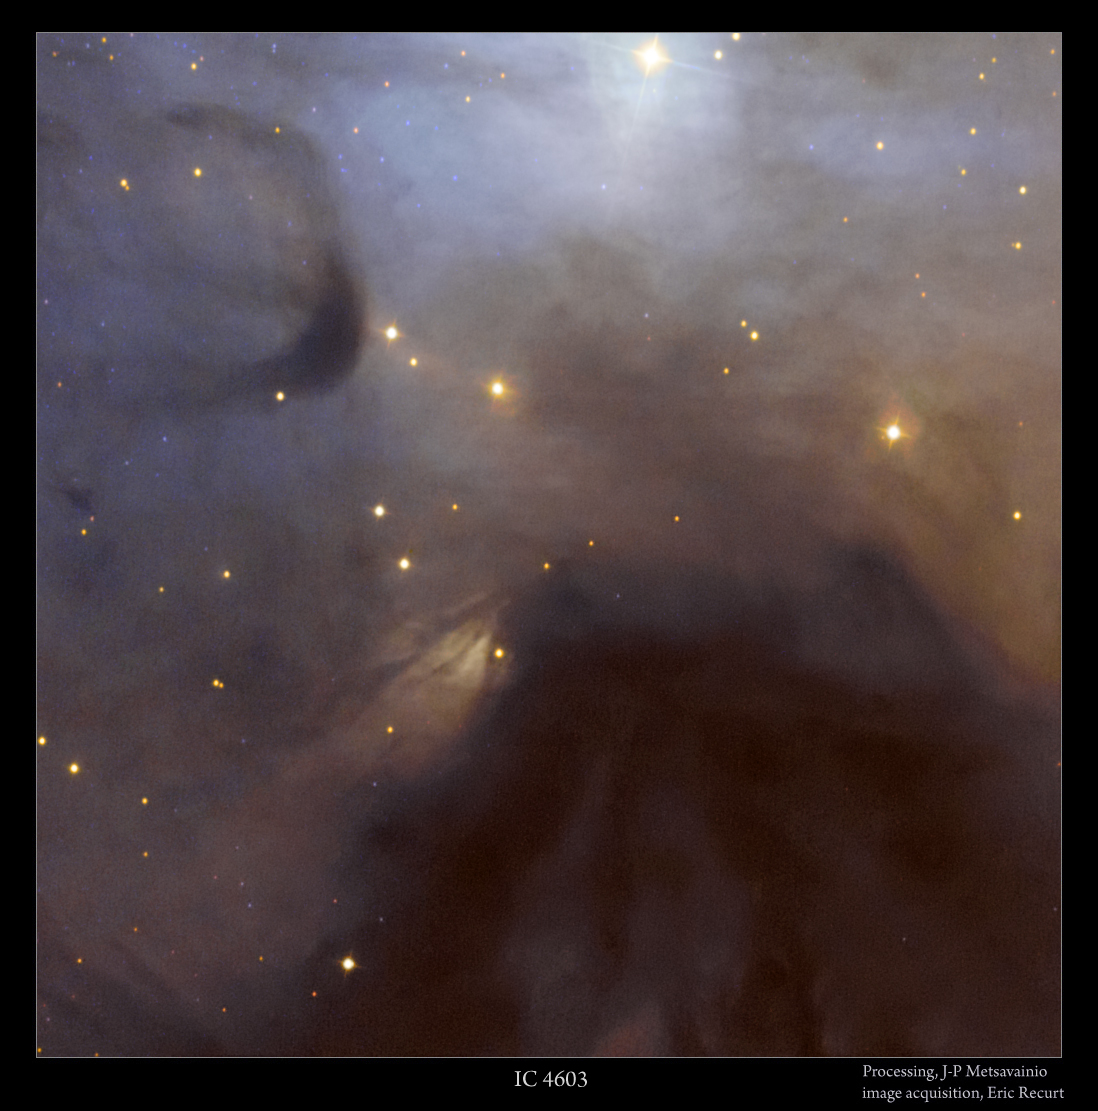
Full scale closeups
Click for a full size image
Technical details

Full scale closeups
Click for a full size image


Technical details
Processing workflow
Deconvolution with a CCDStack2 Positive Constraint, 27 iterations, added at 33% weight
Color combine in PS CS3
Levels and curves in PS CS3.
Imaging optics
340mm F3.3 astrograph
Mount
ASA DDM 85
Cameras and filters
FLI PL 16803
Exposure times
Luminance, 10 x 300s
Red = 10 x 180s
Green = 9 x 180s
Blue = 8 x 180s
Total 2h 11min
Sunday, September 6, 2015
"Howling Wolf" Nebula, vdB 149, vdB 150, LDN 1235 and PGG 67671
The second photo published from the Deep Sky West observatory. Lights are taken under a very dark skie. Unlike in my current light polluted location, it's now possible to image broadband targets, galaxies, reflection nebulae and dark nebulae! HERE is some more info about the Deep sky West Observatory.
I gave the nickname "Howling Wolf" after I saw the photo first time in my monitor. At the end of this blog post, there is an explanation for the nickname.
VdB 149 and companions in the constellation Cepheus
Click for a large image
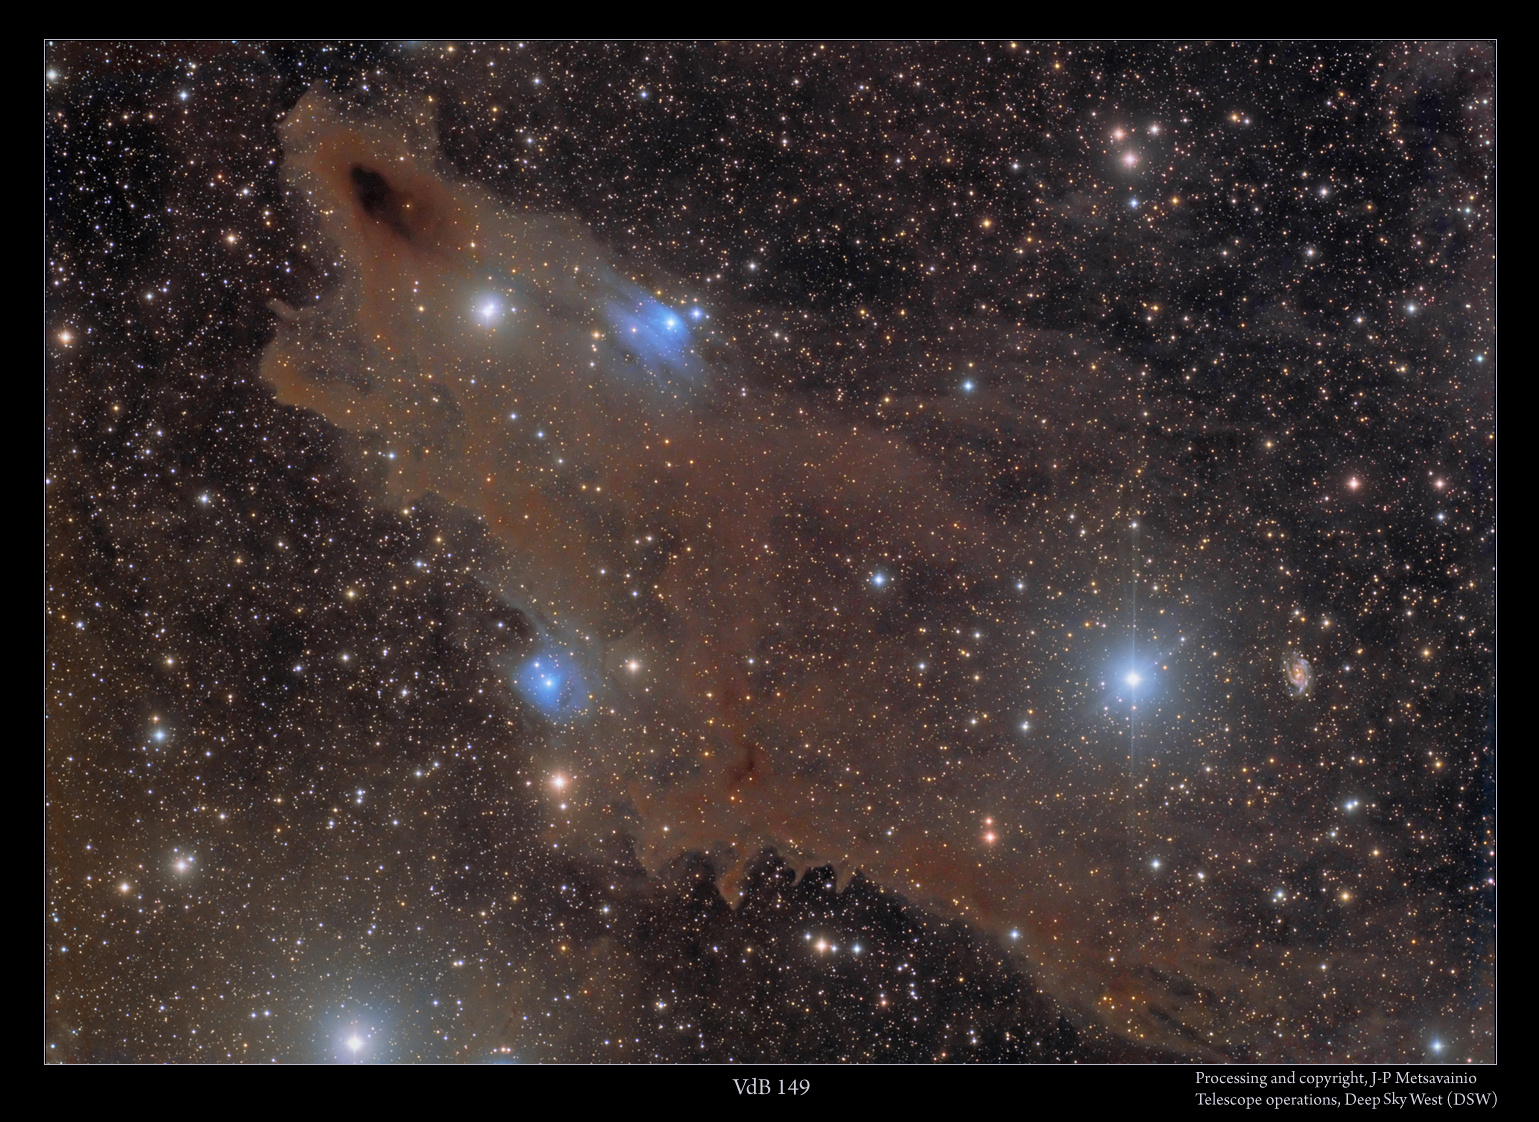
Beautiful collection of dark and reflection nebulae in Cepheus including a galaxy. This is a broadband LRGB image in natural colors.
Full resolution details from the image above
LDN 1235

vdB 150

vdB 149

vdB 149 and some interesting shapes in the dust cloud
Click for a large photo

PGG 67671

An experimental starless version
Click for a large photo

A starless version to show better the actual dust cloud
Howling Wolf

This is how I see the photo in my head.
An animated GIF, stars vs starless
Click for a large image

Technical details
Processing workflow
Stacked and calibrated in CCDStack2.
Deconvolution with a CCDStack2 Positive Constraint, 27 iterations, added at 33% weight
Color combine in PS CS3
Levels and curves in PS CS3.
Imaging optics
Takahashi FSQ-106EDXIII
Mount
Astro-Physics Mach1AP GTO with GTOCP3
Cameras and filters
QSI683WSG
Astrodon Luminance Tru-Balance E-Series Gen
Astrodon Red Tru-Balance E-Series Gen 2
Astrodon Green Tru-Balance E-Series Gen 2
Astrodon Blue Tru-Balance E-Series Gen 2
Exposure times
Luminance, 32 x 900s = 8h
Red = 13 x 900s = 3.25h
Green = 12 x 900s = 3h
Blue = 5 x 900s = 1.25h
Total 15.5h
Friday, September 4, 2015
Half a million stars and Messier 7
This is a second image produced as a collaboration with me and Eric Recurt. The data is shot from his observatory at Tenerife. The Observatory locates at 2400 m altitude and at 28 degrees North. The site has excellent seeing conditions, 0.8 " on average and can be below 0.3 "
Messier 7, "My God, it's full of stars!"
Be sure to click for a full size image! (Quote, 2001: A Space Odyssey)

Just right from the Messier 7 locates a dark nebula B 287. In this image is visible about 500.000 stars of our Milky Way. Click the photo to see all of them! (2100x2100 pixels)
A closeup of Messier 7
Click for a large image

Planetary nebula PN Hf2-1
Click for a large image

Planetary Nebula PN Hf2-1 is a blue dot at middle of the image area.
INFO
Technical details
Processing workflow
Deconvolution with a CCDStack2 Positive Constraint, 27 iterations, added at 33% weight
Color combine in PS CS3
Levels and curves in PS CS3.
Imaging optics
340mm F3.3 astrograph
Mount
ASA DDM 85
Cameras and filters
FLI PL 16803
Exposure times
Luminance, 11 x 300s = 55min
Red = 6 x 180s = 18min
Green = 6 x 180s = 18min
Blue = 6 x 180s = 18min
Total 1h 49min
Rosette Nebula from a professional observatory in Tenerife
This is my second remote image this year but with different partner. I get contacted by Eric Recurt and we started a cooperation between us. The imaging season, up here 65N, hasn't started yet. This is a great way to produce high quality photos during my mandatory summer pause.
Observatory
The Observatory locates at 2400 m altitude and at 28 degrees North. The site has excellent seeing condition usually below 1" year , 0.8 " on average to be exact and can be below 0.3 "
Instruments
The instrument is a 340mm F3.3 astrograph with FLi Pro 16803 + Centerline 10 position filter wheel on a DDM 85 mount .
The first published photo from Teneriffe,
NGC 2244, the Rosette Nebula
Click for a large image

A closeup
Click for a large image

Technical details
Processing workflow
Deconvolution with a CCDStack2 Positive Constraint, 27 iterations, added at 33% weight
Color combine in PS CS3
Levels and curves in PS CS3.
Imaging optics
340mm F3.3 astrograph
Mount
ASA DDM 85
Cameras and filters
FLI PL 16803
Exposure times
Luminance, 10 x 600s = 1h 40min
Red = 5 x 300s = 25min
Green = 5 x 300s = 25min
Blue = 5 x 300s = 25min
Total 2h 55min
An experimental starless version as an animation

Thursday, September 3, 2015
Something new! My first light from The Deep Sky West (DSW) remote observatory
The imaging season, up here 65N, hasn't start yet. I have had a wonderful opportunity to use couple of remote telescopes. One in Canary islands and the other in New Mexico. I'll publish more images from both telescopes soon.
The first photo published is from Deep Sky West observatory. It's taken under a very dark sky. Unlike in my current light polluted location, it's now possible to image broadband targets, like galaxies, reflection nebulae and dark nebulae! HERE is some more info about the Deep sky West Observatory
LDN 1250 & 1251

Closeups
Click for a large image

Galaxy behind the dust

An experimental starless photo of LDN 1250 & 1251 as an animation
INFO
Image contains objects LDN 1251, LBN 558, PGC 69472, PGC 166755
This low mass star forming region in Cepheus is an extended cloud of gas and dust. There are two galaxies visible in the image. At most left middle lays magnitude 15.5 galaxy PGC 69472, angular dimensions are
2.1 x 1.6 arcminutes. Galaxy PGC 166755 At middle left shines at magnitude 16 and has size of 1.3 x 0.6 arcminutes.
Technical details
Processing workflow
Stacked and calibrated in CCDStack2.
Deconvolution with a CCDStack2 Positive Constraint, 27 iterations, added at 33% weight
Color combine in PS CS3
Levels and curves in PS CS3.
Imaging optics
Takahashi FSQ-106EDXIII
Mount
Astro-Physics Mach1AP GTO with GTOCP3
Cameras and filters
QSI683WSG
Astrodon Luminance Tru-Balance E-Series Gen
Astrodon Red Tru-Balance E-Series Gen 2
Astrodon Green Tru-Balance E-Series Gen 2
Astrodon Blue Tru-Balance E-Series Gen 2
Exposure times
Luminance, 26 x 900s = 6.5h
Red = 14 x 900s = 3.5h
Green = 14 x 900s = 3.5h
Blue = 14 x 900s = 3.5h
Total 17h
A single calibrated and stretched 15 min. Luminance frame as it comes from the camera
Click for a large image

Monday, August 3, 2015
A large collection of my experimental 3D-astronomy as a movie
This is an experimental test with a 3D-conversion of my astronomical image. Only real elements from the original images are used, there is nothing added but the estimated volumetric information!
NOTE. This is a personal vision about shapes and volumes, based on some scientific data, deduction and an artistic impression.
A deep deep space
A HD video, ~11 min.
NOTE. This is a personal vision about shapes and volumes, based on some scientific data, deduction and an artistic impression.
A HD video, ~11 min.
Original movie is in HD 1080p resolution.
Please, click the Youtube logo at lower right to see this video in Youtube.
In youtube, click the Gear symbol, at lower right in Youtube window, and select the Quality to 1080p.
Then watch the video in full screen for the best viewing experience.
Then watch the video in full screen for the best viewing experience.
Info about the technique used
Due to huge distances, real parallax can't be imaged in most of the astronomical objects.
I have developed an experimental technique to convert my astropics to a artificial volumetric models.
My 3-D experiments are a mixture of science and an artistic impression. I collect distance and other information before I do my 3-D conversion. Usually there are known stars, coursing the ionization, so I can place them at right relative distance. If I know a distance to the nebula, I can fine tune distances of the stars so, that right amount of stars are front and behind of the object.
I use a “rule of thumb” method for stars: brighter is closer, but if a real distance is known, I'm using that. Many 3-D shapes can be figured out just by looking carefully the structures in nebula, such as dark nebulae must be at front of the emission nebulae in order to show up etc...
The general structure of many star forming regions is very same, there is a group of young stars, as an open cluster inside of the nebula. The stellar wind from the stars is then blowing the gas away around the cluster and forming a kind of cavitation – or a hole — around it. The pillar-like formations in the nebula must point to a source of stellar wind, for the same reason.
How accurate the final model is, depends how much I have known and guessed right. The motivation to make those 3-D-studies is just to show, that objects in the images are not like paintings on the canvas but really three dimensional objects floating in the three dimensional space. This generally adds a new dimension to my hobby as an astronomical imager.
Friday, July 31, 2015
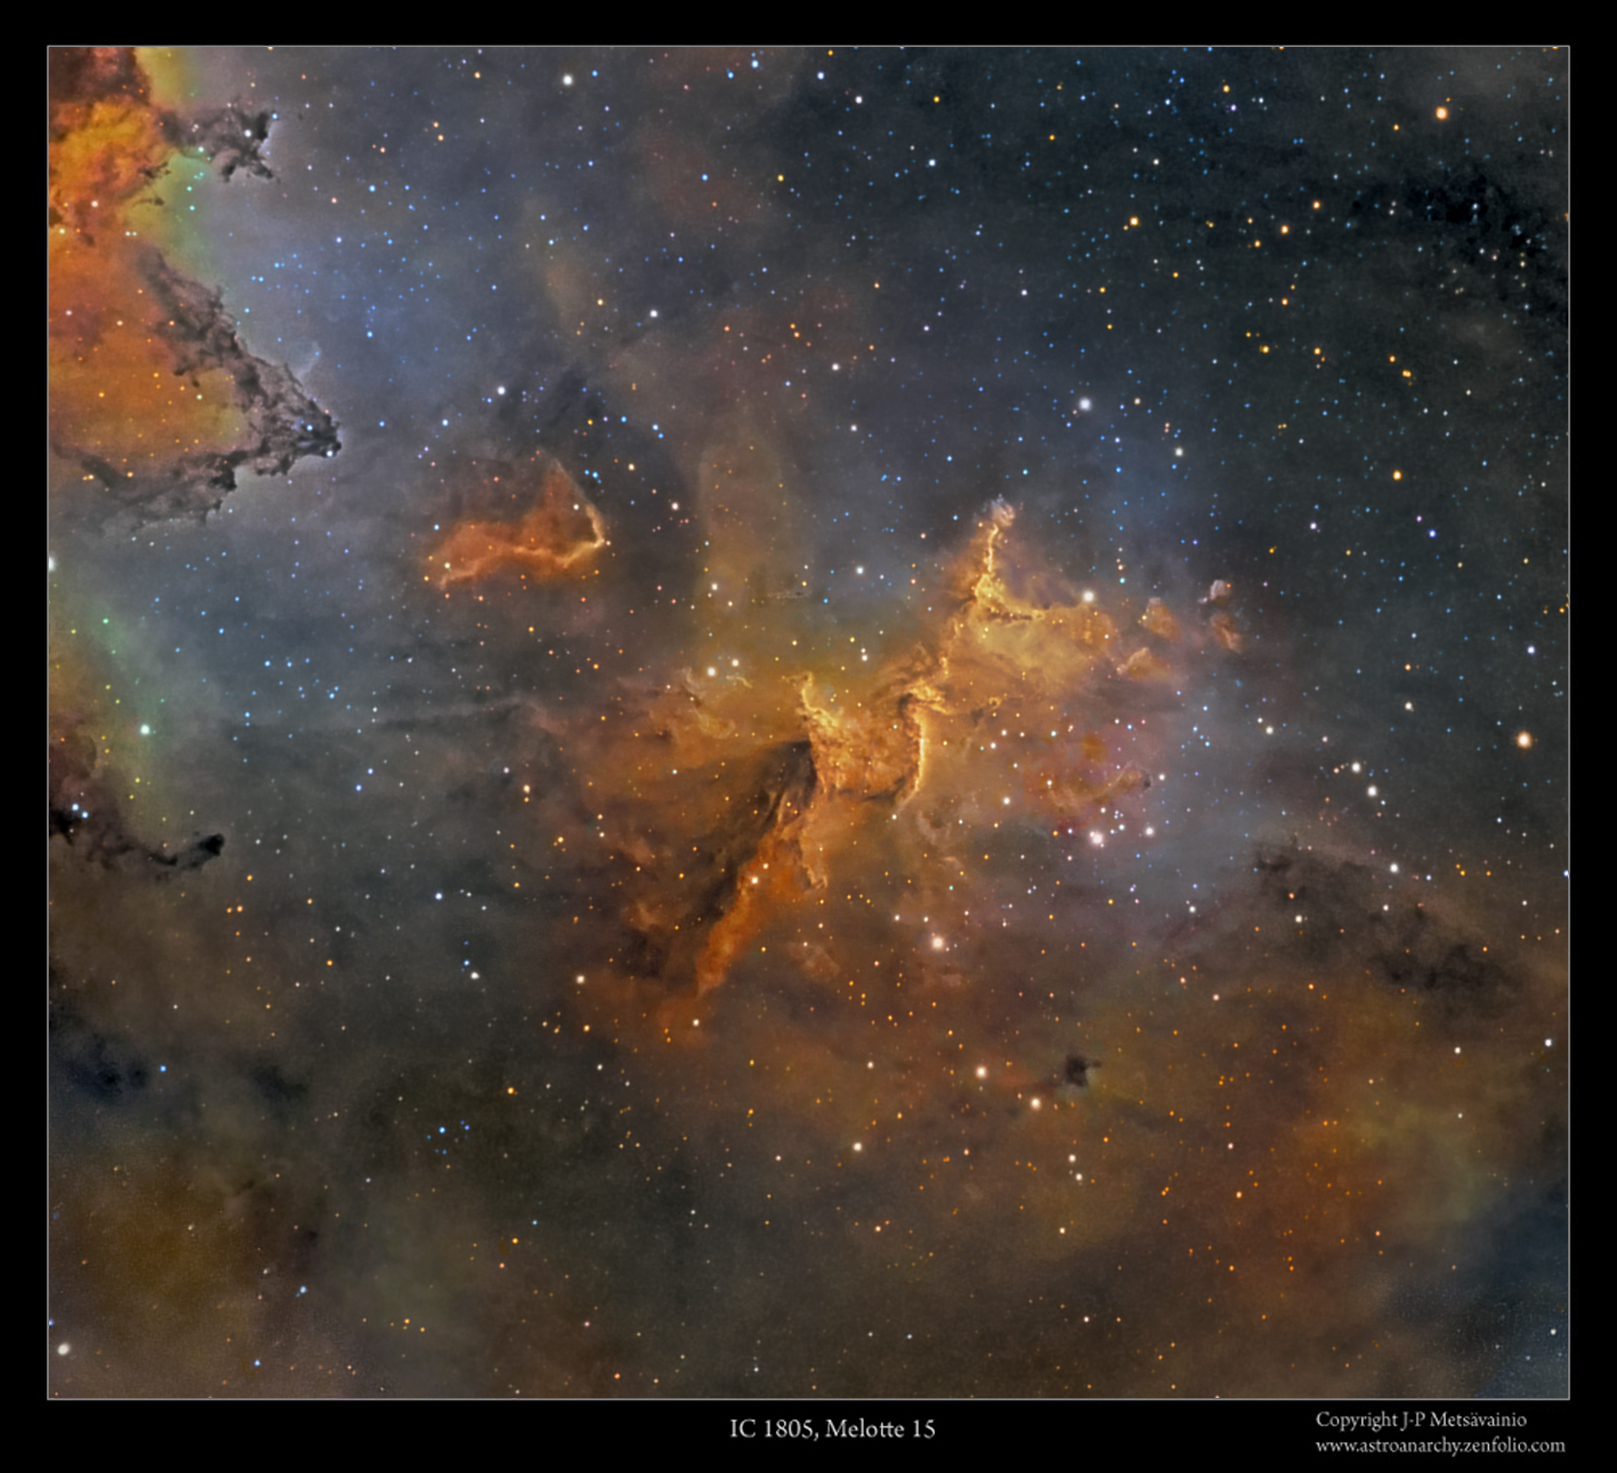
An experimental 3D-study of an emission nebula Melotte 15
This is an experimental test with a 3D-conversion of my astronomical image. Only real elements from the original image are used, there is nothing added but the estimated volumetric information!
NOTE. This is a personal vision about shapes and volumes, based on some scientific data, deduction and an artistic impression.
My original photo of the Melotte 15 in IC 1805
click for a large image
 A blog post about this photo, with the technical details, can be seen HERE
An animated GIF

Video 1
Video 2
Info about the technique used
NOTE. This is a personal vision about shapes and volumes, based on some scientific data, deduction and an artistic impression.
My original photo of the Melotte 15 in IC 1805
click for a large image

An animated GIF

Video 1
This is a looped video, click to start and stop. Original movie is in HD720p resolution.
Video 2
This is a looped video, click to start and stop. Original movie is in HD720p resolution.
Info about the technique used
Due to huge distances, real parallax can't be imaged in most of the astronomical objects.
I have developed an experimental technique to convert my astropics to a artificial volumetric models.
My 3-D experiments are a mixture of science and an artistic impression. I collect distance and other information before I do my 3-D conversion. Usually there are known stars, coursing the ionization, so I can place them at right relative distance. If I know a distance to the nebula, I can fine tune distances of the stars so, that right amount of stars are front and behind of the object.
I use a “rule of thumb” method for stars: brighter is closer, but if a real distance is known, I'm using that. Many 3-D shapes can be figured out just by looking carefully the structures in nebula, such as dark nebulae must be at front of the emission nebulae in order to show up etc...
The general structure of many star forming regions is very same, there is a group of young stars, as an open cluster inside of the nebula. The stellar wind from the stars is then blowing the gas away around the cluster and forming a kind of cavitation – or a hole — around it. The pillar-like formations in the nebula must point to a source of stellar wind, for the same reason.
How accurate the final model is, depends how much I have known and guessed right. The motivation to make those 3-D-studies is just to show, that objects in the images are not like paintings on the canvas but really three dimensional objects floating in the three dimensional space. This generally adds a new dimension to my hobby as an astronomical imager.
Tuesday, July 28, 2015
An experimental 3D-study of an emission nebula IC 410
This is an experimental test with a 3D-conversion of my astronomical image. Only real elements from the original image are used, there is nothing added but the estimated volumetric information!
NOTE. This is a personal vision about shapes and volumes, based on some scientific data, deduction and an artistic impression.
My original photo of the IC 410
click for a large image
 A blog post about this photo, with the technical details, can be seen HERE
An animated GIF

A flythrough video
A flyby video
A study about the general structure of the IC 410
 All pillar like formations are pointing to a source of ionization, the open cluster NGC 1893 at the heart of the IC 410. There are some more dense areas in a gas, able to resist the radiation pressure from young star cluster. Those dense areas, at tip of the pillars, are also potential places for the formations of the new stars. A radiation pressure (solar wind) from the cluster NGC 1893 is forming a hollow space inside a gas cloud, it can be seen in my 3D-studies too.
Stereo images of the IC 410
Parallel and Cross vision stereo pairs. An anaglyph Red/Cyan image (Red/Cyan eyeglasses are needed)
http://astroanarchy.blogspot.fi/2015/02/a-3d-study-of-ic-410-as-free-view.html
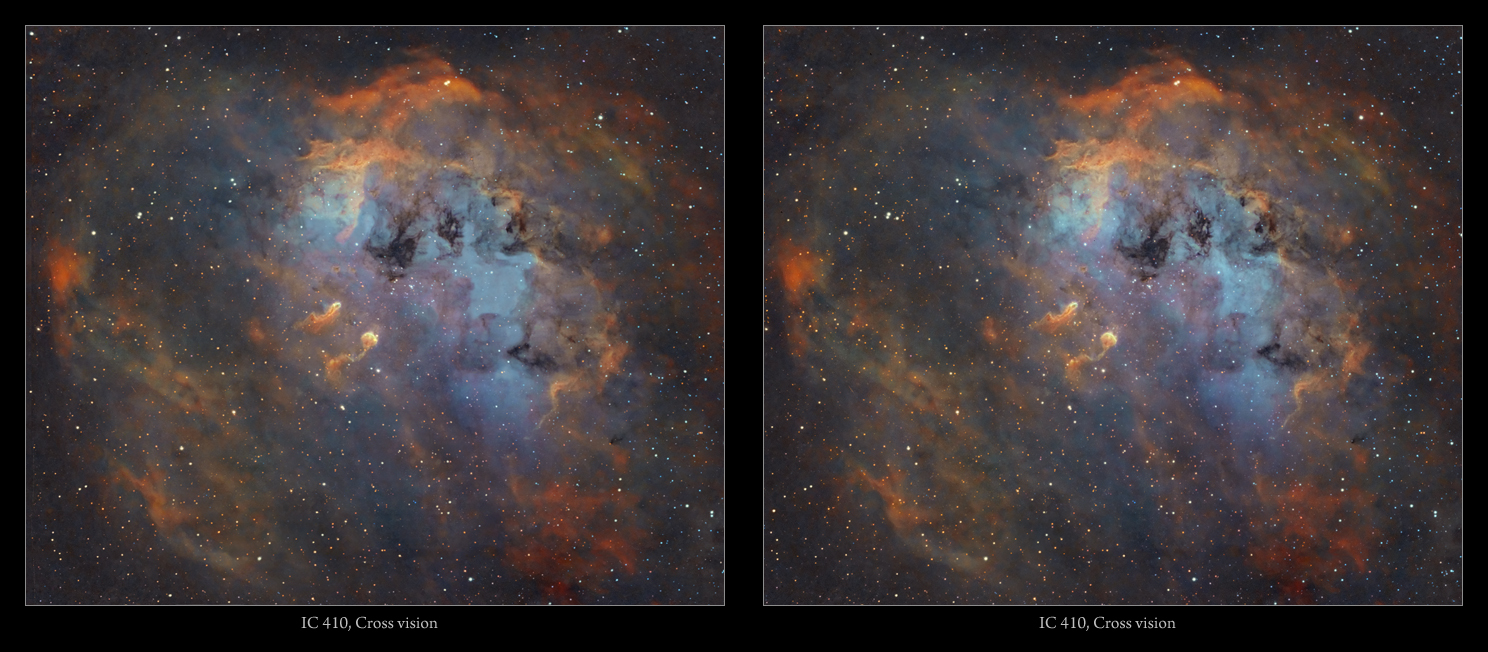 A Cross vision stereo pair as a sample, other formats behind the link above.
Info about the technique used
NOTE. This is a personal vision about shapes and volumes, based on some scientific data, deduction and an artistic impression.
My original photo of the IC 410
click for a large image

An animated GIF

A flythrough video
This is a looped video, click to start and stop. Original movie is in HD720p resolution.
¨A flyby video
This is a looped video, click to start and stop. Original movie is in HD720p resolution.
A study about the general structure of the IC 410

Stereo images of the IC 410
Parallel and Cross vision stereo pairs. An anaglyph Red/Cyan image (Red/Cyan eyeglasses are needed)
http://astroanarchy.blogspot.fi/2015/02/a-3d-study-of-ic-410-as-free-view.html

Info about the technique used
For as long as I have captured images of celestial objects, I have always seen
them three-dimensionally in my head. Over time I realized that we actually have
enough scientific information to build a coarse skeleton model of the nebula itself.
The scientific information makes my visions much more accurate, and the 3-D technique I have developed enables me to share those beautiful visions with others.
How accurate my 3-D-visions are depends on how much accurate information I have and how well I implement it.
Also, many different estimates are needed for the 3-D model. The final 3-D-image is always an appraised simulation of reality based on known scientific facts, deduction, and some artistic creativity
Also, many different estimates are needed for the 3-D model. The final 3-D-image is always an appraised simulation of reality based on known scientific facts, deduction, and some artistic creativity
on top of everything else.
After I have collected all the necessary scientific information about my target,
I start my 3-D conversion using the stars in the image. Usually there is a recognizable star cluster which is responsible for ionizing the nebula. We don’t need to
know its absolute location since we know its relative location. Stars ionizing the
nebula have to be very close to the nebula structure itself. I usually divide up the
rest of the stars by their apparent brightness, which can then be used as an indicator of their distances, brighter being closer. If true star distances are available
I use them, but most of the time my rule of thumb is sufficient.
By using a scientific estimate of the distance of the Milky Way object, I can
By using a scientific estimate of the distance of the Milky Way object, I can
then locate the correct number of stars in front of it and behind it.
Emission nebulae are not lit up directly by starlight; they are usually way too
large for that. Rather, stellar radiation ionizes elements within the gas cloud. So it
is the nebula itself that is glowing, at the characteristic wavelengths of each ionized element. (The principle is very much the same as in fluorescent tubes.) I use
this information for my 3-D model. The thickness of the nebula can be estimated
from its brightness, since the whole volume of gas is glowing, brighter means
thicker. By this means, forms of the nebula can be turned to a real 3-D shape.
Nebulae are also more or less transparent, so we can see both sides of it at the
same time, and this makes model-making a little easier since not much is hidden.
The local stellar wind, from the star cluster inside the nebula, shapes the
nebula by blowing away the gas around the star cluster. The stellar wind usually
forms a kind of cavity in the nebulosity. The same stellar wind also initiates the
further collapse of the gas cloud and the birth of the second generation of stars
in the nebula. The collapsing gas can resist the stellar wind and produces pillar like formations which must point to a cluster.
Ionized oxygen (O-III) glows with a bluish light, and since oxygen needs a lot
of energy to ionize it, this can only be achieved relatively close to the star cluster
in the nebula. I use this information to position the O-III area (the bluish glow) at
the correct distance relative to the heart of the nebula.
Many other small indicators can be found by carefully studying the image
itself. For example, if there is a dark nebula in the image, it must be located in
front of the emission nebula, otherwise we can’t see it.
Explosions in space are more or less symmetrical, due to that, most of the supernova remnants and planetary nebulae mainly has a ball like appearance .
Explosions in space are more or less symmetrical, due to that, most of the supernova remnants and planetary nebulae mainly has a ball like appearance .
Using the known data in this way I build a kind of skeleton model of the
nebula. Then the artistic part is mixed with the scientific and logical elements,
and after that the rest is very much like creating a sculpture on a cosmic scale
Wednesday, July 22, 2015
Pickering's Triangle in O-III light, an experimental 3D-study
This is an experimental test with a 3D-conversion of my astronomical image. Only real elements from the original image are used, there is nothing added but the estimated volumetric information!
NOTE. This is a personal vision about shapes and volumes, based on some scientific data, deduction and an artistic impression.
My original photo of the Pickering's Triangle
click for a large image

A blog post about this photo, with the technical details, can be seen HERE
The 3D-study as a video
This is a looped video, click to start and stop. Original movie is in HD720p resolution.
An older 3D-study of the Veil Nebula supernova remnant
Veil Nebula supernova remnant as a 3D-model
In constellation Cygnus, animation in natural colors
This is a looped video, click to start and stop. Original movie is in HD1080p resolution.
Info about the technique used
Due to huge distances, real parallax can't be imaged in most of the astronomical objects.
I have developed an experimental technique to convert my astropics to a artificial volumetric models.
My 3-D experiments are a mixture of science and an artistic impression. I collect distance and other information before I do my 3-D conversion. Usually there are known stars, coursing the ionization, so I can place them at right relative distance. If I know a distance to the nebula, I can fine tune distances of the stars so, that right amount of stars are front and behind of the object.
I use a “rule of thumb” method for stars: brighter is closer, but if a real distance is known, I'm using that. Many 3-D shapes can be figured out just by looking carefully the structures in nebula, such as dark nebulae must be at front of the emission nebulae in order to show up etc...
The general structure of many star forming regions is very same, there is a group of young stars, as an open cluster inside of the nebula. The stellar wind from the stars is then blowing the gas away around the cluster and forming a kind of cavitation – or a hole — around it. The pillar-like formations in the nebula must point to a source of stellar wind, for the same reason.
How accurate the final model is, depends how much I have known and guessed right. The motivation to make those 3-D-studies is just to show, that objects in the images are not like paintings on the canvas but really three dimensional objects floating in the three dimensional space. This generally adds a new dimension to my hobby as an astronomical imager.
Subscribe to:
Posts (Atom)


