COPYRIGHT, PLEASE NOTE
All the material on this website is copyrighted to J-P Metsavainio, if not otherwise stated. Any content on this website may not be reproduced without the author’s permission.
BUY A MUSEUM QUALITY POSTER
BUY A POSTER:https://astroanarchy.zenfolio.com/
Monday, November 30, 2009
A NEW FEATURE
-
-
QUALITY: All images are in very high resolution! (Up to the 7000x9000 pixels) This makes possible to print out extremely high quality results. Prints are real photographic prints, not an inkjet, or similar ones.
PRICES IN EUROPE:
The price level is from 11x15cm and 1,95€ to a Poster size 51x76cm 49,95€
NOTE, since European products are delivered from inside EU,
NO CUSTOMS COSTS are added!
NO CUSTOMS COSTS are added!
PRICES IN USA:
4" x 5" and 2$ to a Gigant Poster 24" x 36" for 97,95$
(NOTE, US and Canada only Supplier)
Please, have a look, http://astroanarchy.zenfolio.com/p1072219942
If you have any suggestions, just let me know by leaving a comment here or in a Portfolio!
(NOTE, US and Canada only Supplier)
Please, have a look, http://astroanarchy.zenfolio.com/p1072219942
If you have any suggestions, just let me know by leaving a comment here or in a Portfolio!
Labels:
BUY BEST IMAGES
Tuesday, November 24, 2009
Soul Nebula Detail as a Sterogram
Parallel Vision
Cross Vision
-
NOTE! This is a personal vision about forms and shapes, based on some known facts and artistic impression. Wieving instructions can be found from a Right hand side menu.
-
Original Image with details can be found HERE.
-
NEW
Here you can find an Anaglyph, Red/Cyan, Stereo image.
You'll need Red/Cyan Eyeglasses to be able to see images right. Note, if you have a Red and Green filters, you can use them! Red goes to Left eye.
Labels:
anaglyph images and movies,
stereo images
Monday, November 23, 2009
Soul Nebula, testing
Animation, Stars vs No Stars.
-
Sometimes it's usefull to see the Nebula without stars.
Human brains has a tendency to form Shapes and lines from a cloud of dots, in this case Stars.
By removing Stars the actual Nebulosity is seen better.
If the object is located in a very dense Starfield, some dimmer parts might not be seen at all.
I have noticed, that large shapes and formations in a Nebula comes visible by this way.
I can compare this to a CT Scan image, where different tissues can be seen. It's still a real image of the human been, even skin and clothes can't be seen.
After all, in a reality, Stars are only mathematical points, with no dimensions, doe the huge distance.
The difraction and atmosphere blow up the image of a Star to a small disk.
The method used for a Star supression is descripted in a "Tone Mapping" PDF-document HERE. An other sample. Working with a dim targets and an extreme dense Star field: http://astroanarchy.blogspot.com/2009/11/power-of-tone-mapping.html
Labels:
animations,
research and development
Sunday, November 22, 2009
Soul Nebula closeup finalized
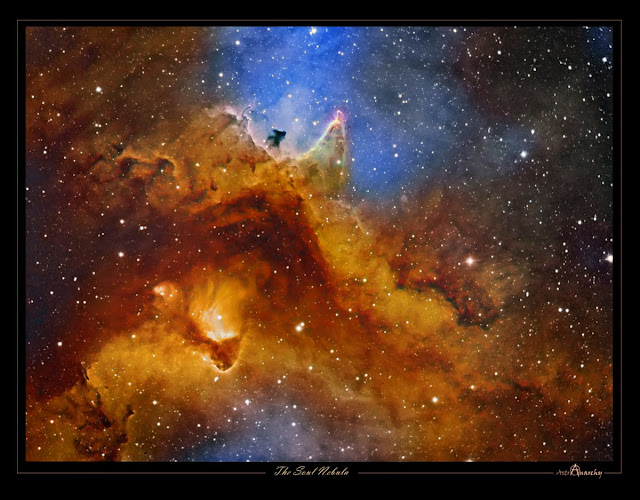
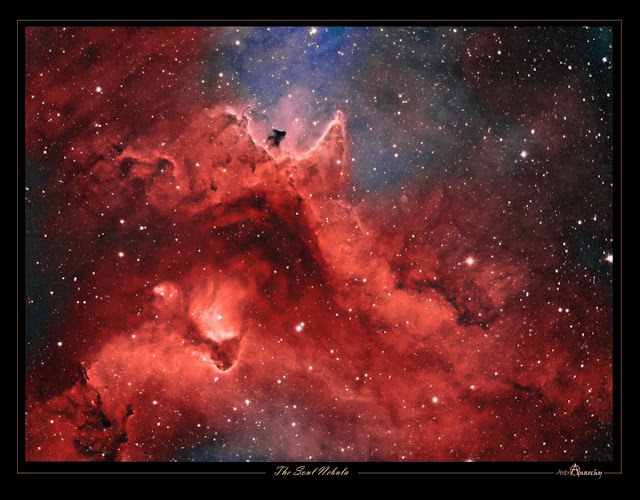 After a long, frustrating period, we finally had kind of clear skys!
Actually, I started my imaging session Three times last night and back everything up at between.
Weather was so volatile, since misty clouds from open see are impossible to predict.
-
After all I was able to capture more H-alpha and enough O-III and S-II to build a decent three band narrowband image.
Two versions , as usually, first one in HST-palette and the Second one in "natural colors" mixed from same material as HST-image.
-
Two color chemes,
HST Palette as S-II=Red, H-a=Green and O-III=Blue.
Second image is in natural colors composed from narrowband data. Channels are balanced so, that image match to visible spectrum, H-a + 24%S-II=Red, O-III=Green and O-III + 15%H-alpha=Blue.
-
Processing work flow:
Image acquisition, MaxiDL v5.07.
Stacked and calibrated in CCDStack.
Deconvolution with a CCDSharp, 30 iterations.
Levels, curves and color combine in PS CS3.
-
Telescope, Meade LX200 GPS 12" @ f4.65
Camera, QHY9
Guiding, SXV-AO @ 11Hz
Image Scale, 0,8 arcseconds/pixel
Exposures:
H-alpha 16x1200s Binned 1x1
O-III 3x600s, binned 3x3
S-II 9x600s, binned 3x3
Top of that, some color data from an older wide field image is used.
Wider view to the Soul Nebula. Area of the current image is marked with a frame. -
A Starless version of the Nebula.
I place it here, since it looks kind of nice and the actual Nebulosity can be seen better this way.
Friday, November 20, 2009
Colors in Astro Images
I made two animations to show difference between different Color schemes used in my images.
At an image of the Elephant's Trunk Nebula abowe, differen color variants are animated together.
-
First is pure Hydrogen alpha channel, second is a RGB-broadband image, next is H-aRGB mix. After that, there is pure Narrowband compositions from three channels, H-a, S-II and O-III. First of them is a "Natural Color" composition mixed so, that resulting colors are close to visible spectrum to human eye. Last image is a "Mapped Color" composition, where all three channels are mapped to selected color. In this case the mixture is S-II=Red, H-a=Green and O-III=Blue, this combination is generally known as a Hubble-palette (HST), after a Palette used in images by Space Telescope Hubble.
-
What is the truth then?
Deep space targets are generally so dim, that human eye is not cabable to see any colors from them.
Closest to real colors is the RGB image, if colors are balanced correctly.
Usually a pure white Star is used to measure a correct color balance between Red, Green and Blue data.
Next closest is the H-aRGB mix, where H-alpha filtered image is used to boost contrast and details in image.
It tend to distor the Red balance in image though.
Third, in reality order, is a Narrowband mixture, where different channels are mapped to visible colors as closely as possible by the wavelenghts.
I'm using a mixture by Richard Crisp.
H-a is mapped to Red with about 20% S-II, O-III is Green and the Blue is mixed from O-III and about 15% H-alpha to compensate missing H-beta.
-
The Hubble palette is least realistic color scheme. It's made famous by wonderful pictures from the Hubble Telescope. This palette is developed to maximize visual difference between different ionized Elements in Nebula. Even though it's used in sientific purposes, it's beautiful as well. I use HST-palette for esthetic reasons only, with that tool I'm able to reveal some of the hidden beauty.
An other good reason to use it is, that it's a de facto standard and makes possible to compare images from different narrowband imagers.
-
An other animated example of color palettes, the Pelican Nebula.
Labels:
animations,
research and development
Thursday, November 19, 2009
An image portfolio
I have opened a portfolio for my Astro Images under a Zenfolio service.
At this moment it's more like a test version, please, have a look.
Comments are welcome.
Tuesday, November 17, 2009
Clouds and more clouds
We have all the darkness but no clear skys.
This must be the worst location on Earth to do astro photographing!
We have about half a Year too light nights to shoot anything (location is 65N)
Friday, November 13, 2009
Anaglyph, Red/Cyan, Stereo images
I have converted some of my 3D Stereo Pairs to a Red/Cyan Anaglyph format.
You need Red/Cyan Eyeglasses to be able to see images right.
2D Astro images are Volumized by a method of mine.
Original 2D-images, with a technical data, can be found from this Blog.
NOTE!
This is a personal vision about forms and shapes,
based on some known facts and artistic impression.
Have Fun!

MAXIMIZE YOUR BROWSER AND
CLICK THE IMAGE TO START THE SLIDESHOW.
Labels:
anaglyph images and movies
Thursday, November 12, 2009
Preview color version of the Soul Nebula
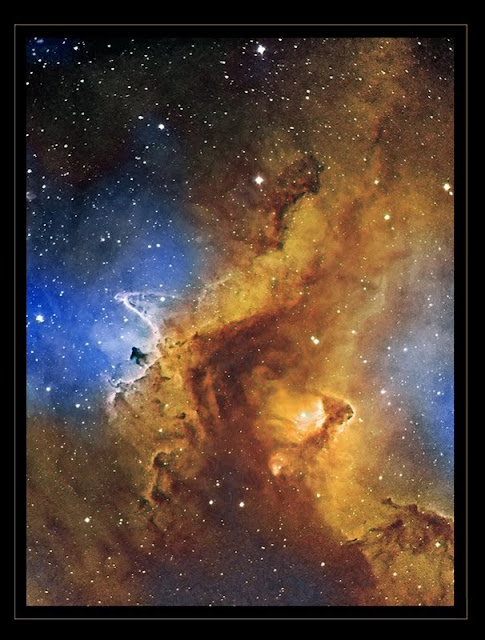
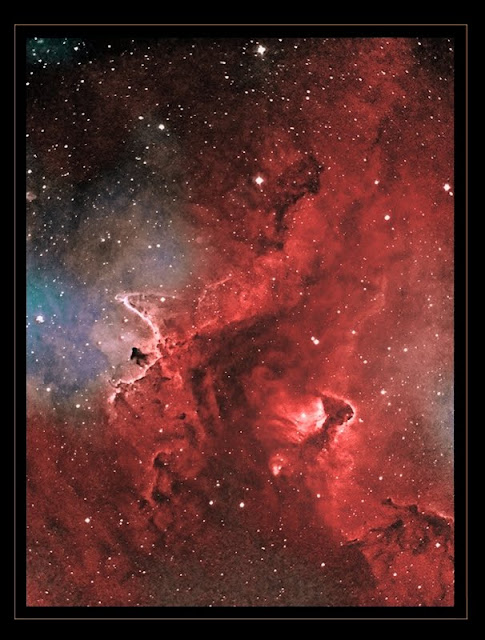
This is a"preview" as colors are from older, wide field image and overall data is very thin, doe the very short exposure time.
Weather doesn't give me any support, so I place it here to see.
An older image of Heart&Soul, details can be found HERE.
IC1848, The Soul Nebula
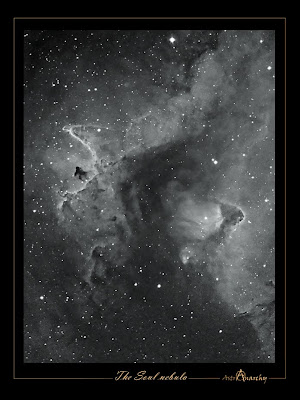
After three weeks of clouds, last night was three hours opening in the cloud cover.
Since my Observatory locates very near from my home, I managed to shot two hours of H-alpha light.
Seeing and transparency were really bad.
I'll shoot other channels and more H-a for this when ever weather allows.
.
Processing work flow:
Image acquisition, MaxiDL v5.07.
Stacked and calibrated in CCDStack.
Deconvolution with a CCDSharp, 30 iterations.
Levels, curves in PS CS3.
-
Telescope, Meade LX200 GPS 12" @ f4.65
Camera, QHY9
Guiding, SXV-AO @ 9Hz
Exposures, 6x1200s with Baader 7nm H-alpha filter
-
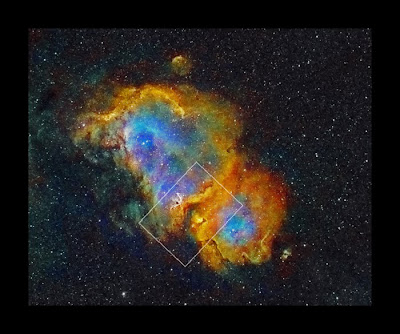
Image is a small part of the Soul Nebula.
Field of view is marked in my older, wider field, image of Soul nebula.
Original wide field image, with details, can be foun HERE
Monday, November 9, 2009
Cloudynights Forum Imaging Contest
Chategory of CCD Imaging & Processing, Oct09, Imaging and Sketching Contest Poll in Cloudynights forums
-
Each month, 6 images will be chosen from each gallery for the readers of that gallery to vote on. The winner will be placed in a site wide poll for our users to determine which is an overall winner.
- Original image and technical details can be found HERE
Labels:
publications
The power of Tone Mapping
I like to show an example of Tone Mapping procedure.
I have used this method now about two years with very good results.
A PDF-document of the Tone Mapping can be found HERE.
NOTE! Images have to be perfectly calibrated and gradient free to this method to work.
-
The image of Sharpless catalog objects Sh2-223, 224 and 225 shows two extremely dim supernova remnants in a same Three degrees field of view.
Original Post about this image can be found here:
http://astroanarchy.blogspot.com/2009/04/sh2-223-224-and-225-lightened-up.html
As can be seen, in Stacked and Stretched 16h H-alpha image, nearly nothing can be seen under a massive Star field.

In the next image objects can be clearly seen after a Star removal procedure.
If Stars are removed with care, no information from actual target is lost.
If there is some minor details lost during a procedure, they are placed back automaticly, when Stars are placed back to a image.

When Stars are removed, it's easy to use Levels and Curves to boost actual data. There is now no need to worry about bloating Stars.
Since Stars has no relevant color information in a Narrowband image, this method can be used. In a Broad band RGB-image stars has real colors.
The same method can be used for RGB-image as well, if Star information is handeld correctly and replaced back to an image after manipulation.
Stars are placed back as a "Screen mode" under the PhotoShop

A "Color Map", from S-II, H-a, and O-III channels (Starless)

This image has all the color information from the Starless channels combined to a HST-palette.
I call it to a "Color Map".
In HST-color palette, the idea is balance colors so, that no line is dominatring the color scheme.
Usually the H-a is the strongest channel and HST images tend to have a strong Green cast doe that.
With this method, channels are easy to stretch equal, since there is no stars to worry about.
Very weak signal can be used, but it's allways better to have enough signal to work with.
A final image

The final image combined from a Tone Map and Color Map images.
As can be seen in a image, there is no Purple halos around stars, as typically seen in a HST-palette images, doe the strong stretching usually needed for a weaker channels.
In this image Stars are placed back. Whan stars are in separate layer over the Starless image, the tranparency can be tweaked carefully to balance visibility of Stars and Objects.
There is several methods to combine Stars and Objects. Stars can be placed as a Lighten mode in PS or by using the Screen mode. The right method depends of imagetype and some testing is needed by a user. Images can be combined by simply stacking them to gether as well.
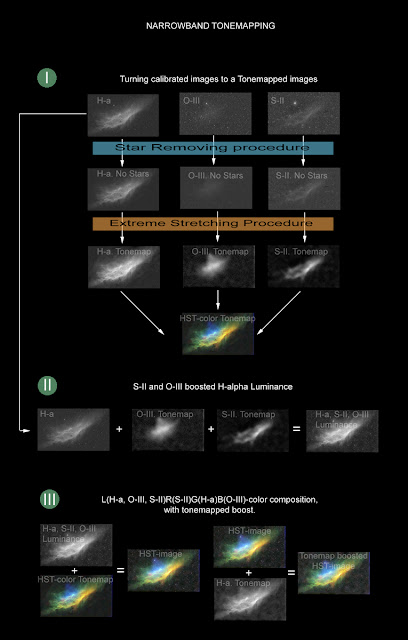
We can't use H-a as a luminance alone, since it doesn't containe any information from other channels.
the weak signal from S-II and O-III channels is added to a H-a luminance
by a method descripted in a Tone Mapping PDF-document.
The result can be seen in the image above.
-
-
Please, if you have tested this method, send a comment here.
Direct link to a you Tone Mapped image could be nice as well.
I need some feedback to be able to further improve this Work flow.
Labels:
research and development
Wednesday, November 4, 2009
RGB and Narrowban data Testing
 Original RGB-image from 2007
 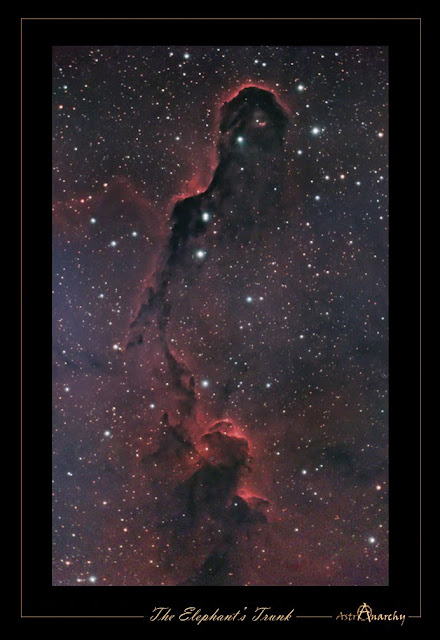 RGB + Natural color narrowband data 50%/50%
 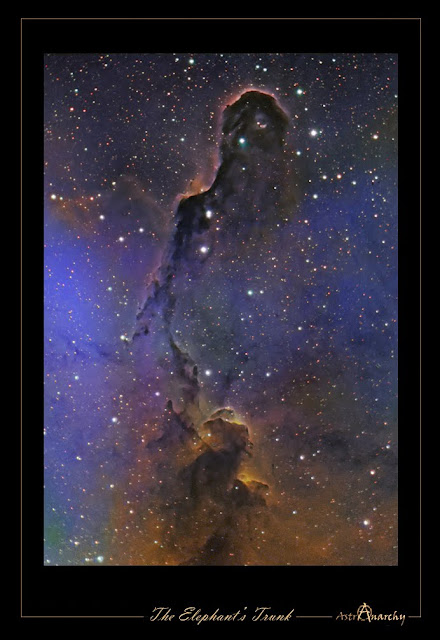 RGB + HST-narrowband. Mixed 40% as luminance/60%HST + star color 100% from RGB - -
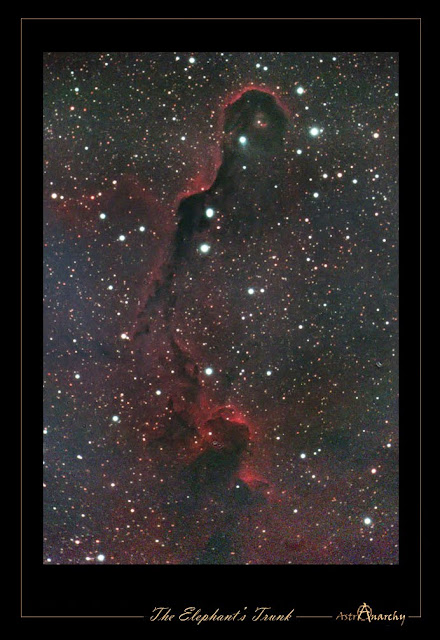
I found an older RGB-image of Elephant's Trunk Nebula, from year 2007.
It's imaged with a UHC-s filter. this filter gives real Star colors. Camera was a single shot QHY8 cooled astro camera.
Exposures for RGB image:
Meade LX200 Gps 12"@f6.3 with a UHC-s filter, 5x900s only.
-
I have combined this RGB image to a reacently imaged narrowband data.
Interesting looking combination, softer look and real Star colors.
Labels:
research and development
Subscribe to:
Comments (Atom)


